郑州响应式网站设计百度推广广告收费标准
目录
二叉树OJ(leetcode)训练习题::
1.单值二叉树
2.检查两棵树是否相同
3.二叉树的前序遍历
4.另一棵树的子树
5.二叉树的构建及遍历
6.二叉树的销毁
7.判断二叉树是否是完全二叉树
二叉树OJ(leetcode)训练习题::
1.单值二叉树
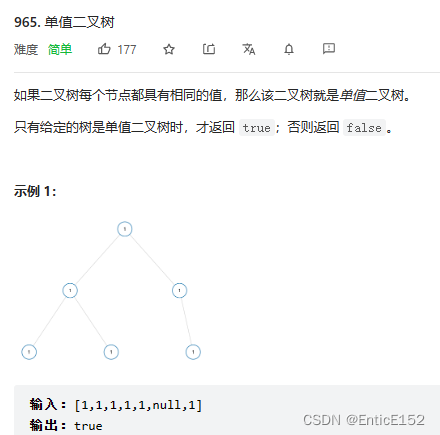
//单值二叉树
//思路:相等的传递性
struct TreeNode
{int val;struct TreeNode* left;struct TreeNode* right;
};
bool isUnivalTree(struct TreeNode* root)
{if (root == NULL)return true;if (root->left && root->val != root->left->val)return false;if (root->right && root->val != root->right->val)return false;//走到此位置说明当前的父亲和孩子是相等的return isUnivalTree(root->left) && isUnivalTree(root->right);
}
2.检查两棵树是否相同
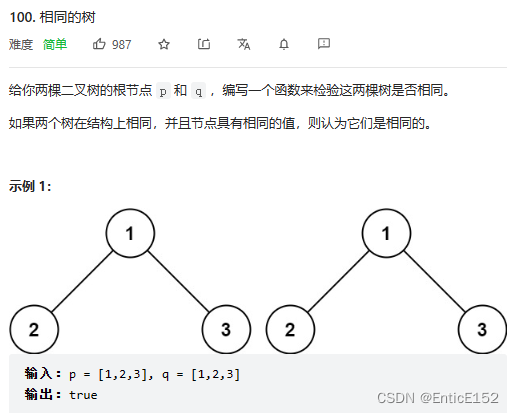
//相同的树
//思路:根比较 子树比较
struct TreeNode
{int val;struct TreeNode* left;struct TreeNode* right;
};
bool isSameTree(struct TreeNode* p, struct TreeNode* q)
{if (p == NULL && q == NULL)return true;//其中一个为空 另一个不为空if (p == NULL || q == NULL)return false;//都不为空if (p->val != q->val)return false;//走到此位置说明p,q均不为空,且根的值是相等的return isSameTree(p->left, q->right) && isSameTree(p->right, q->right);
}
3.二叉树的前序遍历
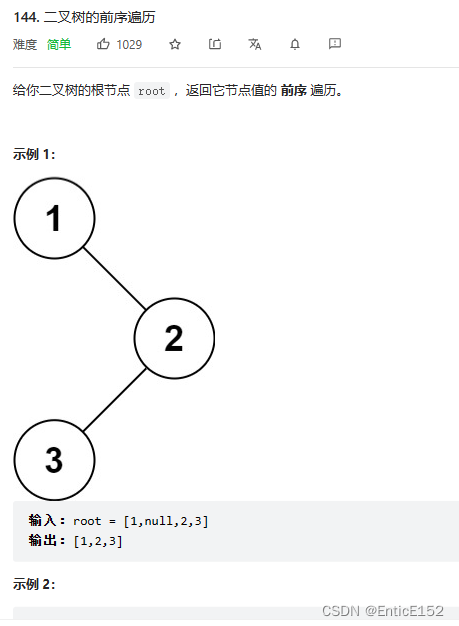
//二叉树的前序遍历
//要求:既要返回数组的首地址 又要返回数组的长度
struct TreeNode
{int val;struct TreeNode* left;struct TreeNode* right;
};
int TreeSize(struct TreeNode* root)
{if (root == NULL)return 0;return TreeSize(root->left) + TreeSize(root->right) + 1;
}
void preorder(struct TreeNode* root, int* a, int* pi)
{if (root == NULL)return;a[*pi] = root->val;(*pi)++;preorder(root->left, a, pi);preorder(root->right, a, pi);
}
int* preorderTraversal(struct TreeNode* root, int* returnSize)
{int n = TreeSize(root);int* a = (int*)malloc(sizeof(int) * n);int i = 0;preorder(root, a, &i);*returnSize = n;return a;
}
4.另一棵树的子树
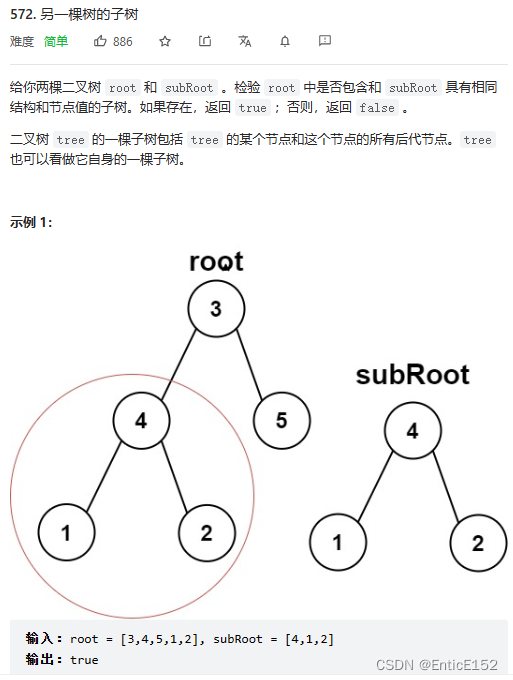
//另一棵树的子树
//思路:原树中的每棵子树都和subRoot树比较+相同的树代码
struct TreeNode
{int val;struct TreeNode* left;struct TreeNode* right;
};
bool isSameTree(struct TreeNode* p, struct TreeNode* q)
{if (p == NULL && q == NULL)return true;//其中一个为空 另一个不为空if (p == NULL || q == NULL)return false;//都不为空if (p->val != q->val)return false;//走到此位置说明p,q均不为空,且根的值是相等的return isSameTree(p->left, q->right) && isSameTree(p->right, q->right);
}
bool isSubtree(struct TreeNode* root, struct TreeNode* subRoot)
{if (root == NULL)return false;if (isSameTree(root, subRoot))return true;return isSubtree(root->left, subRoot) || isSubtree(root->right, subRoot);
}
5.二叉树的构建及遍历

//二叉树遍历
//通过前序遍历的数组构建二叉树
typedef char BTDataType;
typedef struct BinaryTreeNode
{BTDataType data;struct BinaryTreeNode* left;struct BinaryTreeNode* right;
}BTNode;
//递归的下一层++在返回时 不会影响上一层 所以要传地址
//注意:树的每个节点不是递归的时候链接上的 而是在返回的时候链接上的 root->left = BinaryTreeCreate(a,pi)
BTNode* BinaryTreeCreate(BTDataType* a, int* pi)
{if (a[*pi] == '#'){(*pi)++;return NULL;}BTNode* root = (BTNode*)malloc(sizeof(BTNode));if (root == NULL){perror("malloc fail");return NULL;}root->data = a[*pi];(*pi)++;root->left = BinaryTreeCreate(a, pi);root->right = BinaryTreeCreate(a, pi);return root;
}
void InOrder(BTNode* root)
{if (root == NULL){return;}InOrder(root->left);printf("%c ", root->data);InOrder(root->right);
}
6.二叉树的销毁
//二叉树销毁
//外面调用该函数的人置空
void BinaryTreeDestory(BTNode* root)
{if (root == NULL){return;}BinaryTreeDestory(root->left);BinaryTreeDestory(root->right);free(root);
}
7.判断二叉树是否是完全二叉树
//判断二叉树是否是完全二叉树
//思路:层序遍历,一层一层走,遇到空以后,后续层序不能有非空,有非空就不是完全二叉树
//注:完全二叉树遇到空以后 后面节点一定都入队列了
//复制粘贴队列代码
#pragma once
#include<stdio.h>
#include<stdlib.h>
#include<assert.h>
#include<stdbool.h>
typedef int QDataType;
typedef struct QueueNode
{struct QueueNode* next;QDataType data;
}QNode;
//第三种不用二级指针的方式 封装成结构体
typedef struct Queue
{QNode* head;QNode* tail;int size;
}Queue;
void QueueInit(Queue* pq);
void QueueDestory(Queue* pq);
void QueuePush(Queue* pq, QDataType x);
void QueuePop(Queue* pq);
//取队列头部数据
QDataType QueueFront(Queue* pq);
//取队列尾部数据
QDataType QueueBack(Queue* pq);
bool QueueEmpty(Queue* pq);
int QueueSize(Queue* pq);
#include"Queue.h"
void QueueInit(Queue* pq)
{assert(pq);pq->head = pq->tail = NULL;pq->size = 0;
}
void QueueDestory(Queue* pq)
{assert(pq);QNode* cur = pq->head;while (cur){QNode* del = cur;cur = cur->next;free(del);}pq->head = pq->tail = NULL;
}
void QueuePush(Queue* pq, QDataType x)
{assert(pq);QNode* newnode = (QNode*)malloc(sizeof(QNode));if (newnode == NULL){perror("malloc fail");exit(-1);}else{newnode->data = x;newnode->next = NULL;}if (pq->tail == NULL){pq->head = pq->tail = newnode;}else{pq->tail->next = newnode;pq->tail = newnode;}pq->size++;
}
void QueuePop(Queue* pq)
{assert(pq);assert(!QueueEmpty(pq));if (pq->head->next == NULL){free(pq->head);pq->head = pq->tail = NULL;}else{QNode* del = pq->head;pq->head = pq->head->next;free(del);del = NULL;}pq->size--;
}
//取队列头部数据
QDataType QueueFront(Queue* pq)
{assert(pq);assert(!QueueEmpty(pq));return pq->head->data;
}
//取队列尾部数据
QDataType QueueBack(Queue* pq)
{assert(pq);assert(!QueueEmpty(pq));return pq->tail->data;
}
bool QueueEmpty(Queue* pq)
{assert(pq);return pq->head == NULL && pq->tail == NULL;
}
int QueueSize(Queue* pq)
{assert(pq);/*QNode* cur = pq->head;int n = 0;while (cur){++n;cur = cur->next;}return n;*/return pq->size;
}
int BinaryTreeComplete(BTNode* root)
{Queue q;QueueInit(&q);if (root)QueuePush(&q, root);while (!QueueEmpty(&q)){BTNode* front = QueueFront(&q);QueuePop(&q);if (front == NULL){break;}QueuePush(&q, front->left);QueuePush(&q, front->right);}//遇到空以后 后面全是空 则是完全二叉树//遇到空以后 后面存在非空 则不是完全二叉树while (!QueueEmpty(&q)){BTNode* front = QueueFront(&q);QueuePop(&q);if (front != NULL){QueueDestory(&q);return false;}}QueueDestory(&q);return true;
}