企业门户网站费用网络营销课程有哪些
1波动光学的电磁理论
1.1波动方程
1)波动方程是通过描述波函数随时间和空间的变化来表达波动的传播和演化。
2)一维波动方程:
a.一维波动方程描述了沿着一条直线传播的波动。它的一般形式为:
∂²u/∂t² = v² ∂²u/∂x²
其中,u是(u(x, t)),表示在位置 (x) 和时间 (t) 处的波的位移,t是时间,x是空间坐标,v是波速。下面我尝试翻译此方程。
b.对于一条波u,此条波由x个点组成,在此条波的x处的波点的位移;与在此条波的x+1处的波点的位移差,两位移之差随x变化而变化,随位置x变化而变化的位移的变化率的变化率为K1’’=∂²u/∂x²,
c.对于一条波u,此条波随时间在X轴这条直线上向前传播,在经过t个单位时间后,此波振动向前时与x轴的偏移;与在经过t+1个单位时间后,此波振动向前时的偏移。两偏移之差随t变化而变化。随时间t变化而变化的位移的变化率的变化率为K2’’=∂²u/∂t²。
d.变化率的变化率,曲线斜率大小变化率,即曲线斜率如何变化。
e.K1’‘与K2’'成正比例关系。比例系数是v²。就是说随位置x变化而变化的位移与随时间t变化而变化的位移,这两种“变化方式”一样。
3)二维波动方程:
二维波动方程描述了在平面上传播的波动。它的一般形式为:
∂²u/∂t² = v² (∂²u/∂x² + ∂²u/∂y²)
其中,u是波函数,t是时间,x和y是平面上的空间坐标,v是波速。
4)三维波动方程:
三维波动方程描述了在三维空间中传播的波动。它的一般形式为:
∂²u/∂t² = v² (∂²u/∂x² + ∂²u/∂y² + ∂²u/∂z²)
其中,u是波函数,t是时间,x、y和z是三维空间中的空间坐标,v是波速。
5)真空电磁波动方程
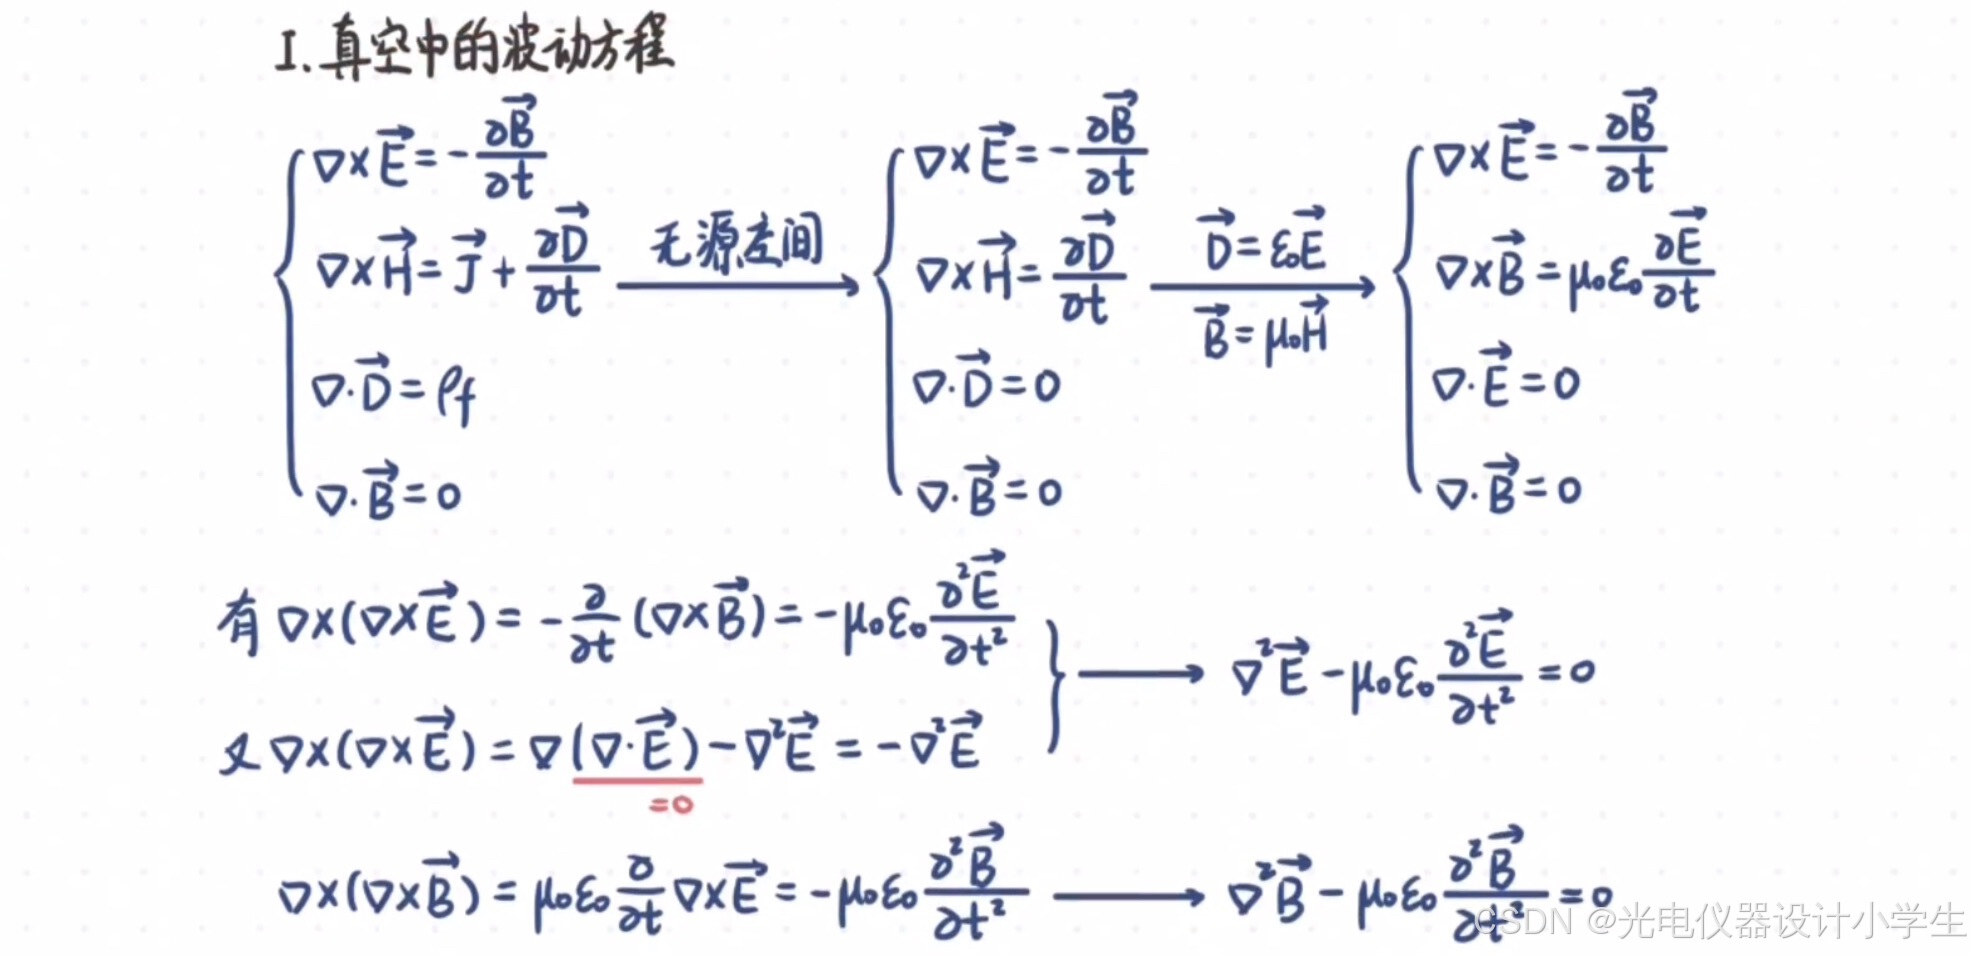
1.2平面电磁波函数
1)平面简谐波函数
x用于指定空间的振动点,t用于指定时间的值。
2)波矢k:波矢也叫角波数是一种表示波的矢量,大小为2π除以波长,这样波矢k乘以传播距离x就就可以等于传播x个单位长度所需要的周期数。波矢的方向表示波传播的方向。下图r即是传播距离

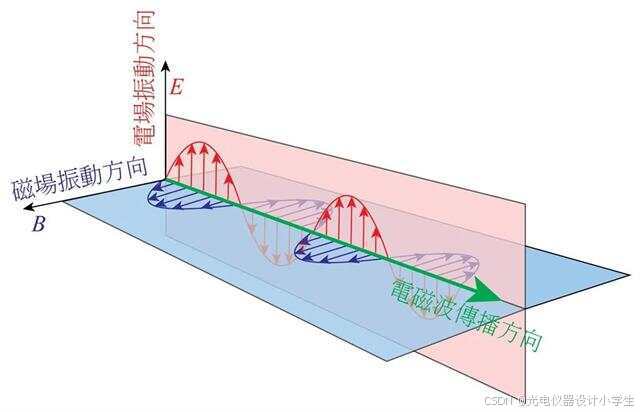
3)根据将平面波函数带入∇•H=0;∇•E=0;∇•E=-μμ₀(∂H)/(∂t)可以得到E⊥k,H⊥k,H⊥E。

4)自然光
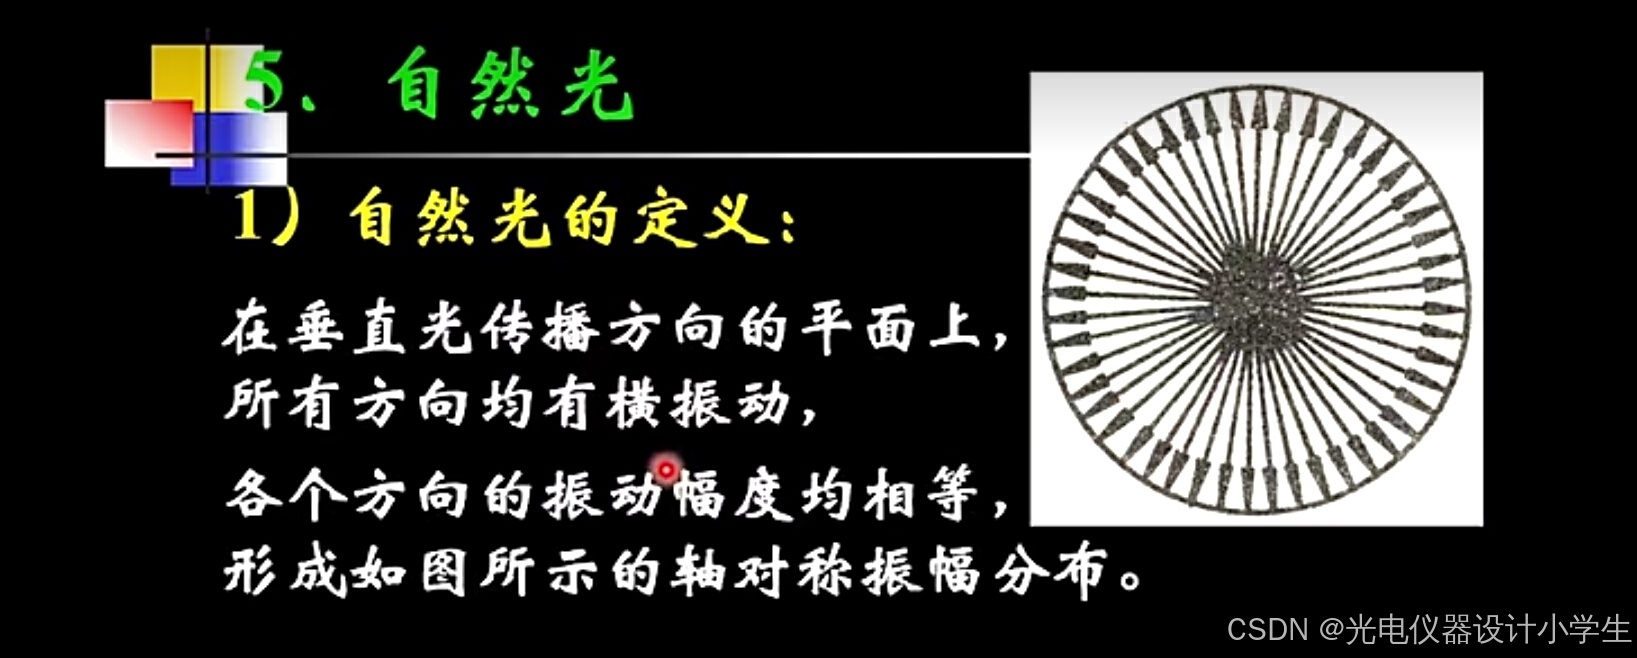
自然光中那些不同取向但是振幅相等的线偏振光之间没有确定的相位差。
1.3电磁能流密度
1)电磁波能流密度是描述电磁波能量传播的一个重要物理量。
2)电磁波能流密度:大小是单位时间内通过单位面积的电磁能量,方向是电磁能量传播的方向。
3)某点的电场强度与磁场强度越大,则电磁能量越大。
4)电磁波能流密度计算公式为:S=E*H,其中S表示能流密度,E表示电场强度,H表示磁场强度。
2定态光播
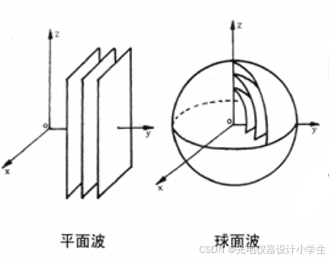
2.1平面波与球面波
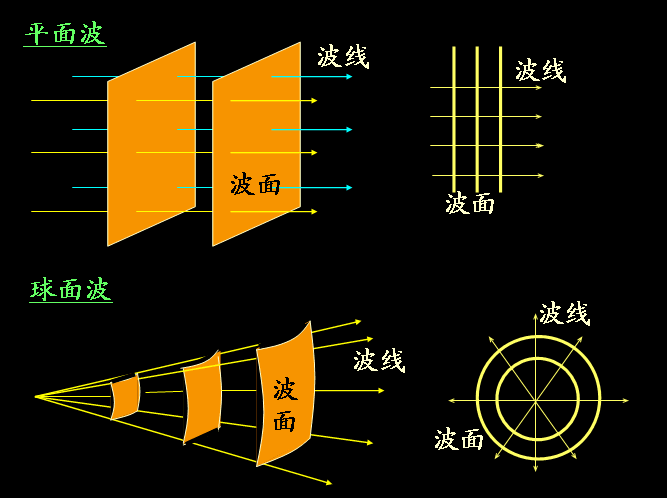
1)在电磁波和声波的传播中,相位相同的点构成的曲面叫等相面,也称为波阵面或波前。
2)光束的意思是:由光源发出,在一定空间内沿固定方向直线传播的电磁光波。
3)电磁波是能量的一种,但凡是高于绝对零度的物体,都会释出电磁波。
4)平行光束会产生平面波,不考虑激光的发散性,激光可以近似平行光束。
5)同心光束会产生球面波,同心光束是由点光源发出的光束。
6)球面简谐波的数学表达式
1)符号在数学中表示以自然常数e为底的指数函数,即exp(x)等于e的x次方。
2)Eo代表波源的强度,振幅与传播的距离成反比,但在距波源距离r相同的球面上,振幅仍然均匀相等。
格式a:E ( r ,t) = E0/r•cos (kr-ωt+ϕ0);
格式b:E ( r ,t) = E0/r• exp[j (kr-ωt+ϕ0 )];
复振幅格式:E ( r ) = E0/r• exp[j(kr+ϕ0)];
2.2定态波与脉冲波
1)脉冲波:在观测时间中,波源振荡短暂,产生脉冲波包,在空间中推移。
2)定态波:在观测时间中,光源作持续稳定的振荡,波长中各点均以同一频率作稳定的振荡。
3)我们常常选择定态波,作为我们的研究对象,其特点:频率单一、振幅稳定。
2.3定态光波的标量表示
1)光的频率范围在3.9×10 ^ 14~7.5×10 ^ 14Hz之间。
2)因为频率过高时,介质的磁化机构几乎冻结,所以光与物质的相互作用,主要是电场。
3)我们不考虑光的电场E(P,t)与磁场B(P,t)中的磁场B(P,t)。
4)我们只考虑光的电场时,时间上的电场E(P,t),有三个空间上的分量E={Ex(P,t),Ey(P,t),Ez(P,t)}。
5)先选择定态波,作为我们的研究对象,再选择简谐波作为光波基元成分。可以得到:
Ex(p,t)=A( p )cos(ωt−ϕx( p ));
Ey(p,t)=A( p )cos(ωt−ϕy( p ));
Ez(p,t)=A( p )cos(ωt−ϕz( p ));
对于定态波振幅A( p )固定,频率f=ω/2π单一,初相位ϕz( p )随场点位置变化。
6)U(p,t)={Ex(p,t),Ey(p,t),Ez(p,t)}。
2.4波函数的复数表示
1)欧拉公式表示为 e^iθ=cosθ+ i•sinθ。
2)复数的指数形式:z= r•e^iθ=r•(cosθ+ i•sinθ)。
3)简谐波函数的复数形式,在光波干涉和衍射理论中非常重要。
4)e^iθ的实数部分是cosθ,而虚数部分是sinθi。因此,在波函数中,我们经常看到这样的表示:Re[e ^ iθ],注意:复数形式的波函数没有虚数部分。
5)将函数Ez(p,t)=A( p )cos(ωt−ϕz( p ))变换为复数形式Ez(p,t)=A( p )e^i(ωt−ϕz( p )。加上波矢k乘以传播距离r,得到的传播r个单位(米)长度所需要的传播多少个单位(弧度)相位,Ez(p,t)=A( p )e ^-i(ωt-k•t−ϕz( p ))=A( p )•e ^-iωt•e ^ikt•e ^iϕz( p )
2.5复振幅概念
1)因为定态波时间上的频率单一,所以可舍去波函数的 e ^ -iwt,舍弃后得到的即为复振幅A( p )·e^ i Φ( p )。
2)复振幅统一概括了波场的振幅分布与相位分布。
3)因为定态波场的主要特征是振幅分布与相位分布,所以分析定态波场的复振幅分布就是分析定态波场。
4)因为U(p,t)={Ex(p,t),Ey(p,t),Ez(p,t)},所以U§={Ex§,Ey§,Ez§}。
5)Ex§=A( p )cos(−ϕx( p ));
Ey§=A( p )cos(−ϕy( p ));
Ez§=A( p )cos(−ϕz( p ));
6)U§=A( p )·e^ i Φ( p )。
2.6平面波的振幅分布与初相位分布
1)振幅分布
平面波的复振幅U( p )=A( p )·e^ i Φ( p ),振幅分布A( p )为常数A,即A( p )=A。代表平面波的所有场点的振幅都为固定的A。
2)初相位分布
a、波矢k:波矢也叫角波数是一种表示波的矢量,大小为2π除以波长,这样波矢k乘以传播距离x就就可以等于传播x个单位长度所需要的周期数。波矢的方向表示波传播的方向。
b、平面波的复振幅U§=A( p )·e^ i Φ( p ),初相位分布Φ( p )=K•r,代表平面波的所有场点的初相位一方面与波矢有关,另一方面与场点和波源的距离r有关。
c、Φ( p )=K•r可以分为三个量的叠加Φ( p )=kx•x+ky•y+kz•z。
2.7球面波的振幅分布与相位分布
1)振幅分布
a、球面波的复振幅U( p )=A( p )·e^ i Φ( p ),振幅分布A( p )为a1/r,代表平面波的所有场点的振幅一方面与波源强度a1正相关,另一方面与场点距离波源的距离r成负相关。
b、场点距离波源的距离计算方法是r=√(x ^ 2+y ^ 2+z ^ 2)。
2)初相位分布
a、球面波的复振幅U( p )=A( p )·e^ i Φ( p ),初相位分布Φ( p )=K•r,代表平面波的所有场点的初相位一方面与波矢有关,另一方面与场点和波源的距离r有关。
b、场点距离波源的距离计算方法是r=√(x ^ 2+y ^ 2+z ^ 2)。
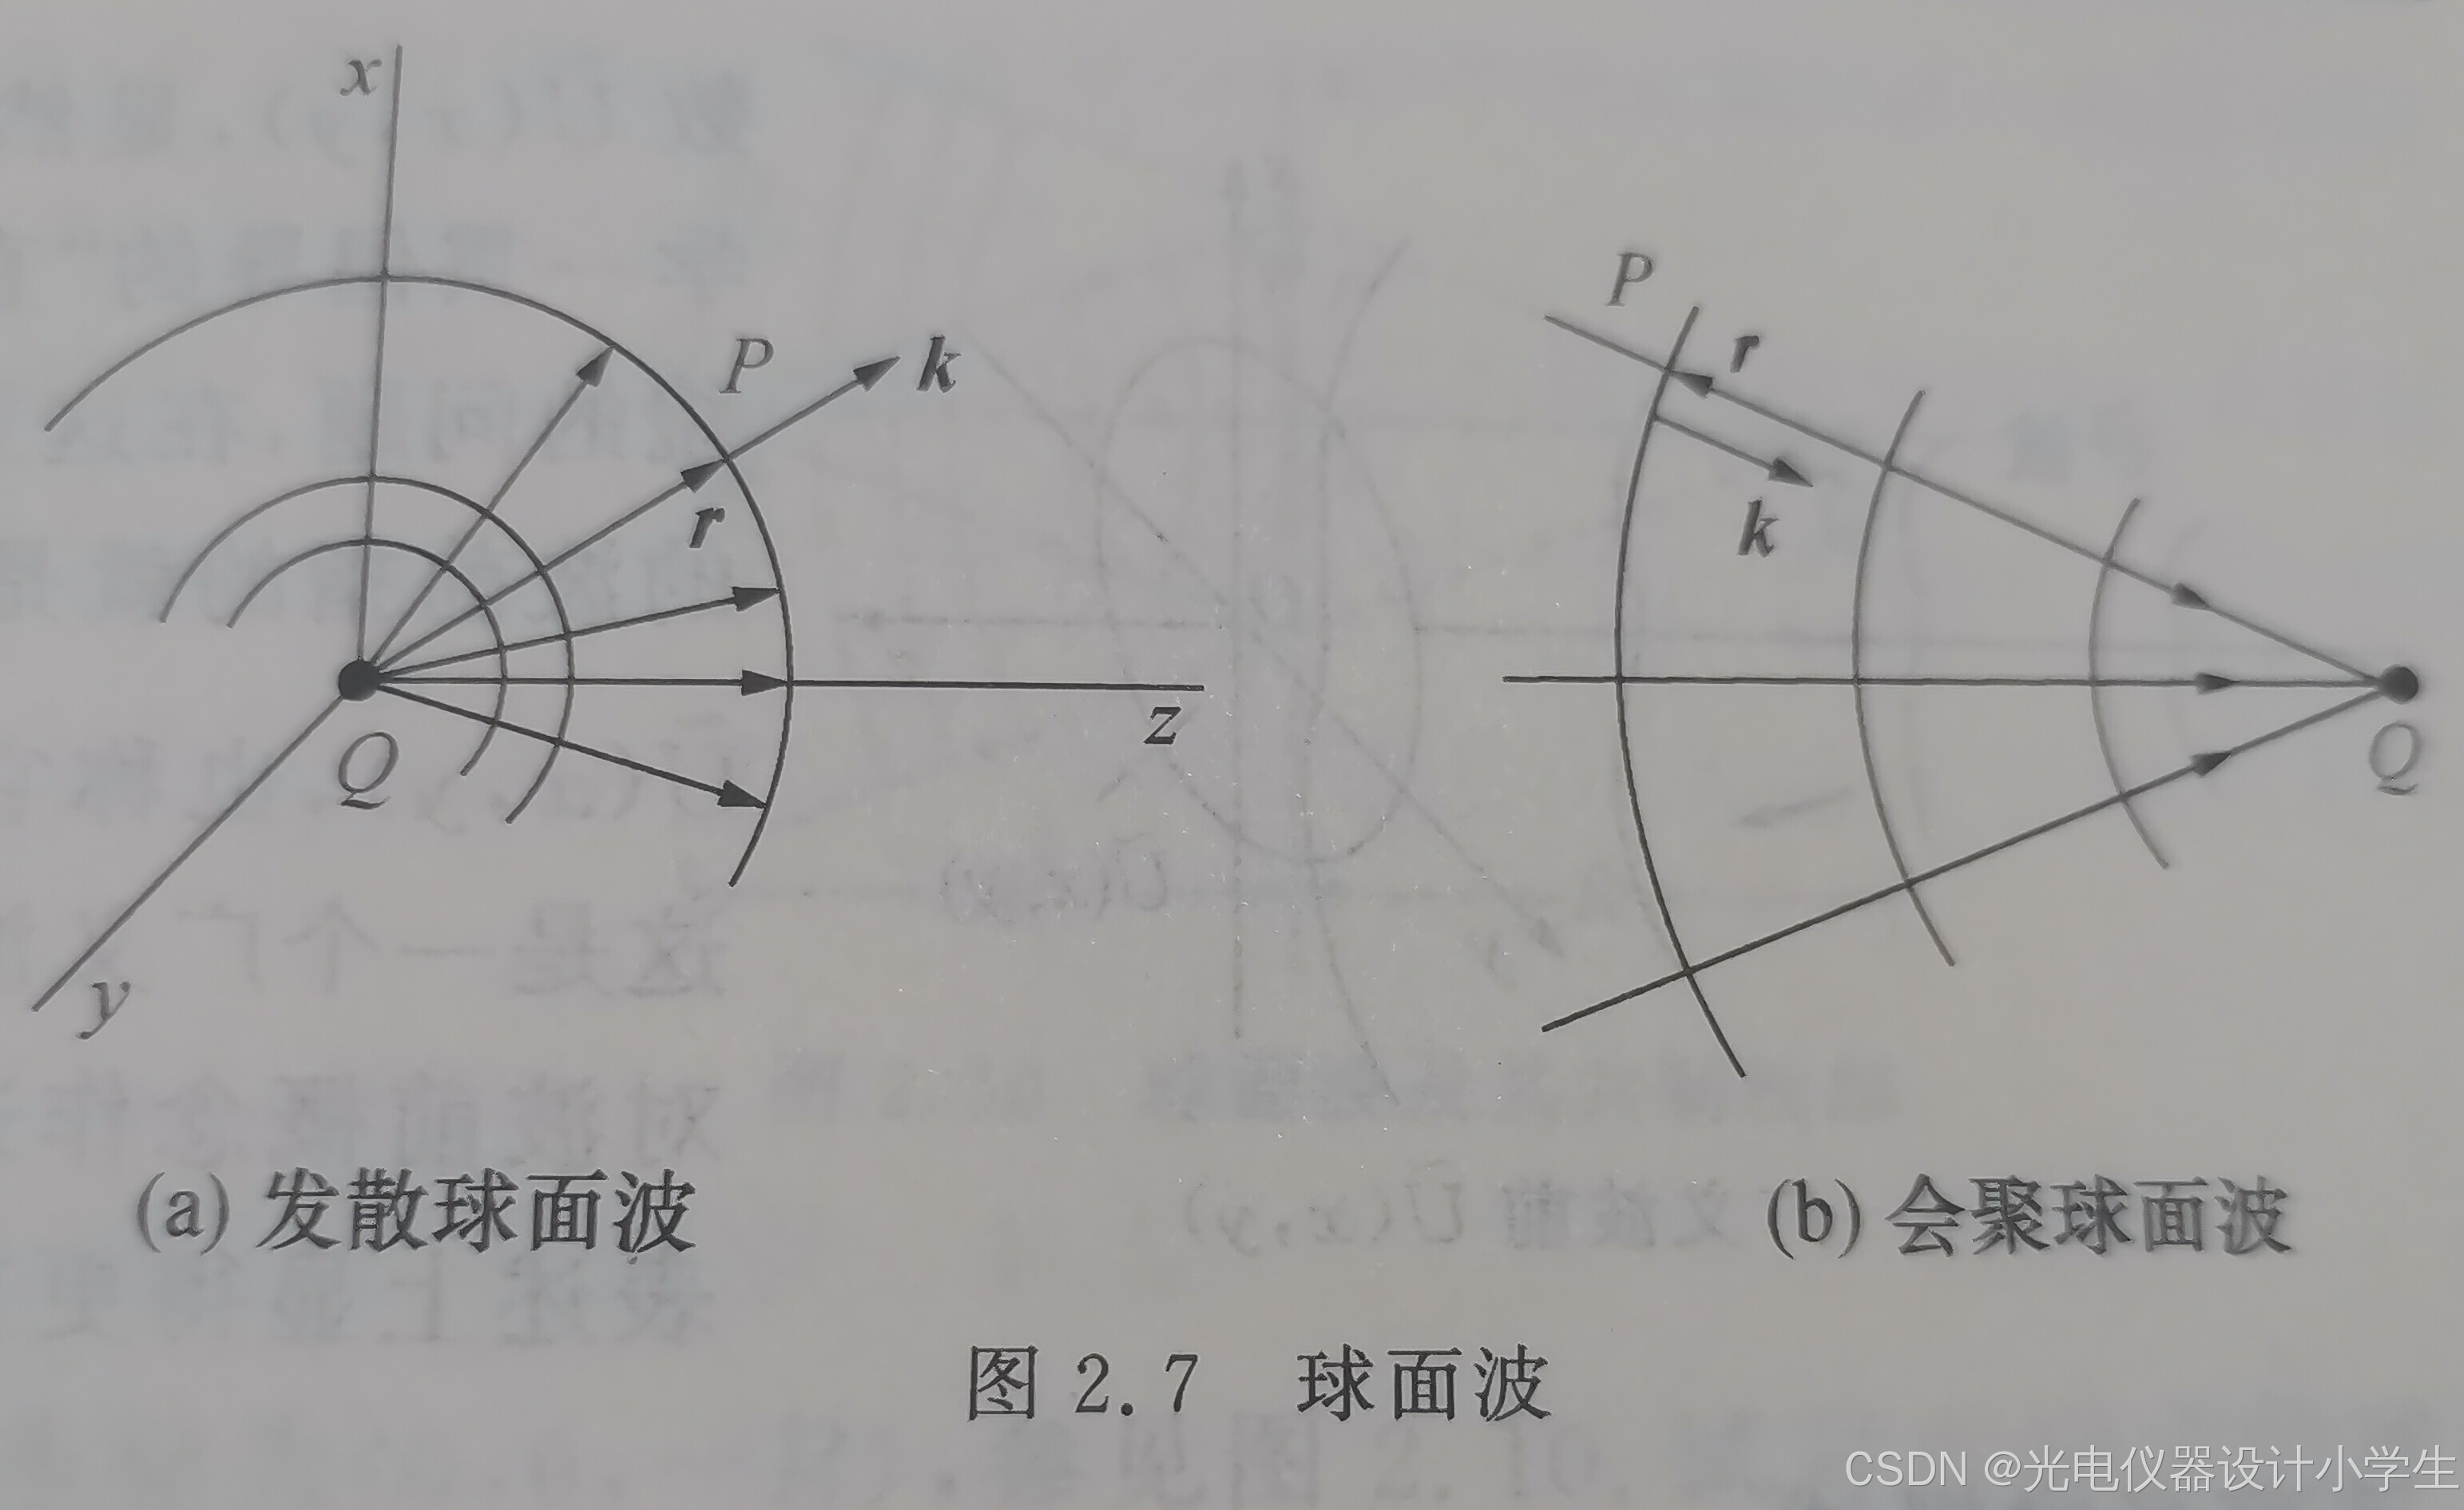
c、初相位分布既可以是Φ( p )=+K•r,又可以是Φ( p )=-K•r。正号代表发散球面波,负号代表会聚球面波。
d、光强与振幅的关系可以通过公式表示为:光强(I)与光振动振幅(A)的平方成正比,即 I ∝ A^2
3波前函数
1)广义波前概念:广义前人们将跑在波最前面的波面称为波前,广义后也将跑到接收波的装置的接收面,与接收装置发生相互作用的光扰动称为波前。
2)波前分析贯穿本书,包括波前的描述与识别、波前的叠加与干涉、波前的变换与分解、波前的记录与再现。
3)平面波的共轭波前
a、某一列平面波U1,空间上其传播方向平行与x轴与z轴所在的平面,且与z轴这根线的夹角为θ。波失为K1。K1可以分为3个分量k1x=K1•sinθ,k1y=0(因为y轴垂直于x轴与z轴所在的平面,所以y轴垂直于平面波U1),k1z=K1•cosθ。
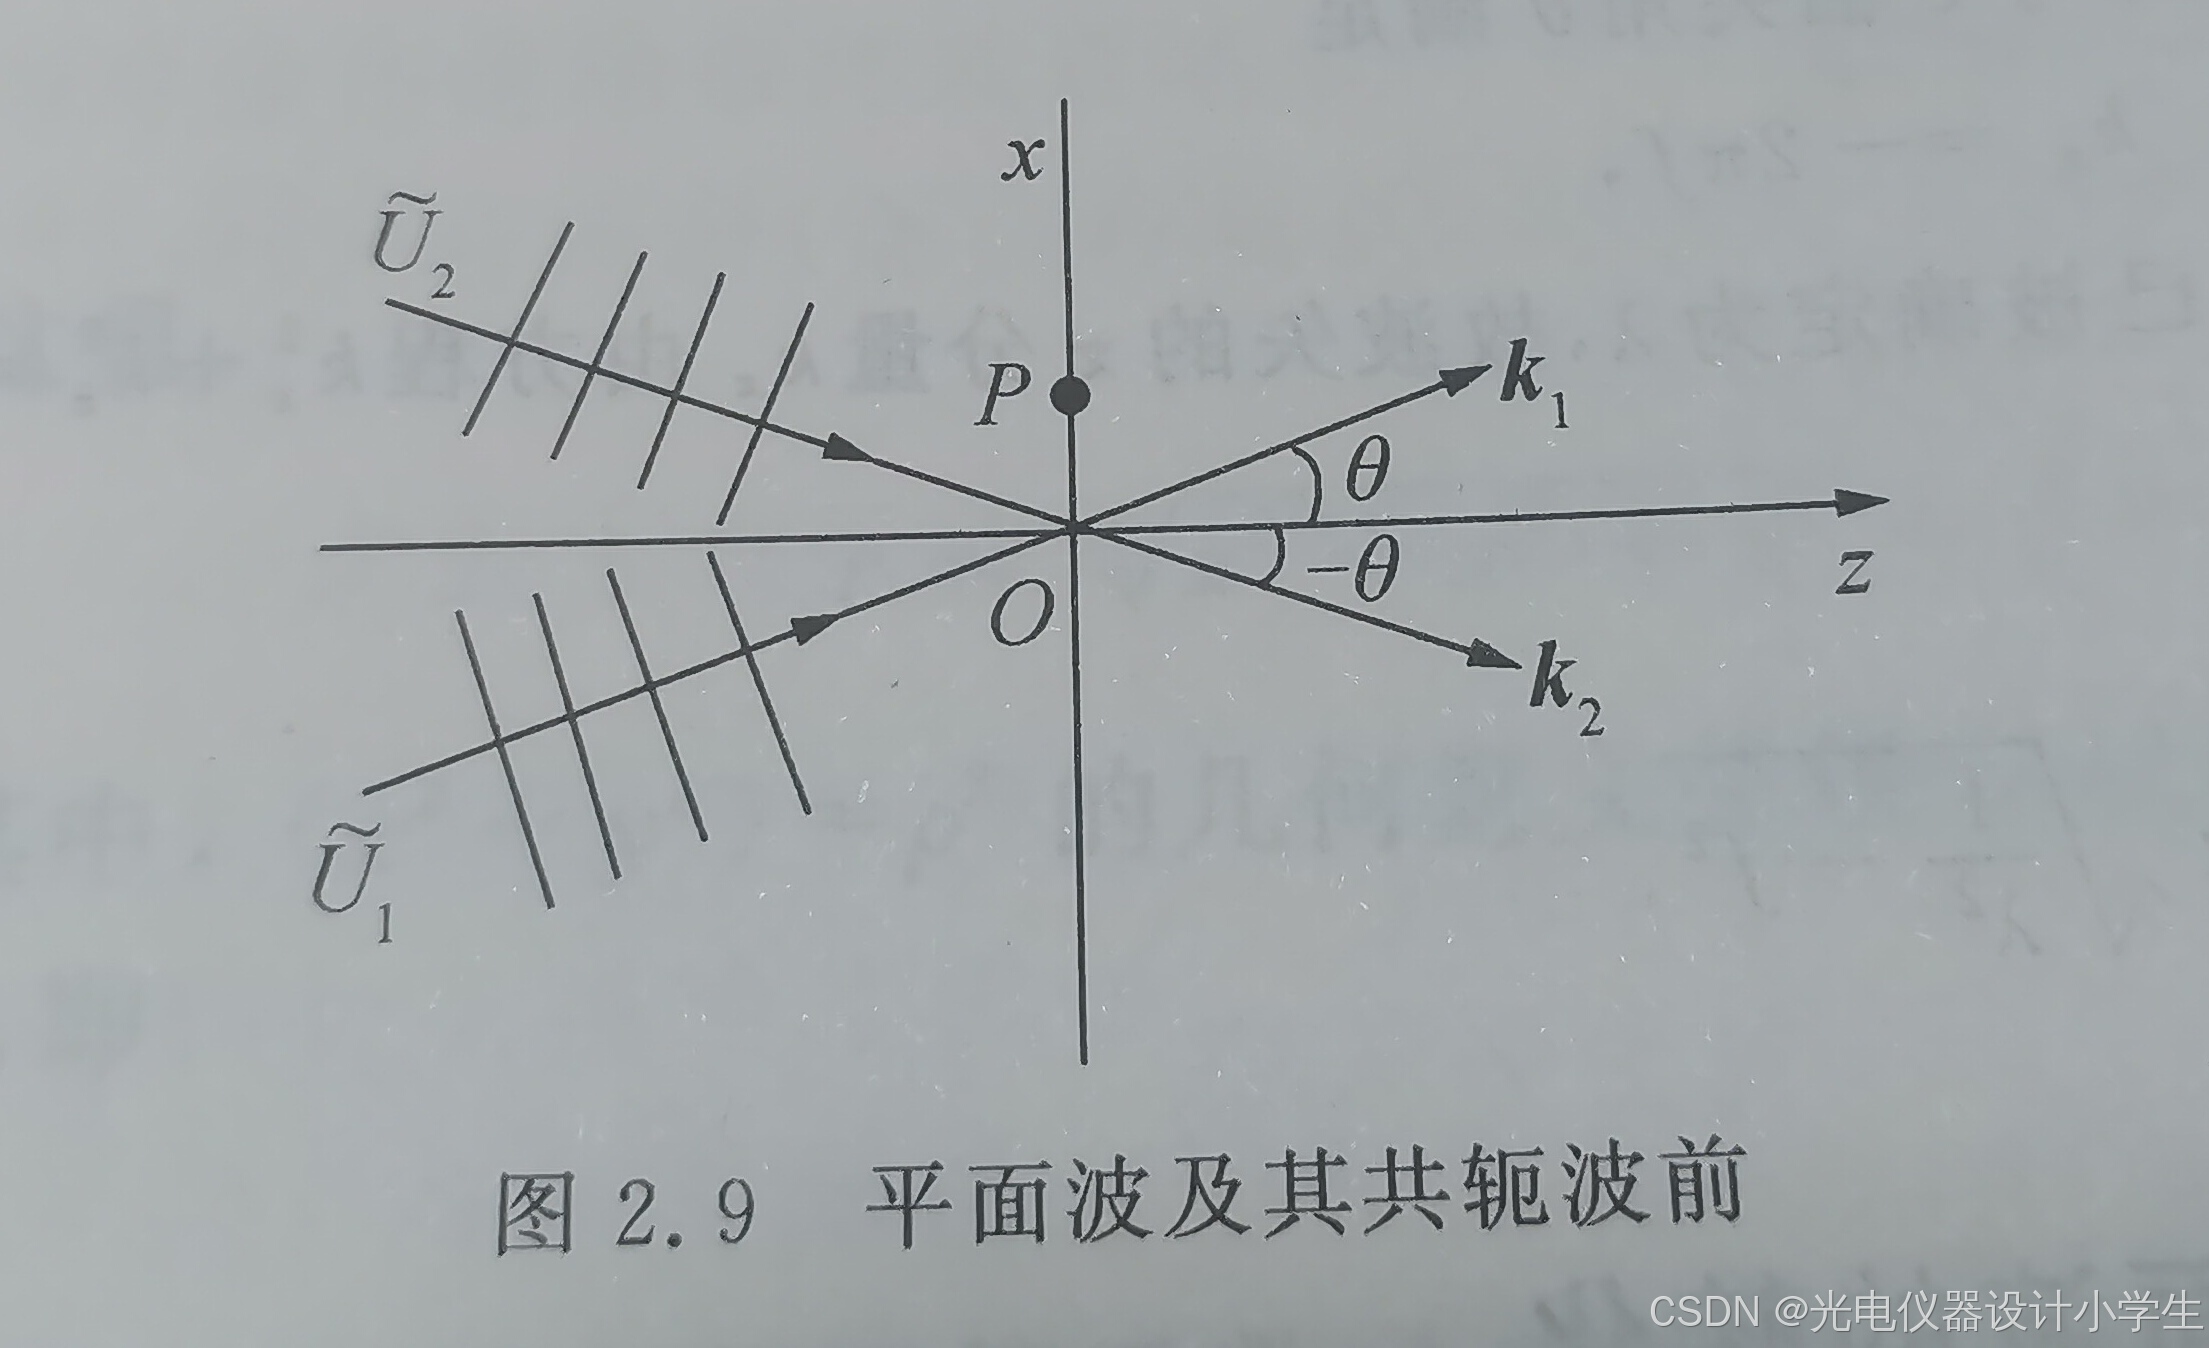
b、根据平面波的复振幅公式U( p )=A·e^ i(kx•x+ky•y+kz•z),得到U( p )=A·e^ i(K1•sinθ•x+K1•cosθ•z)。 对于平面波U1在z=0平面上的波前函数,不考虑z轴上的分量,U1’=A·e^ i(K1•sinθ•x)。
c、默认约定光传播的正方向是从左到右。
d、因为两个实部相等,虚部互为相反数的复数互为共轭复数。所以共轭波前是U2"=A·e^ i(K1•sinθ•x)。
4)球面波的共轭波前
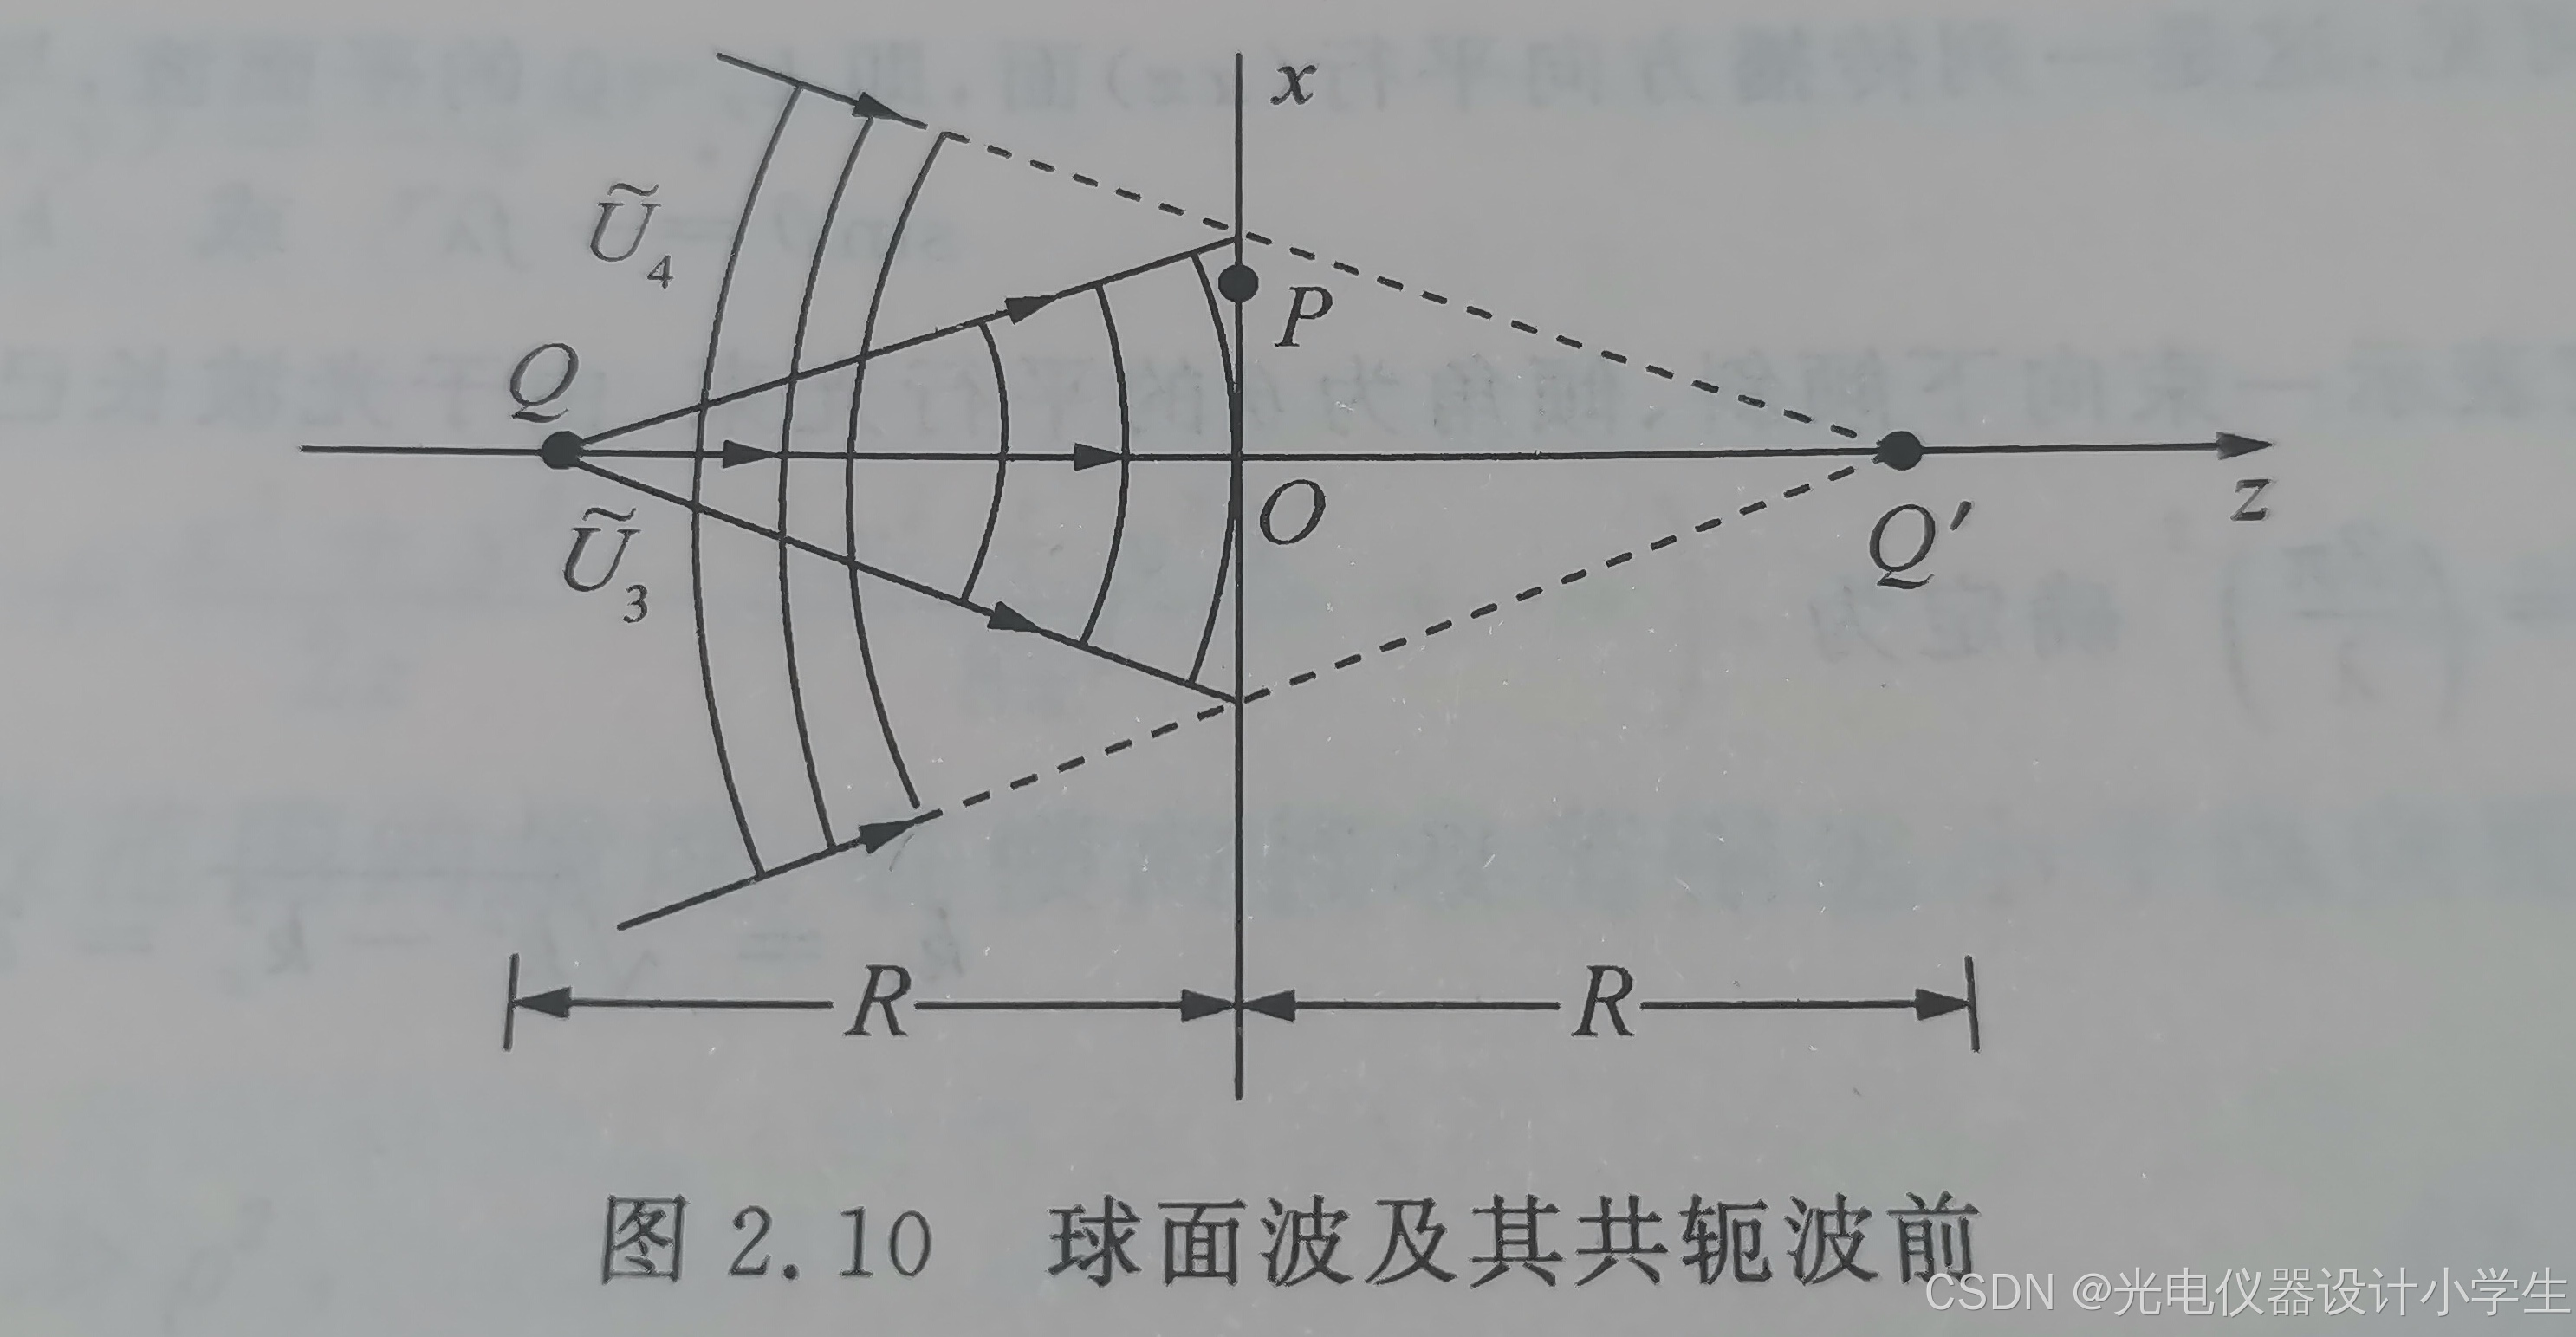
a、如上图有一个坐标为(0,0,-R)的点光源Q。
b、根据公式U( p )=a1/r·e^ i(k•√(x-x0 )^ 2+(y-y0 )^ 2+(z-z0) ^ 2)),得到波前函数为U3( p )=a1/r·e^ i(k•√(x-0 )^ 2+(y-0 )^ 2+(z-(-R)) ^ 2))。
c、共轭波前函数则添个符号为U4( p )=a1/r·e^ -i(k•√(x-0 )^ 2+(y-0 )^ 2+(z-(-R)) ^ 2))。
5)上述根据波的类型和特征书写波前函数和共轭波前函数,是本书的4个方面内容之“波前的描述与识别”。“波前的描述与识别”还有一个方面是根据接收得到的波前函数书写波的类型和特征。
4球面波向平面波的转换
1)平面波经过透镜聚散,可以转化为球面波;球面波在一定远距离后,可以具有平面波的特性。
2)傍轴条件,也叫振幅条件。
a、首先介绍一下开平方的计算公式如下:

b、考量一点源O,坐标为(0,0,0),发出的球面波到达(xy)面的情况。面(xy)上的波前函数为U(x,y)=a1/r•e^ikr。
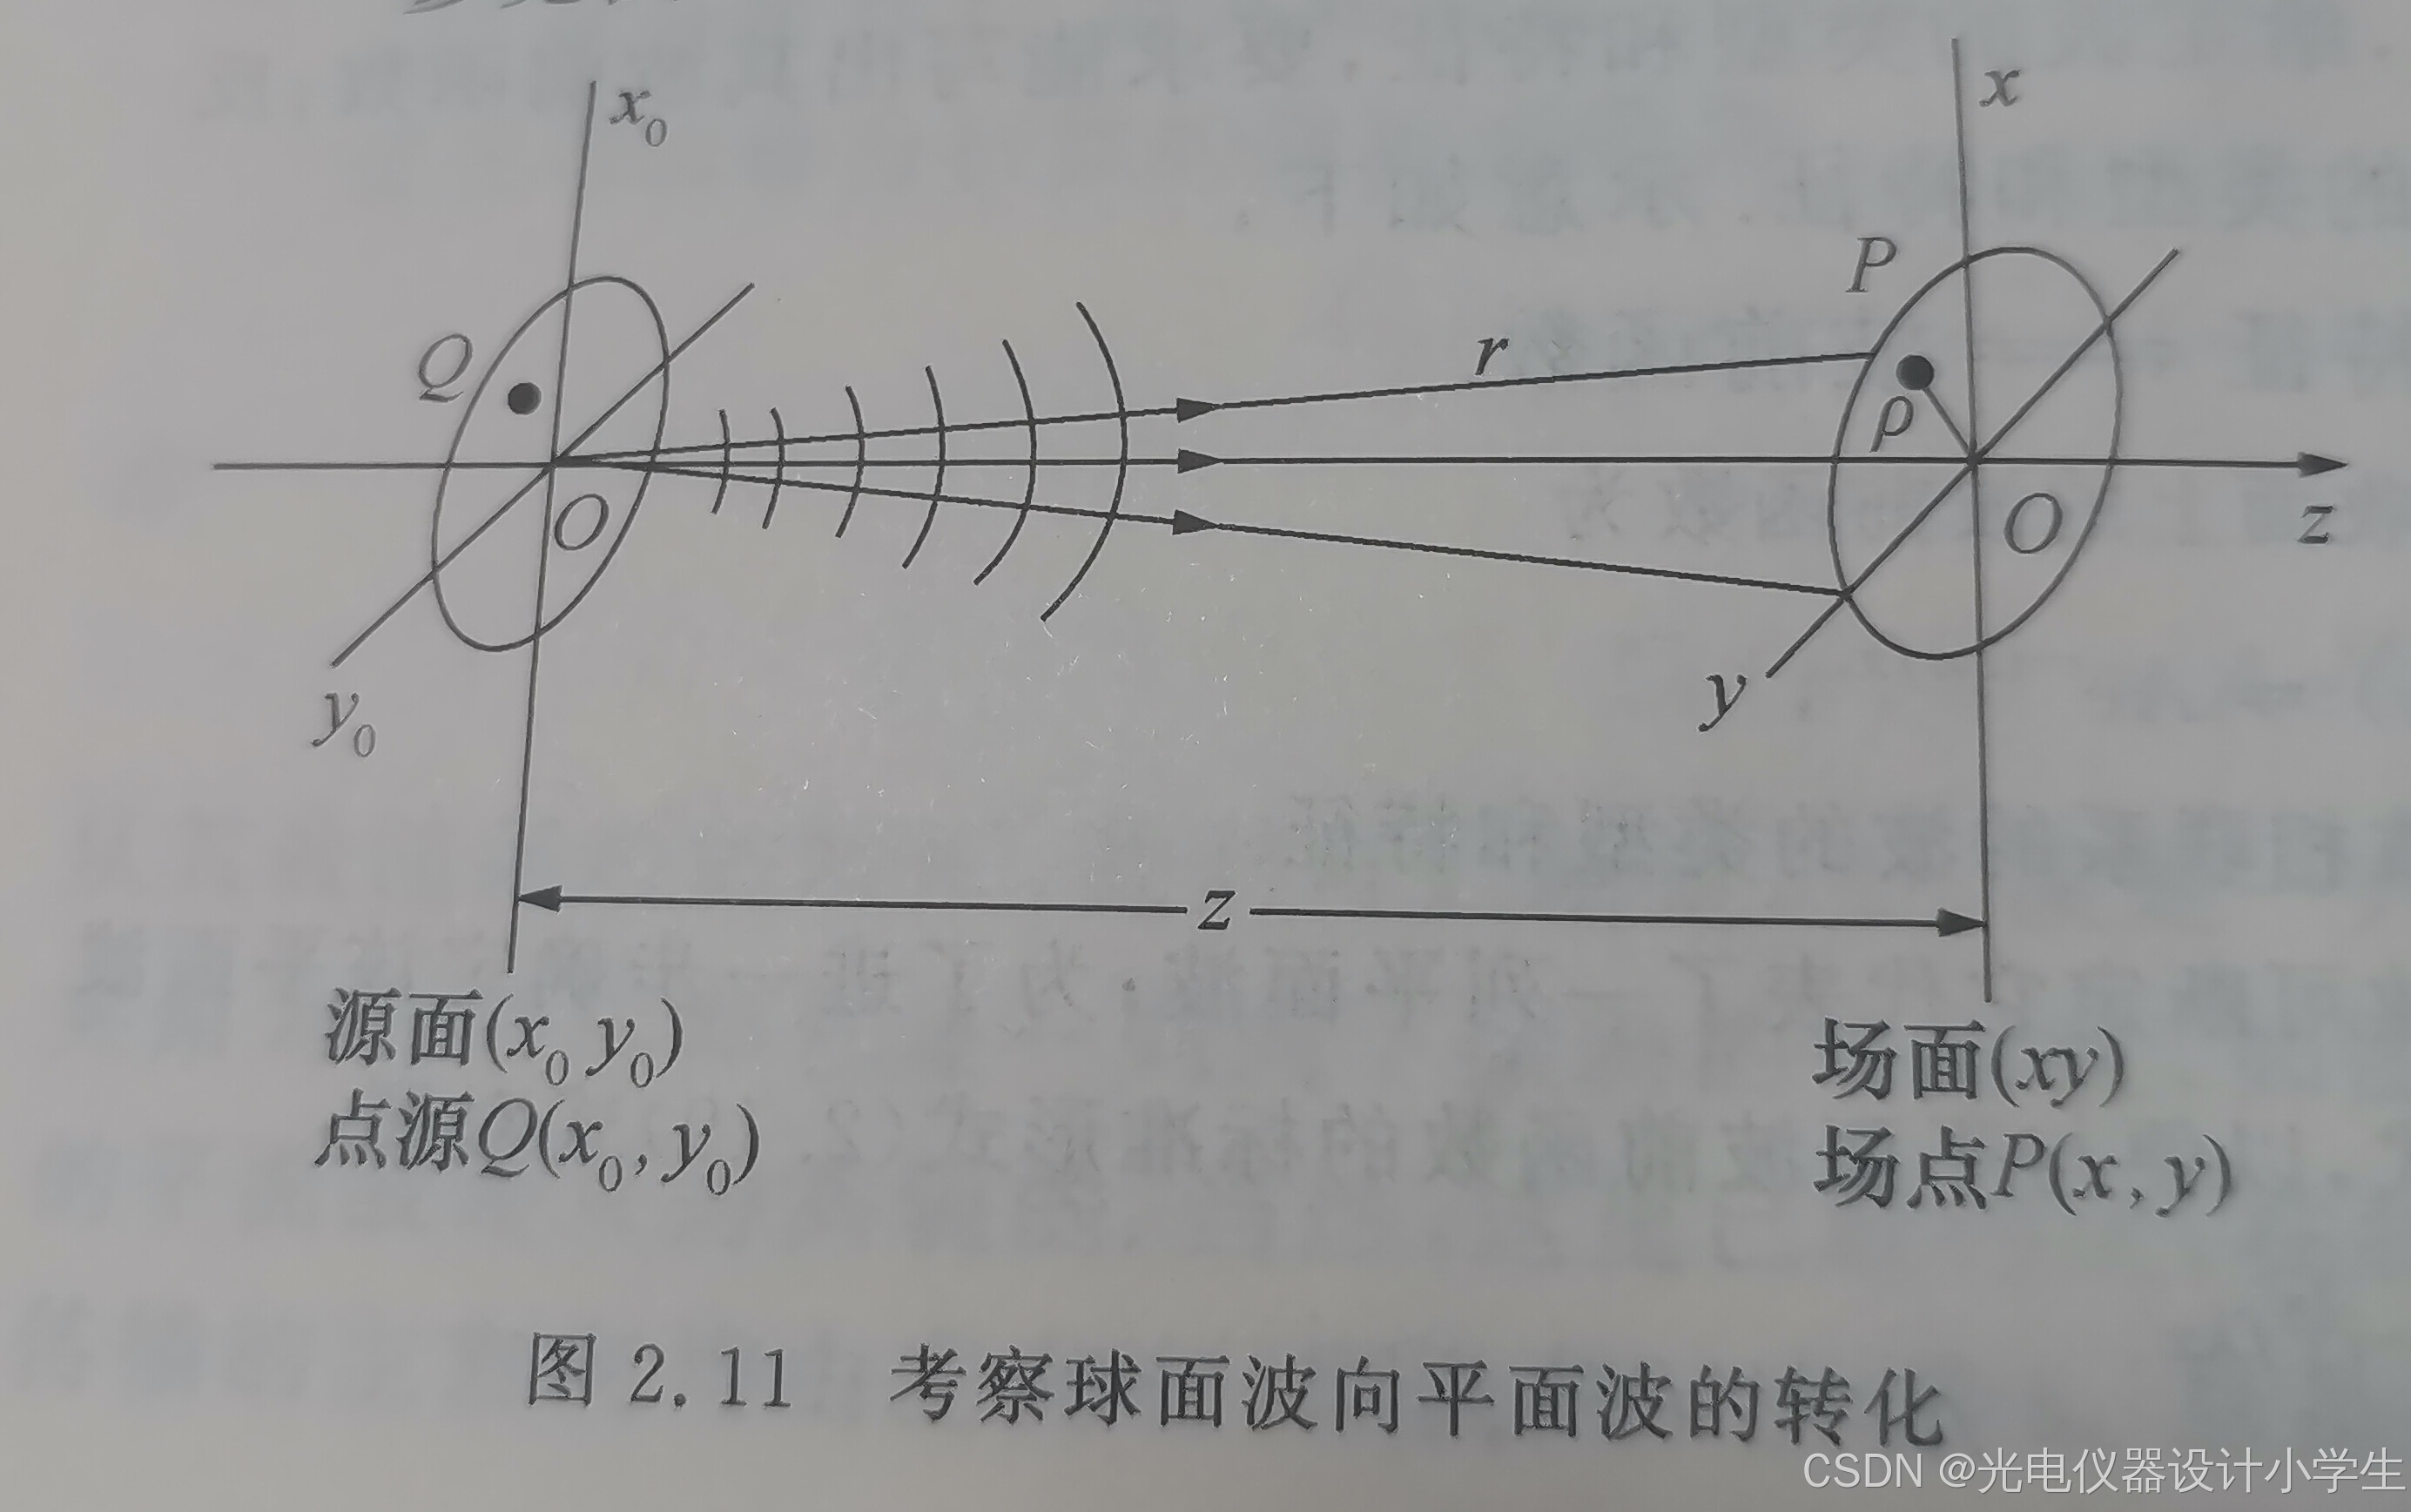
c、用开平方公式展开方程r=√(x ^2+y ^2+z ^2),得到r=( z+(x ^2+ y ^ 2) ^2/2z+ (x ^2+ y ^2) ^3/8z ^3+ …… )
d、根据公式r=( z+(x ^2+ y ^ 2) ^2/2z+ (x ^2+ y ^2) ^3/8z ^3+ …… ),如果z ^2远远大于x ^2+ y ^ 2,则(x ^2+ y ^ 2) ^2/2z+ (x ^2+ y ^2) ^3/8z ^3+ …… 接近于零。所以此时r≈z。
d、如此U(x,y)=a1/r•e ^ikr≈a1/z•e ^ikz≈a1/z•e ^ik(z+(x ^2+ y ^ 2) ^2/2z)。(x ^2+ y ^ 2) ^2/2z是(x ^2+ y ^ 2) ^2/2z+ (x ^2+ y ^2) ^3/8z ^3+ …… 中最大的,通常相位因子约掉 (x ^2+ y ^2) ^3/8z ^3及以后的项,保留两项(z+(x ^2+ y ^ 2) ^2/2z)。
e、如此约等于,得到的球面波波前函数U(x,y)≈a1/z•e ^ik(z+(x ^2+ y ^ 2) ^2/2z),振幅是常数表现出平面波特性,而初相位函数有保留了球面波的特性。
3)远场条件,也叫相位条件。
a、相因子中,多小的相位变化量△Φ,可以忽略?答案是相位变化量远远大于π,即△Φ<<π => △Φ≈0。
b、根据△Φ<<π => △Φ≈0,得到((x ^2+ y ^ 2) ^2/2z+ (x ^2+ y ^2) ^3/8z ^3+ …… )<<π =>((x ^2+ y ^ 2) ^2/2z+ (x ^2+ y ^2) ^3/8z ^3+ …… ) =0。
3)同样的,通常相位因子只约掉 (x ^2+ y ^2) ^3/8z ^3及以后的项。
4)考量到波矢k=2π/λ,可以得到若zλ远大于 (x ^2+ y ^2),则△Φ≈0。
5光波干涉引论
5.1相干叠加
1)物理学中,干涉指的是两列或两列以上的波在空间中相遇时,发生叠加或抵消,从而形成新的波形的现象。
2)根据叠加后的光强分布是否遵从叠加原理,可以将波的叠加分为两个类,一类是多列光叠加后的光强分布服从叠加原理的非相干叠加,一类是多列光叠加后的光强分布不服从叠加原理的相干叠加。
3)非相干叠加是平淡无奇的,相干叠加会出现各种形状和色彩的干涉花纹,应用前景多姿多彩。
4)介绍三个产生相干叠加的条件:
a、两列波的振动方向不一致,或者说是有方向不一致的振动方向分量。
b、两列波频率不同。
c、两列波在叠加区域的场点的相位差不固定。
5)如何用理论证明条件a
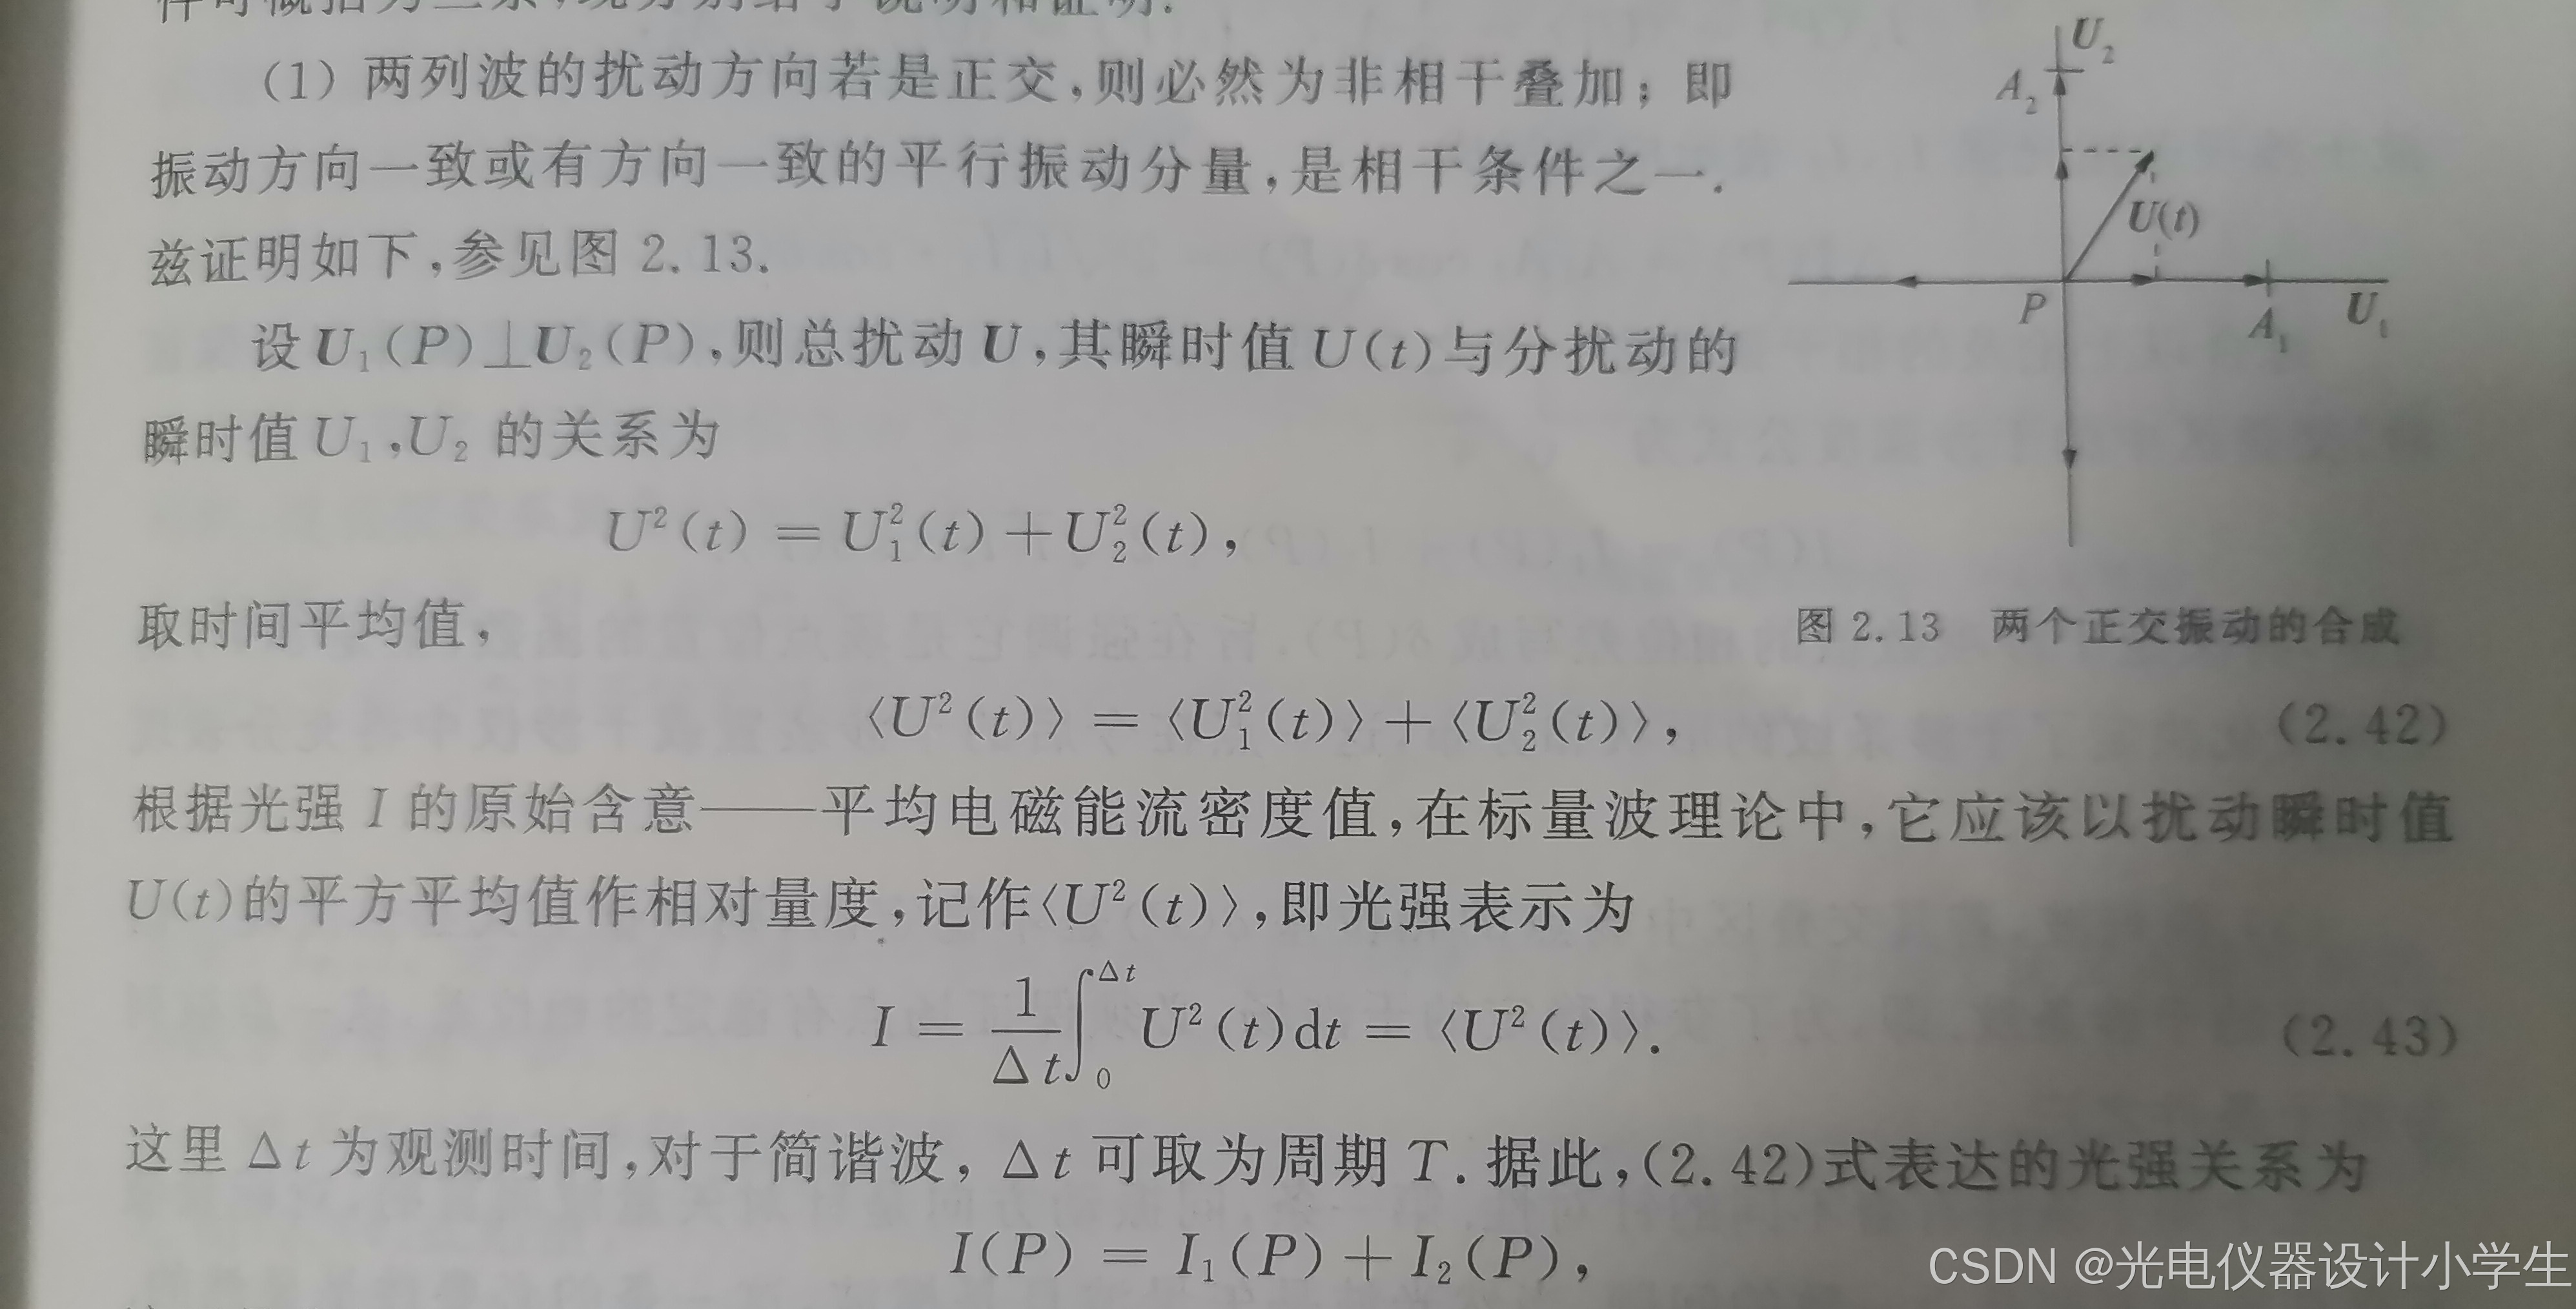
上图证明了相互垂直的两列波,满足勾股定理,再根据光强大小与振幅的平方成正比,最后证明正交的两列波必然为非相干叠加。
6)如何用理论证明条件b
a、正弦函数的有效值是峰值的根号2分之一,即有效值 = 峰值 / 根号2。
b、三角函数的积化和差公式

c、我们对光强的观察周期为T,在周期T内光强大小,与用周期T内振幅的平方的积分除以周期T的值成正比。
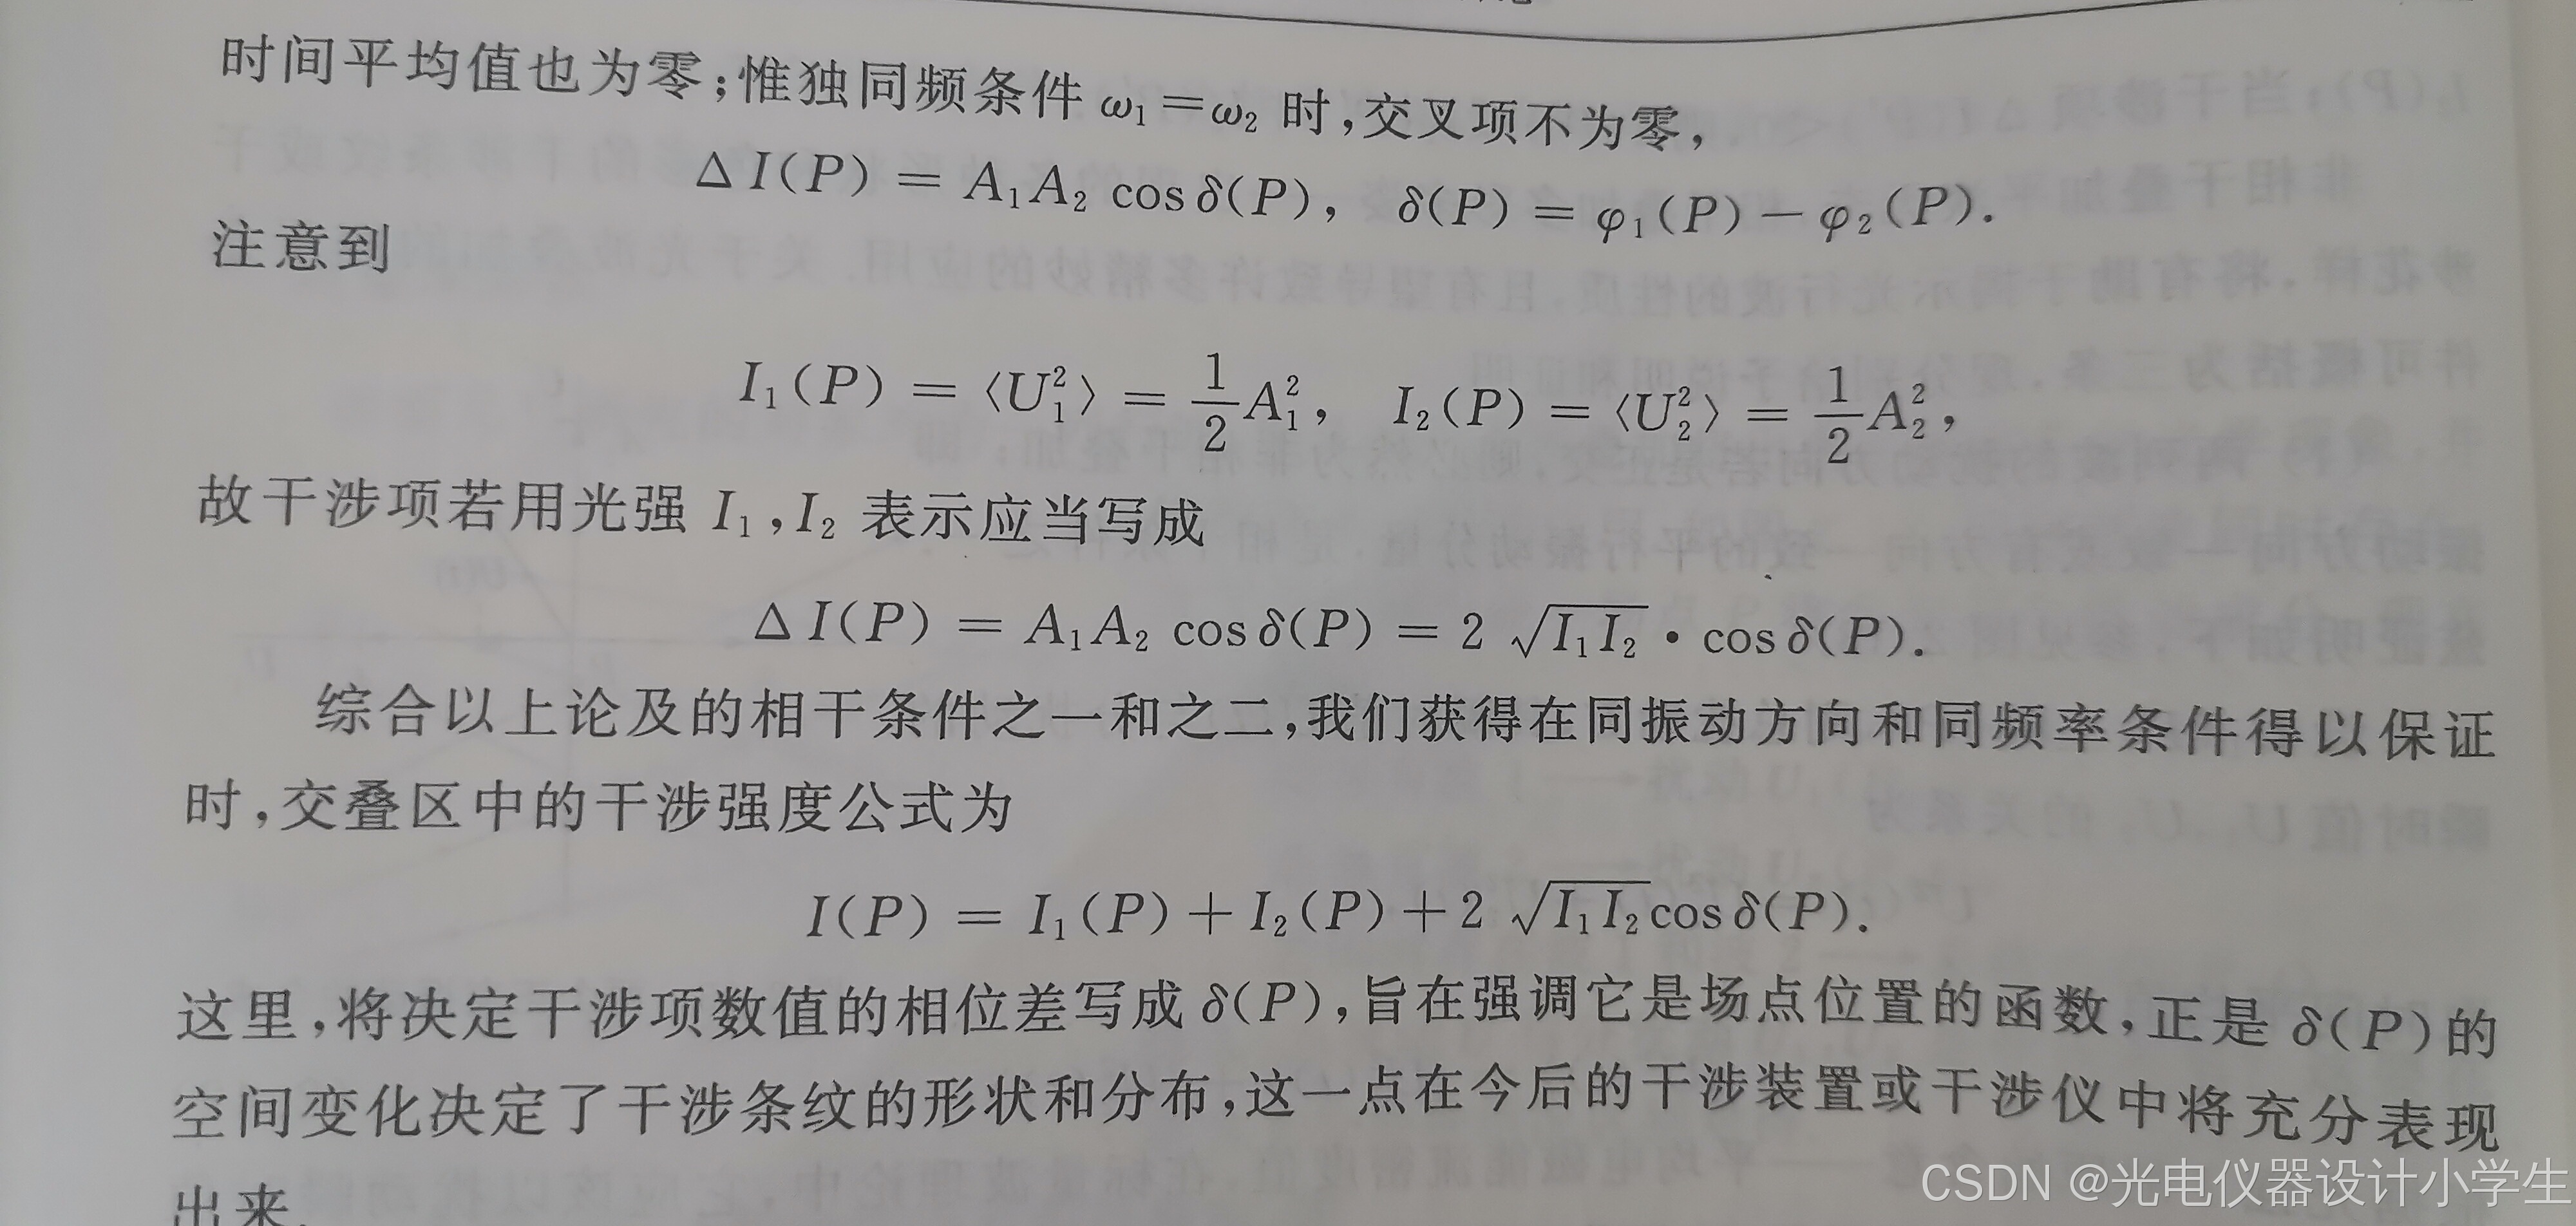
d、为什么和频平均值为零,差频平均值只有w1、w2相等时为零?因为只有观察周期远大于光的周期,而正余弦函数周期内积分是零,感觉就是一种非常快的增加光强和减少光强,增加和减少是等量的,由于太快感觉不到这个振动,所以它的平均值为零。而差频且w1、w2相等时,才出现了一个常数量。
e、I1(t)=U1^ 2=1A1/2,这里的有效值是针对U1的“相位”常数项。
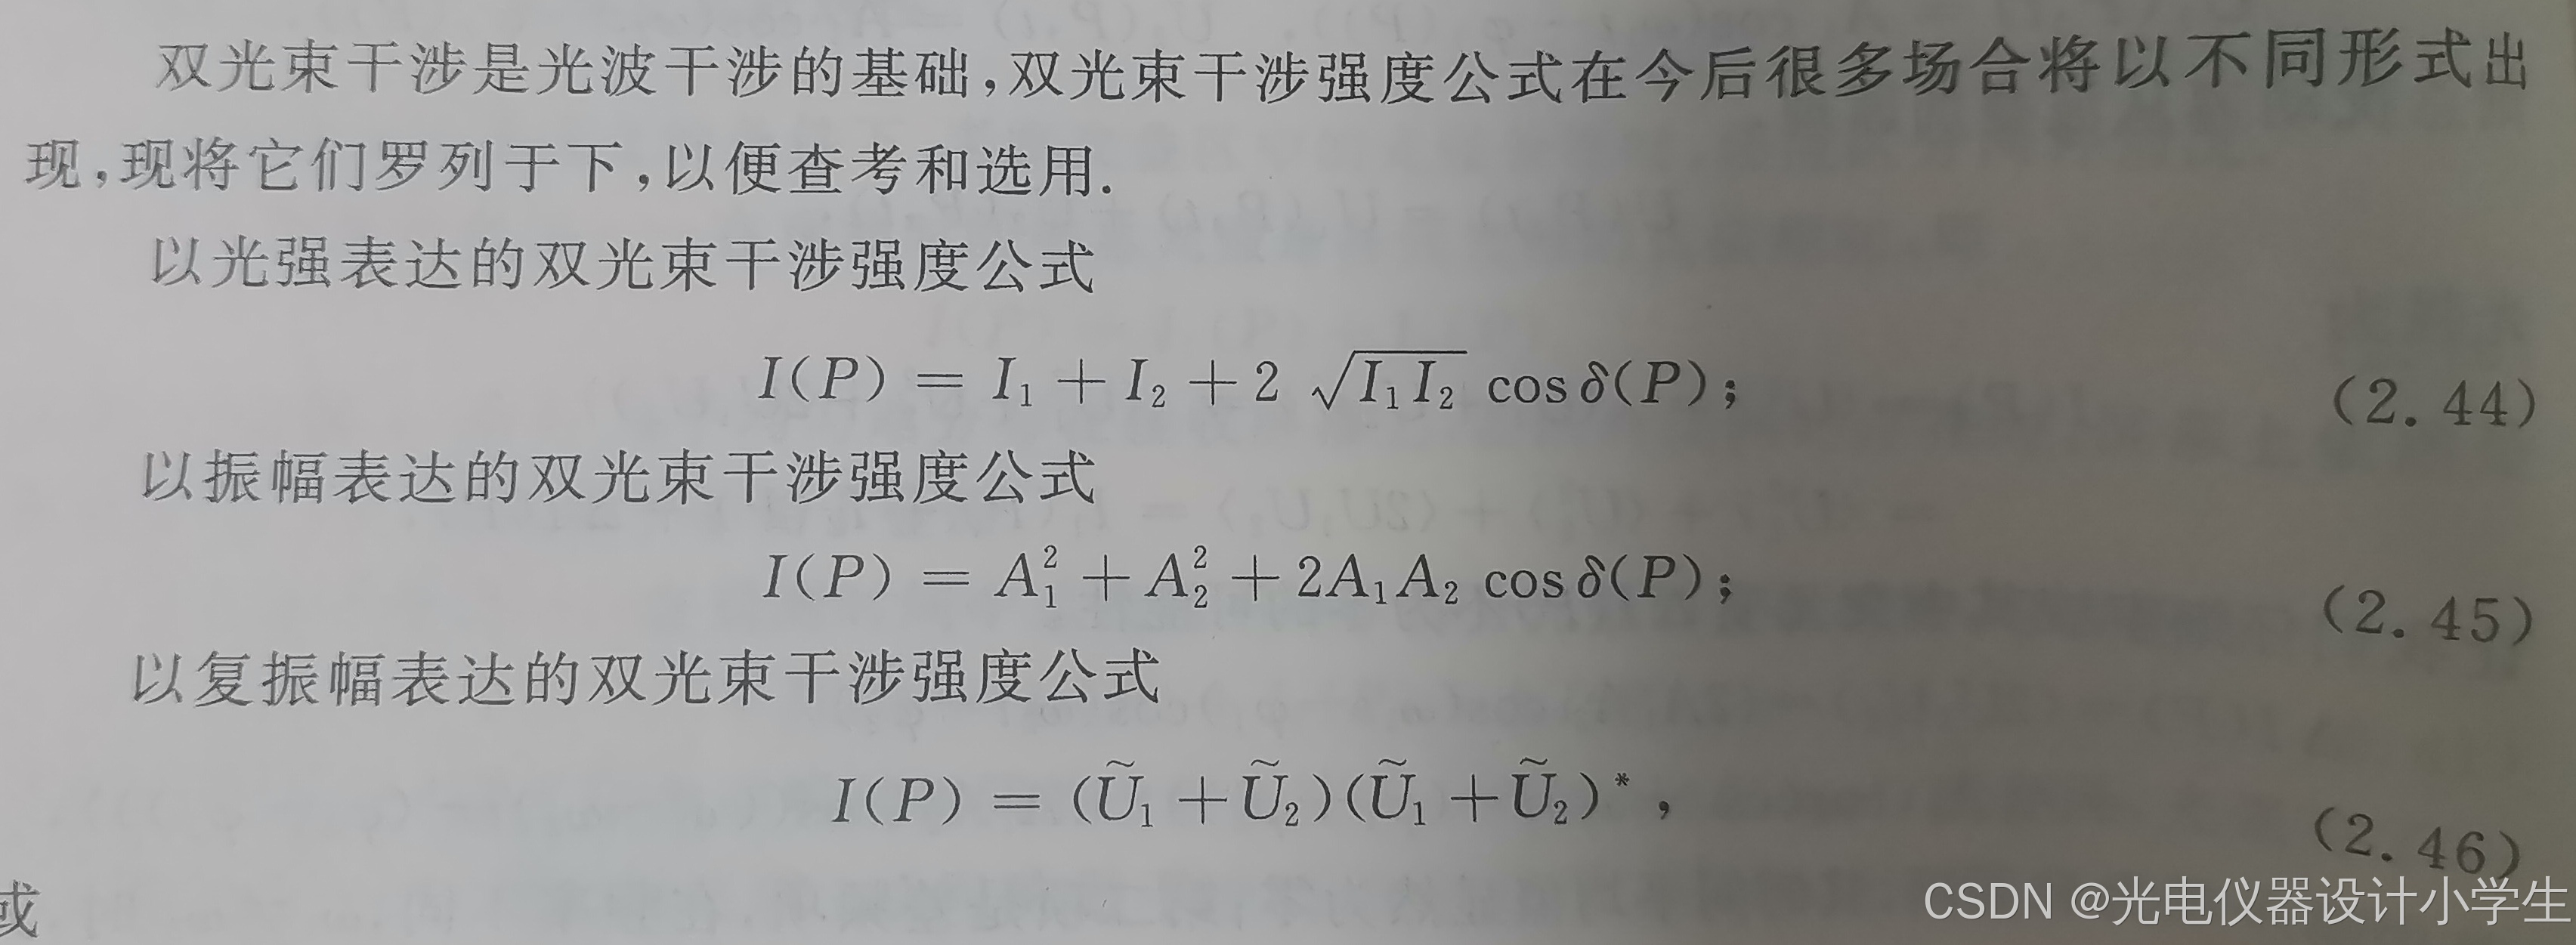
5.2双光束干涉强度公式
详细应用,后面遇到再细讲。
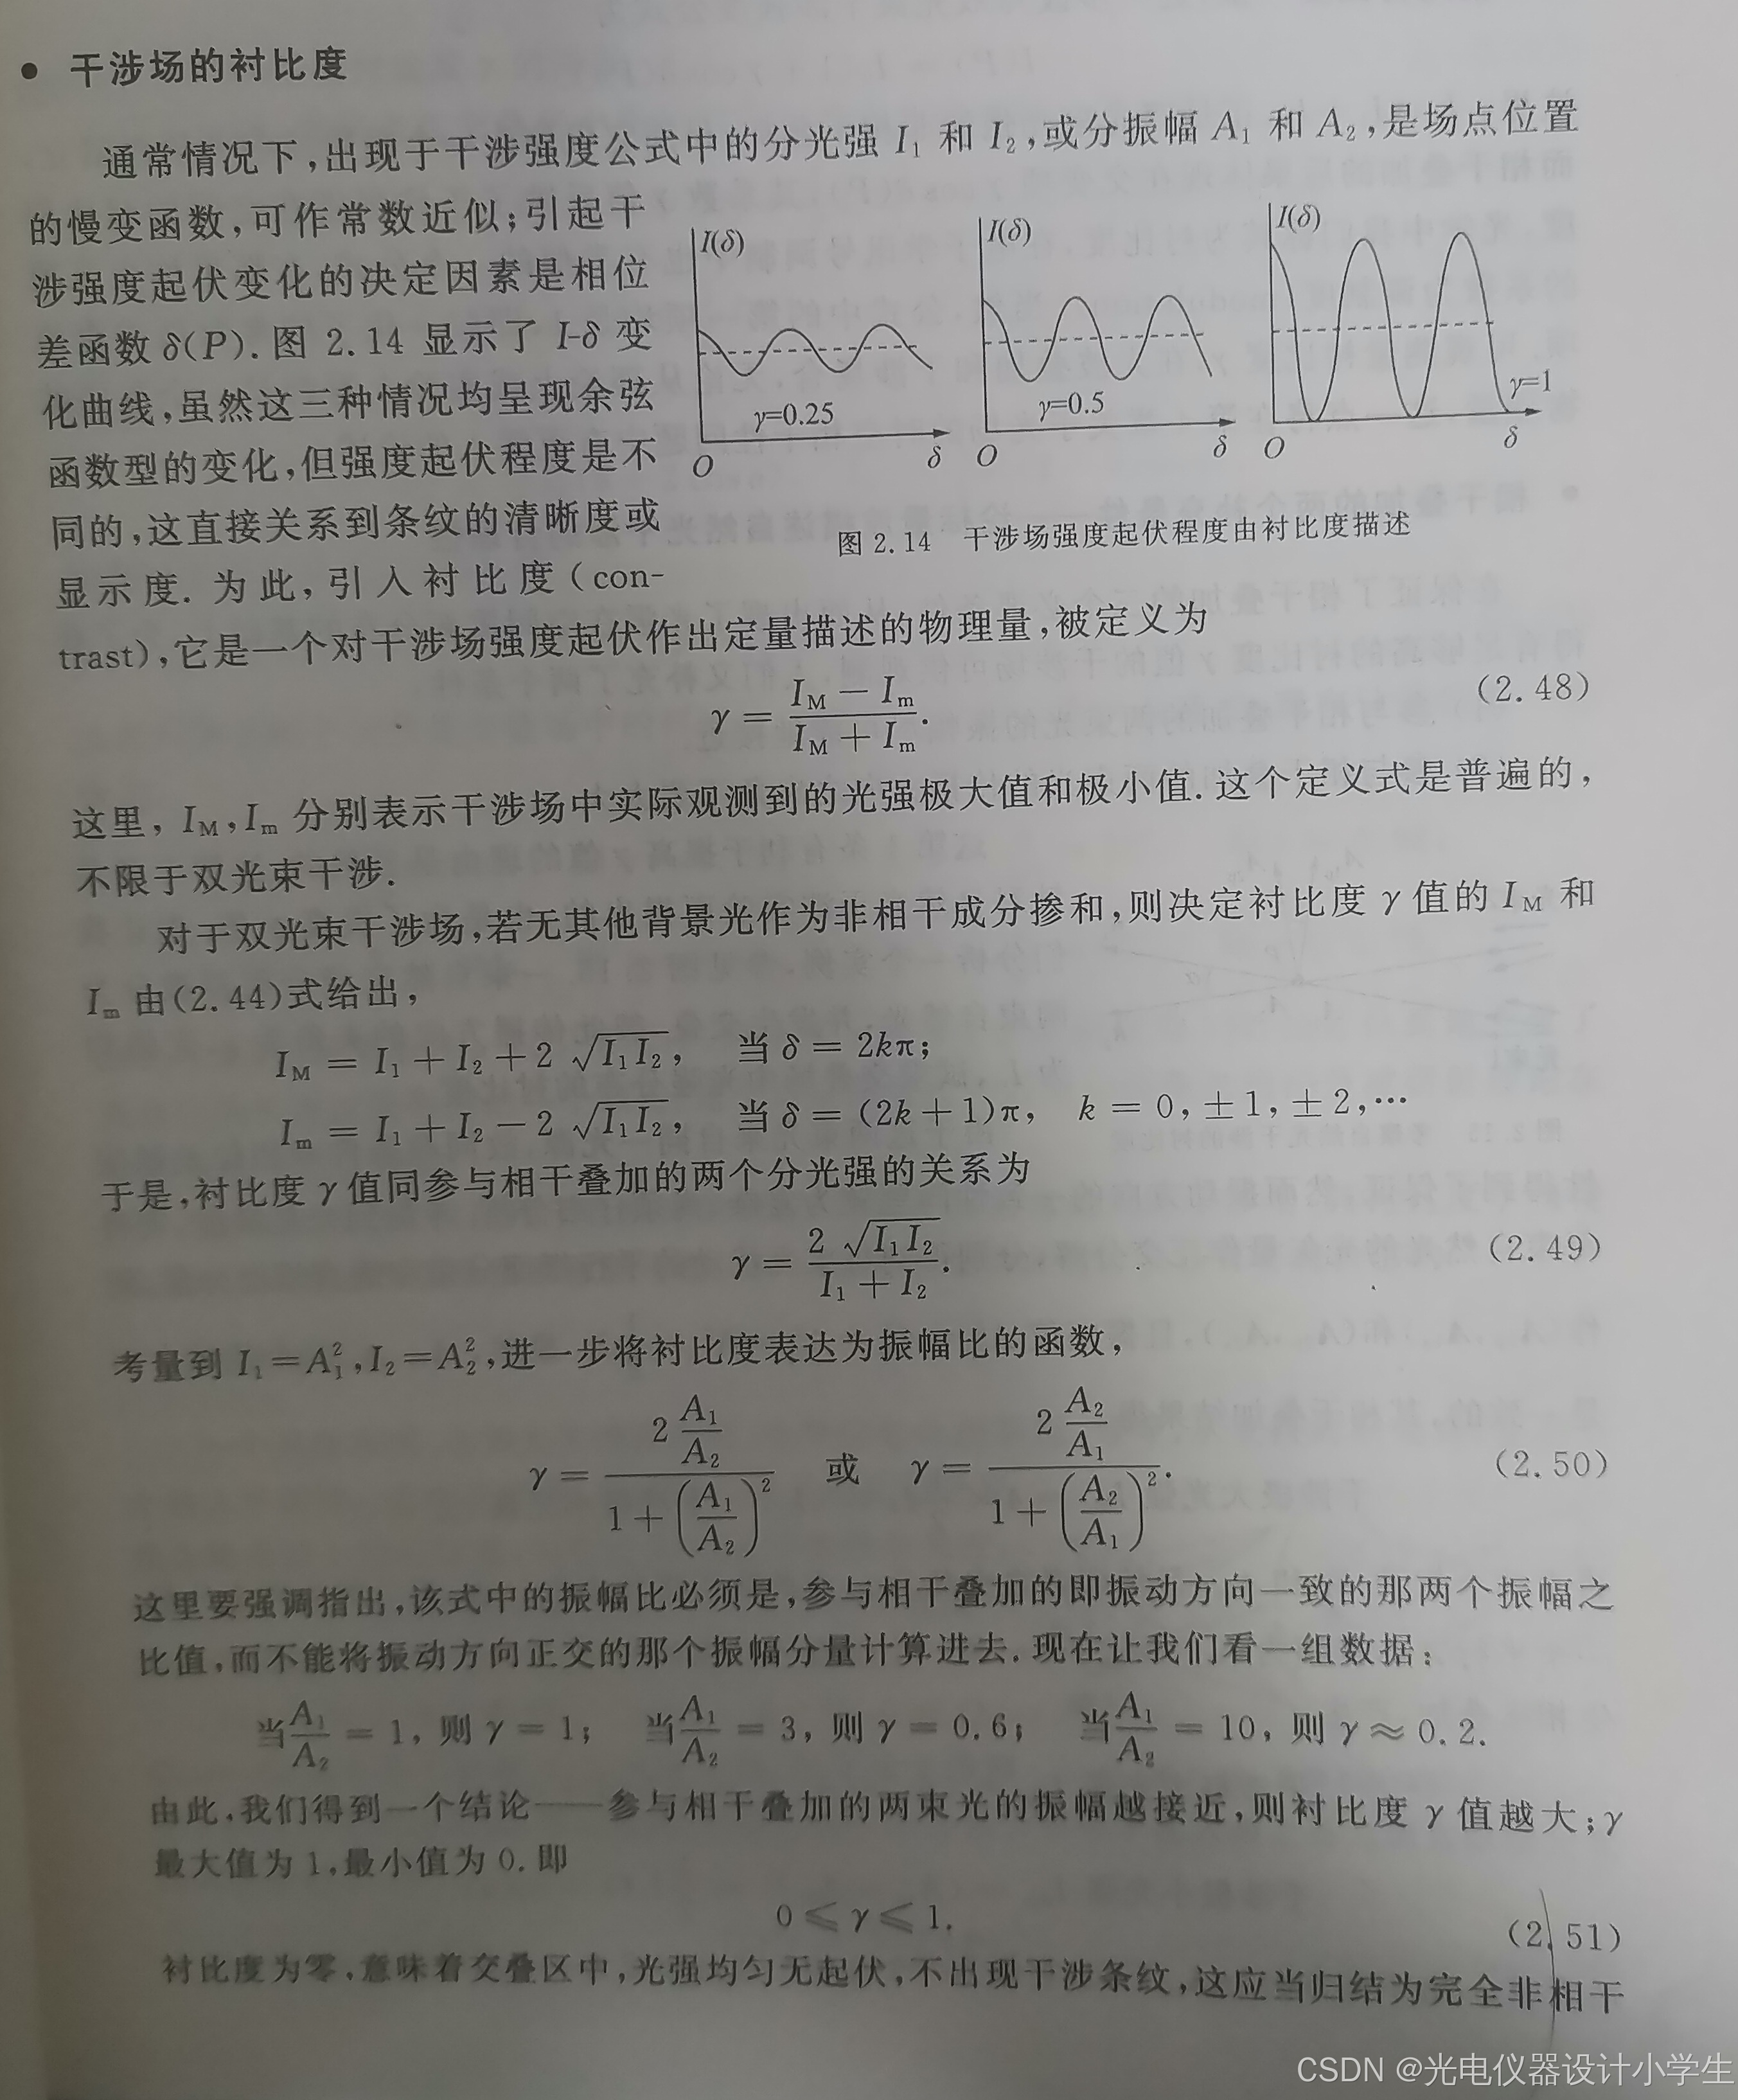
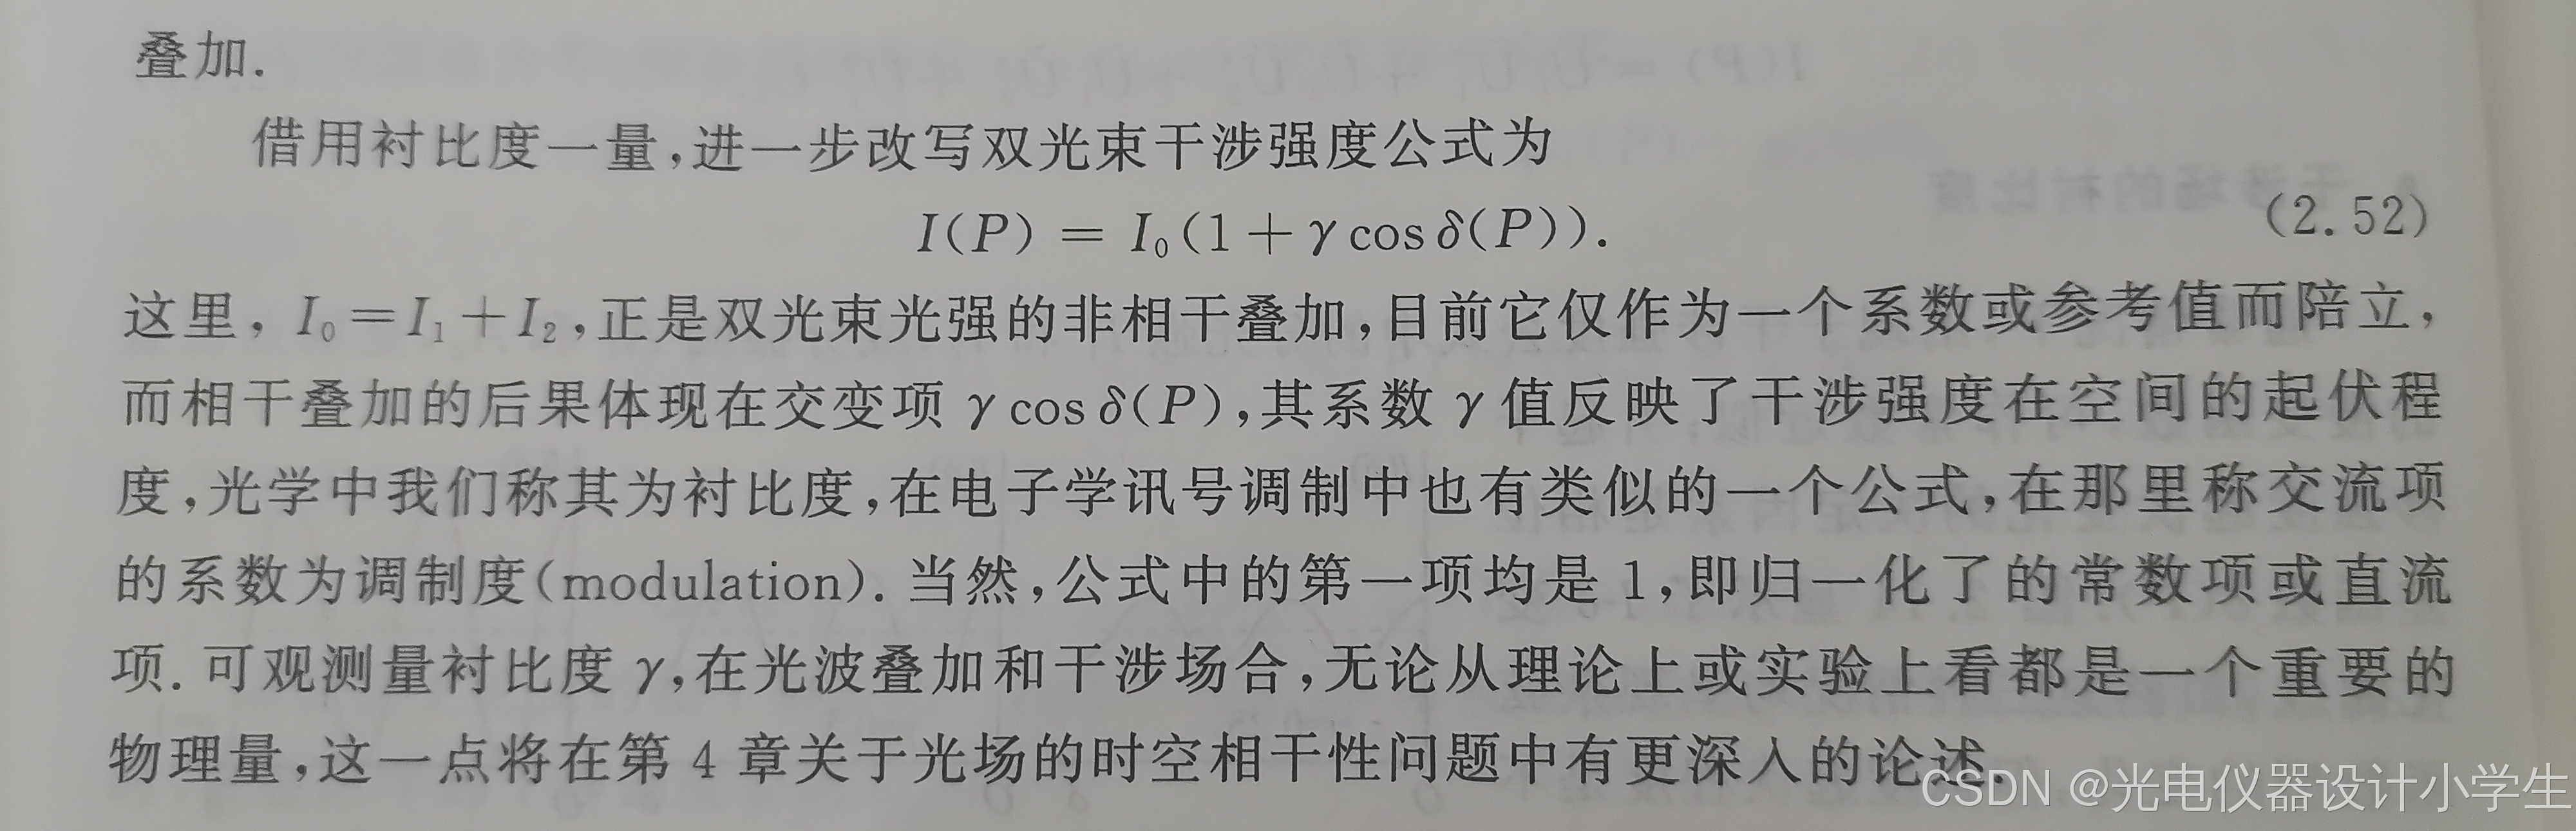
5.3用衬比度描述相(互)干(涉)叠加
5.4如何让波间的相互干涉加剧
1)加剧波间的相互干涉可以:让参与相干叠加的两束光的振幅尽可能接近。
2)加剧波间的相互干涉可以:让参与相干叠加的两束光的传播方向之夹角尽可能小。
3)两束光的传播方向之夹角与衬比度之间的关系。
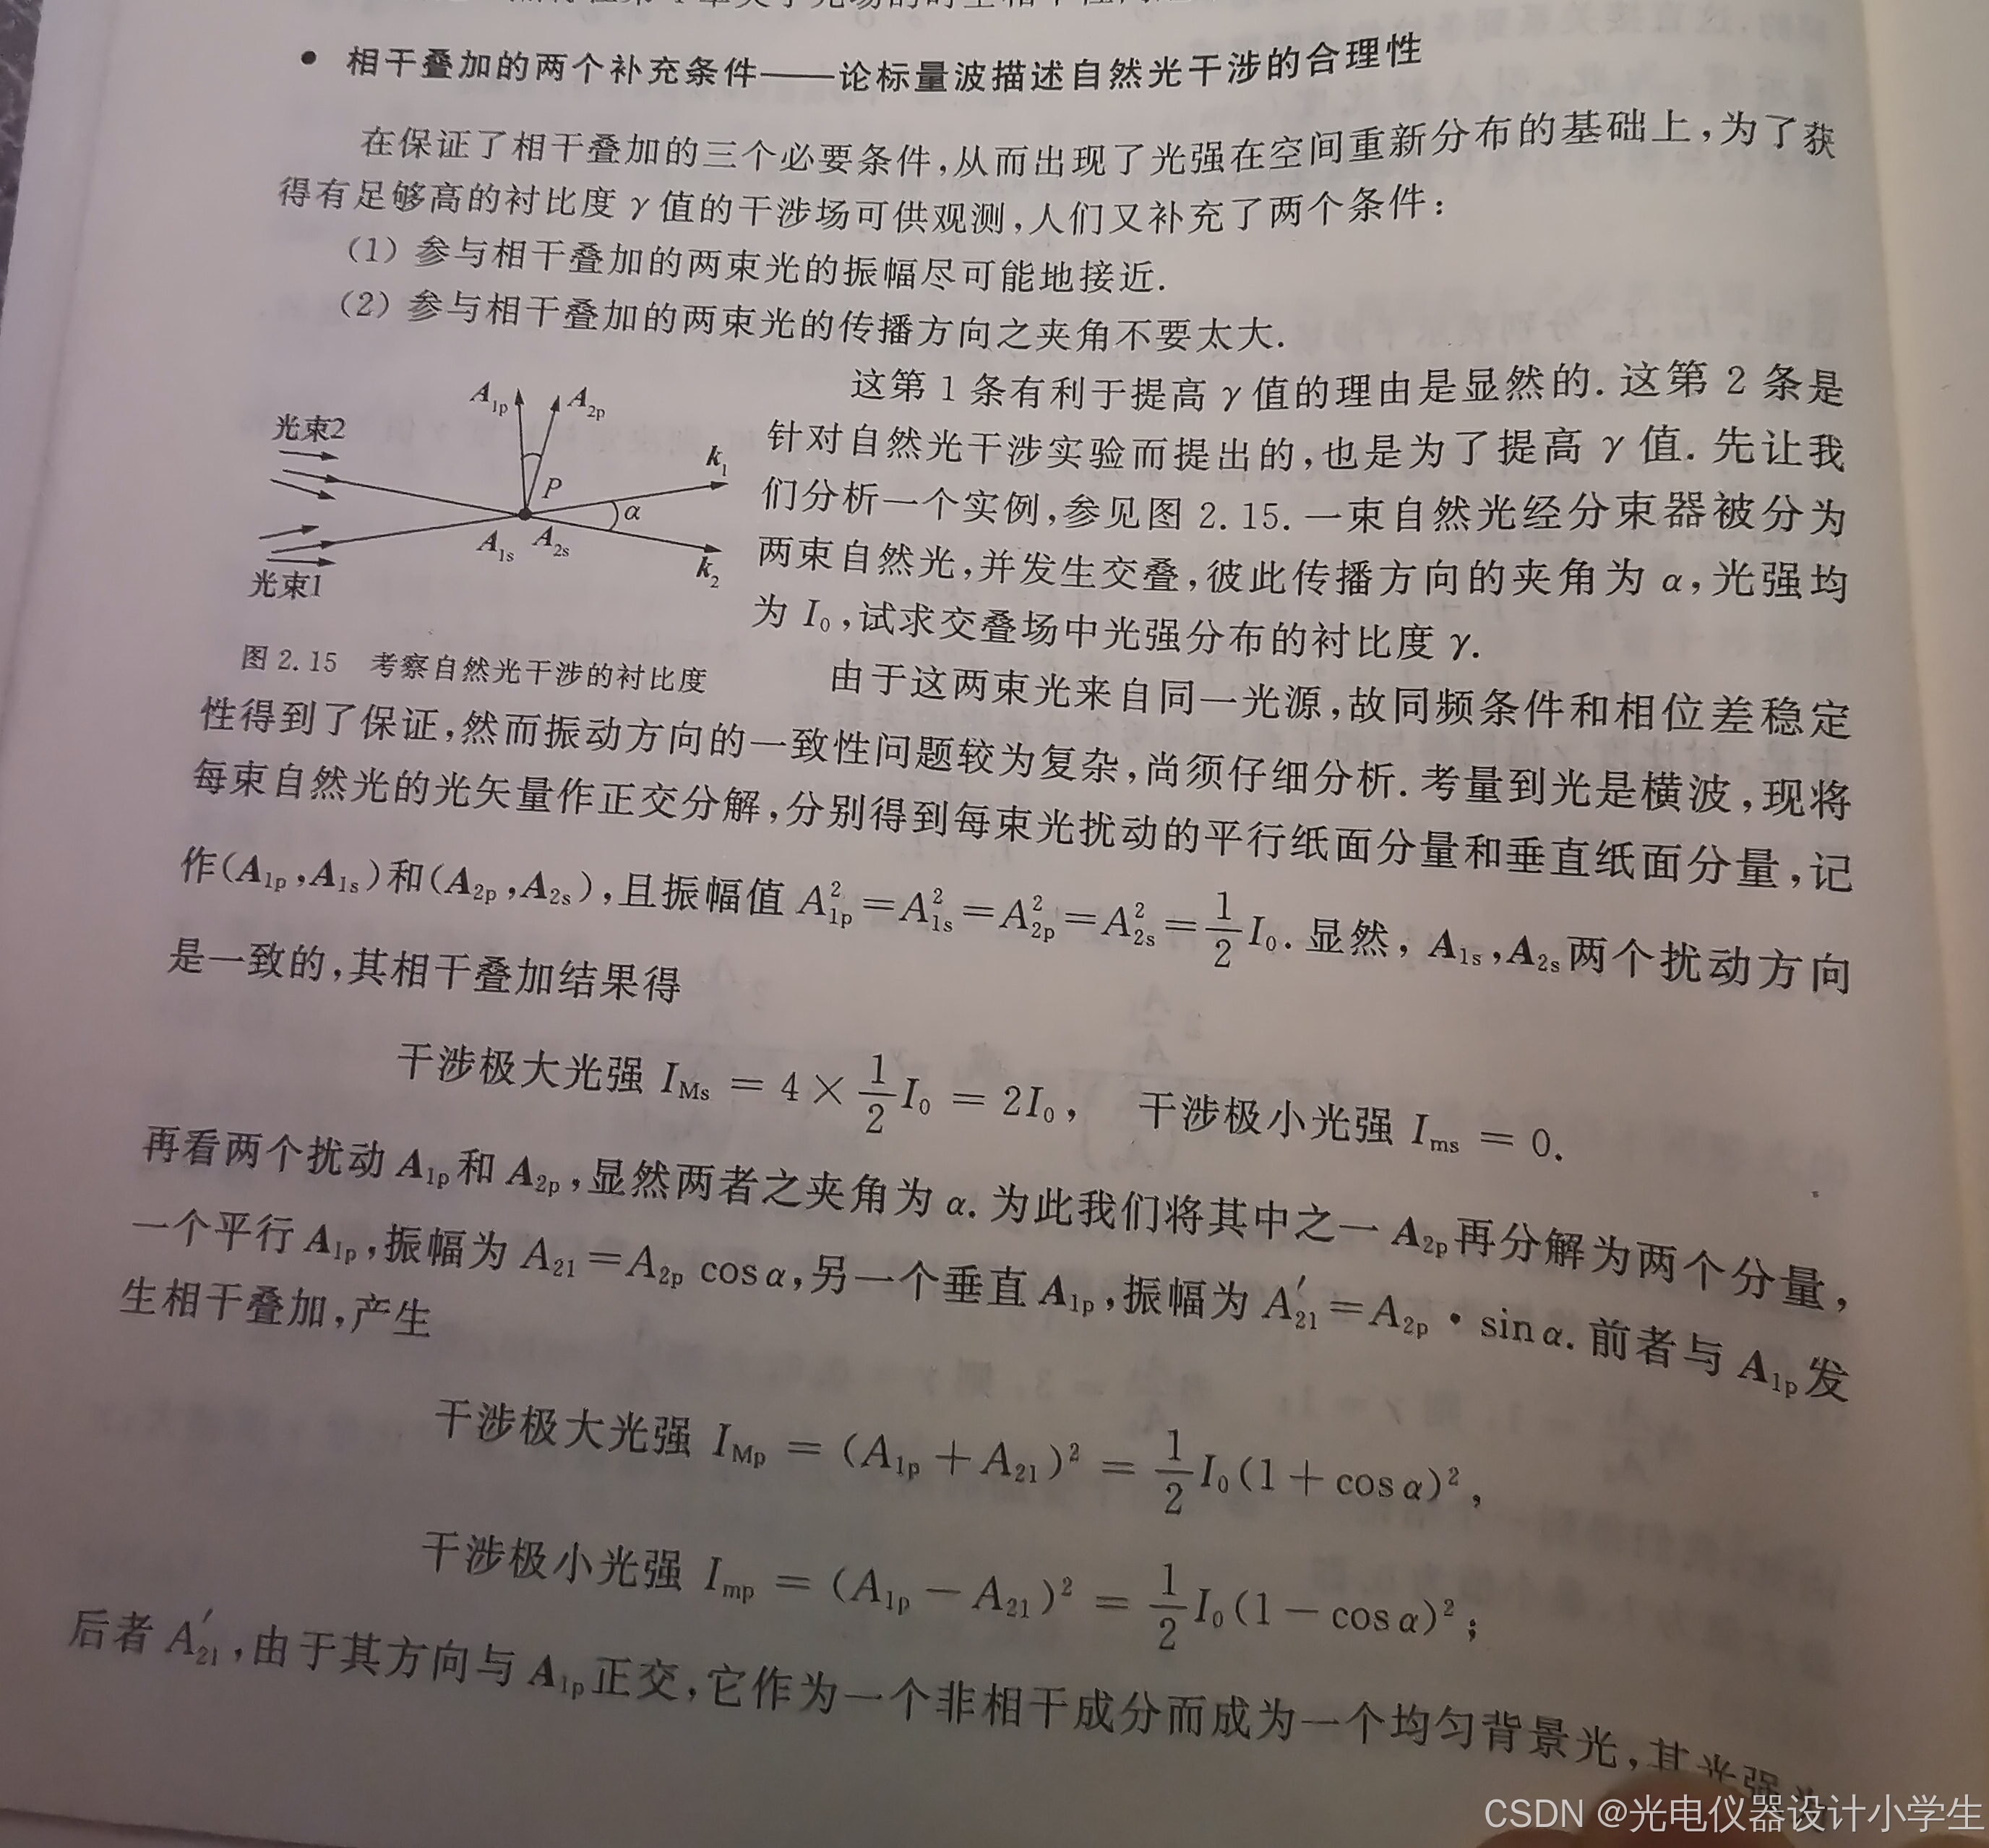

4)与传播方向平行的振幅分量为均匀背景光。
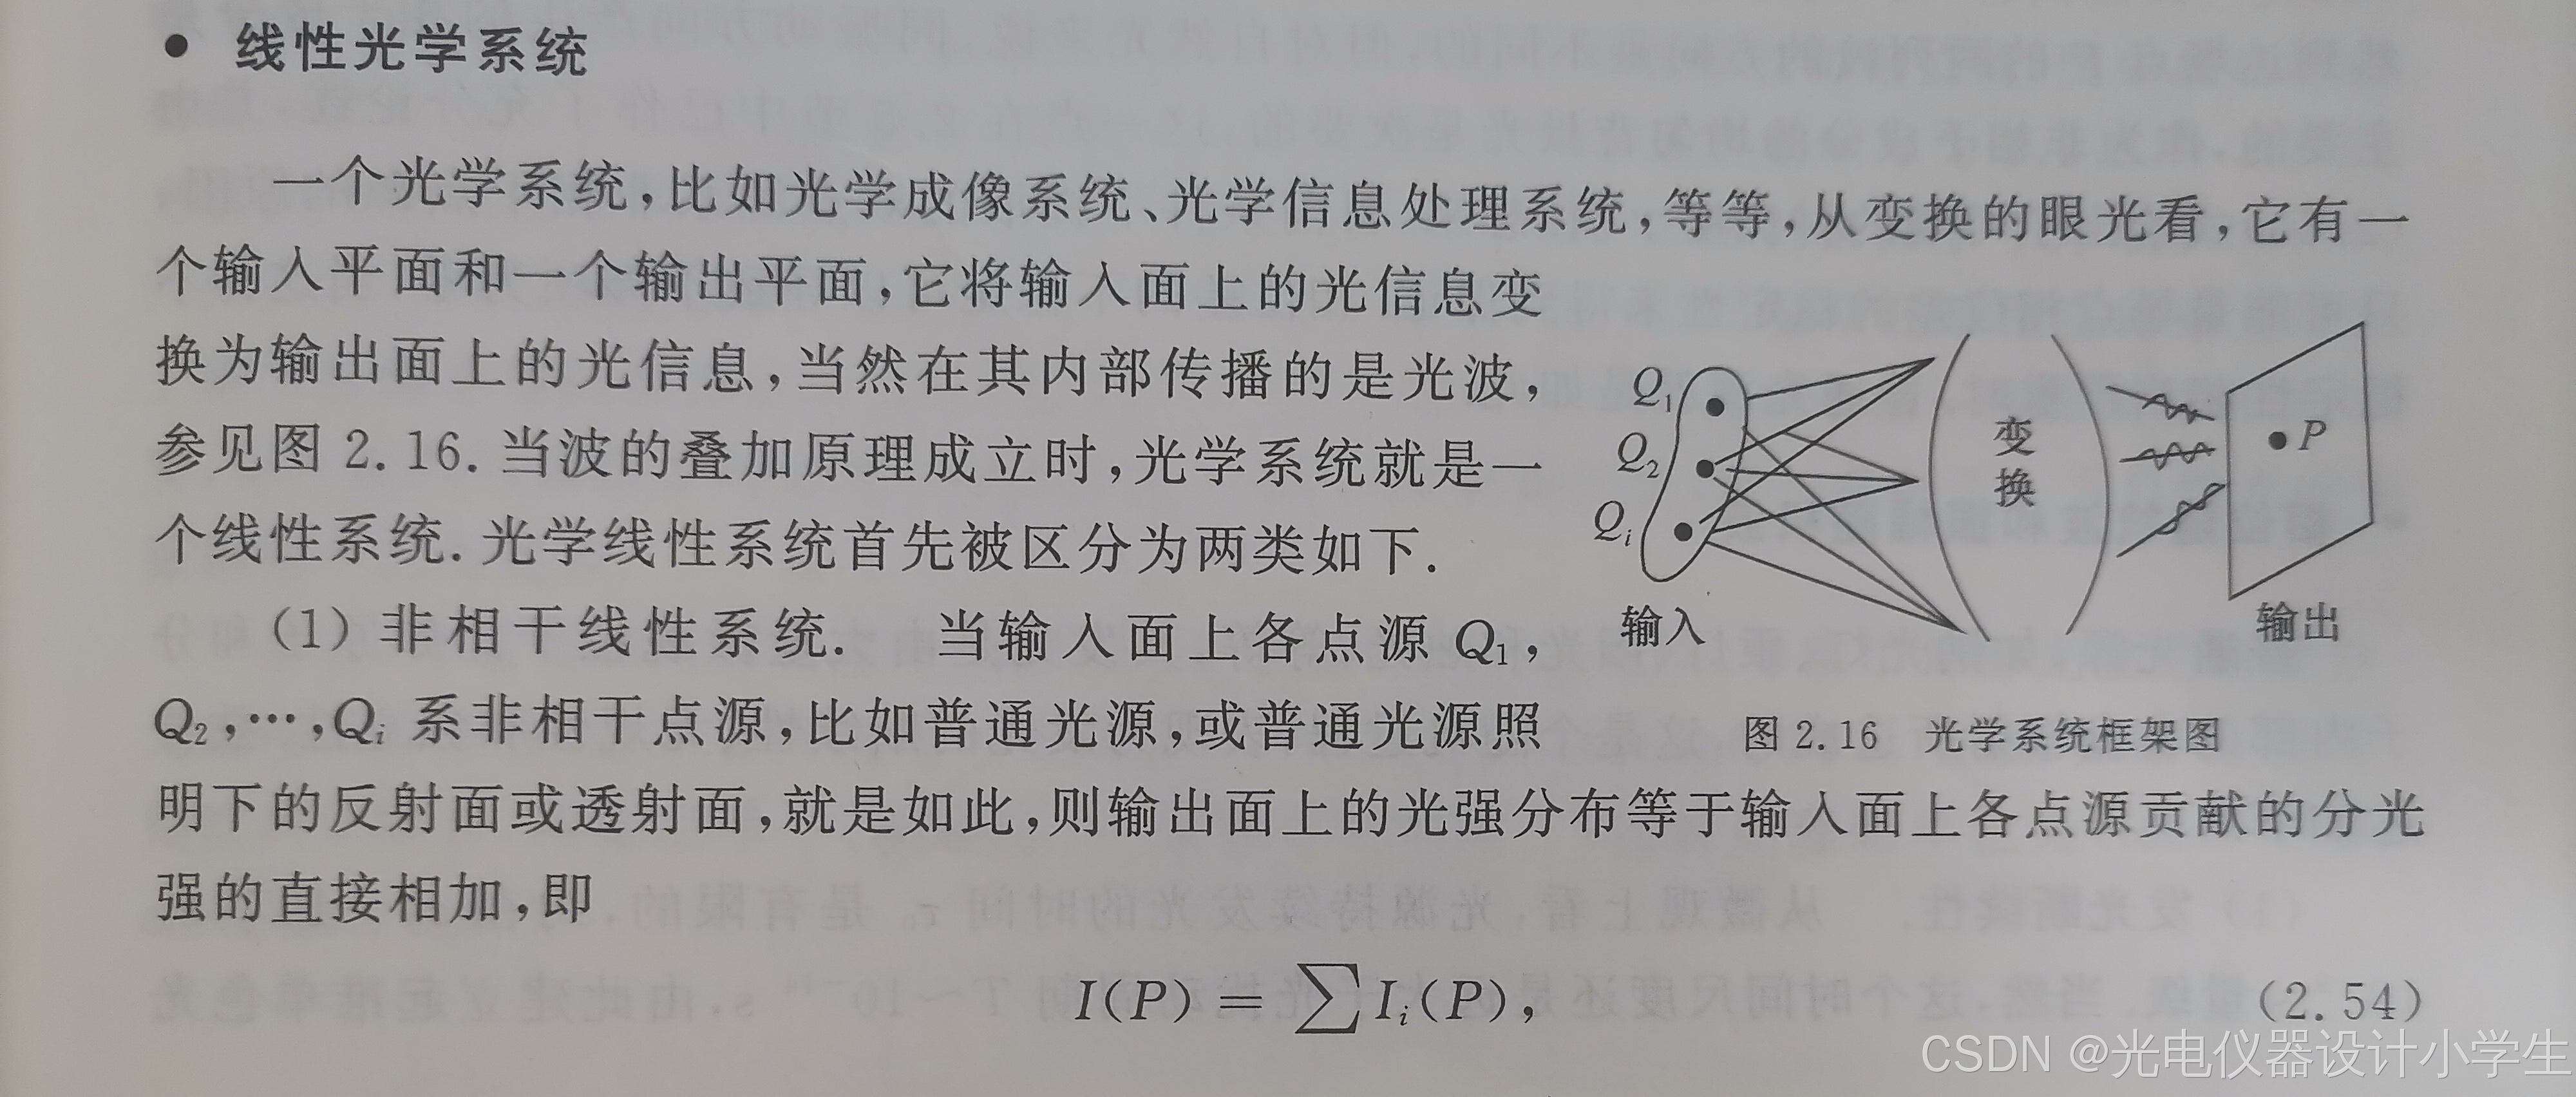
5.5线性光学系统

6两个点源的干涉场
6.1随机的自发辐射
1)生活中的阳光、烛光是普通光源;
2)组成普通光源的是大量微观粒子,如原子、分子;
3)发光是分子原子的自发辐射造成的。
4)自发辐射是在没有任何外界作用下,激发态原子自发地从高能级(激发态)向低能级(基态)跃迁,同时辐射出一个光子的过程。
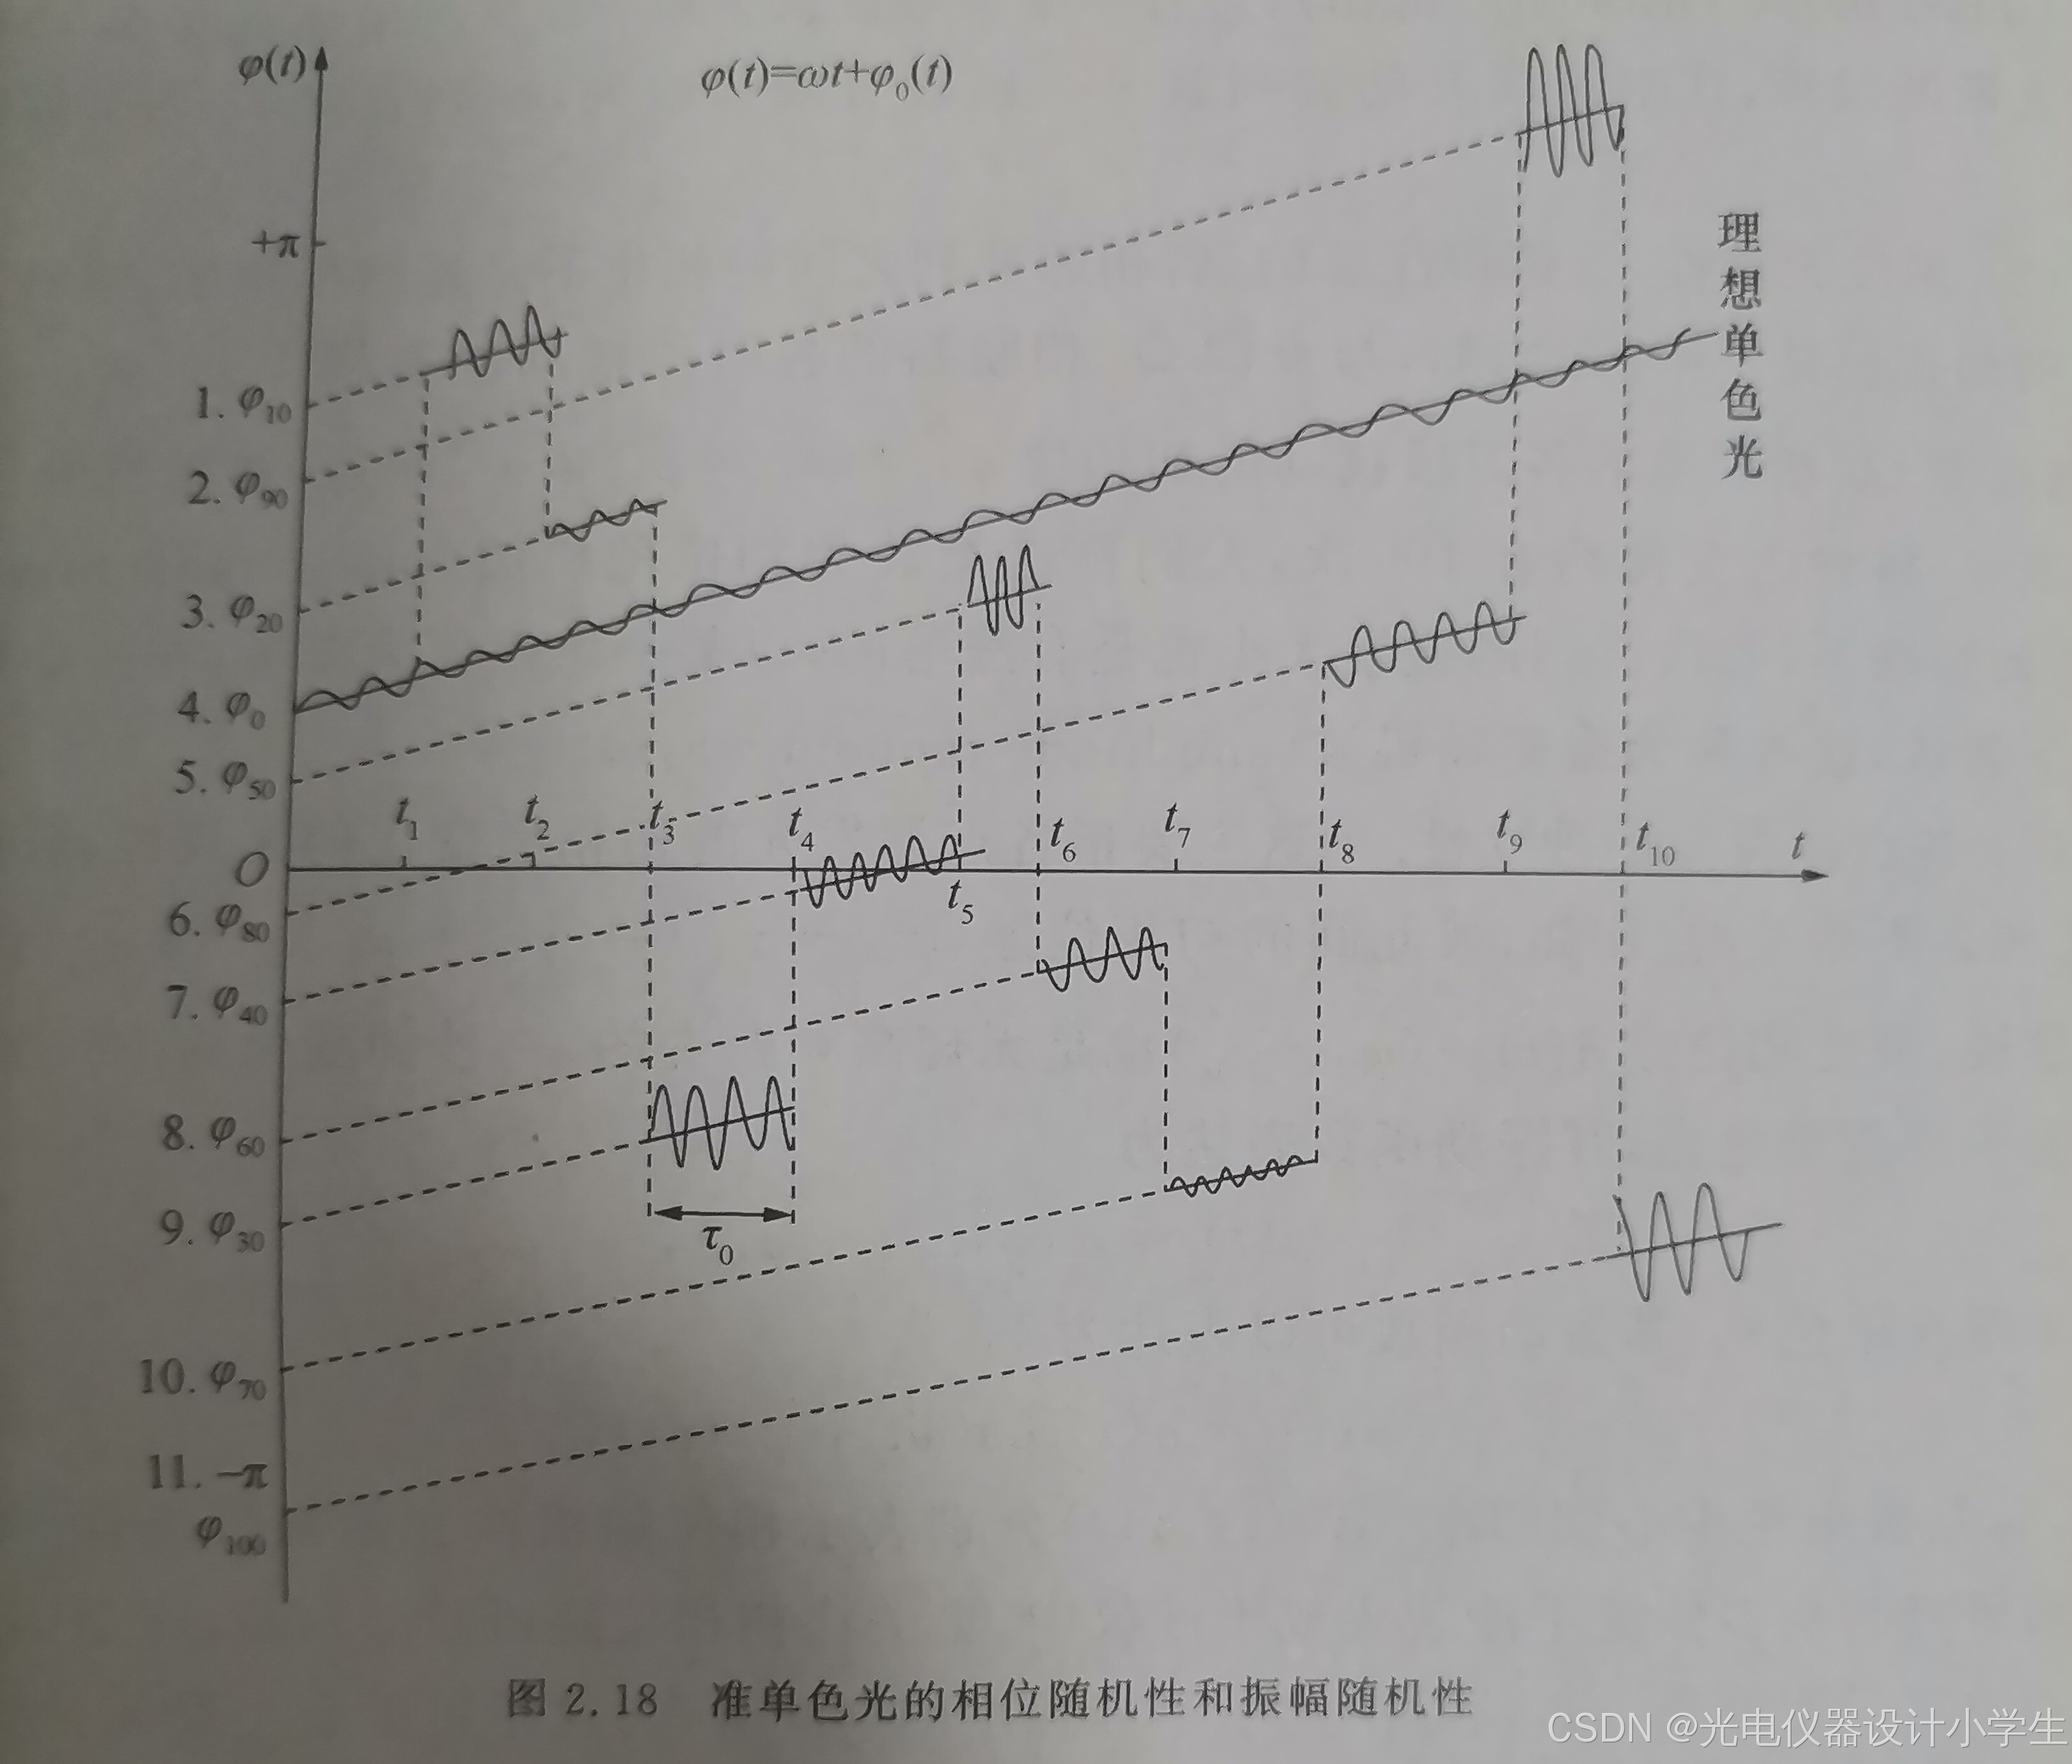
5)因为普通光源内部自发辐射的随机性,所以普通光源外部光波具有断续性、无规性、独立性。
6)断续性:光源持续发光时间是10^ 8秒到10^ 9秒。
7)无规性:同一束波上的两个波段,它们之间只有一个间断部分。它们是相邻的两列连续时长为10^ 8秒到10^ 9秒的波段。它们之间的振幅和初相位没有规律。
8)独立性:同一普通光源的不同束光波,每束光波的点源发光的初相位和振幅是没有规律的。
6.2时间尺度
1)接收器的时间响应能力τ,人眼10^ -1秒、高级摄像机10^ -3秒;
2)光源持续发光时间τ0,普通光源一般是10^ 8秒到10^ 9秒;
3)光扰动周期T,因为光的频率范围为4.2×10^ 14~7.8×10^ 14Hz,所以光的扰动周期约为10^-14秒。
4)接收器的观测时间△t,如果△t>τ>>τ0>>T,则接收器观测到的光强I(P,t) ,实际是时间平均值。
5)在接收器的时间响应能力τ长时,从时间平均值上分析,进一步得到:两列波相位差的变化,在满足一定抵消条件后,可以使得非正交的两列波,也可以为非相干叠加。
6)当然如果我们时间响应能力τ高于光源持续发光时间τ0的接收器,我们就可以记录瞬间变动的初相位,引起的干涉条纹。
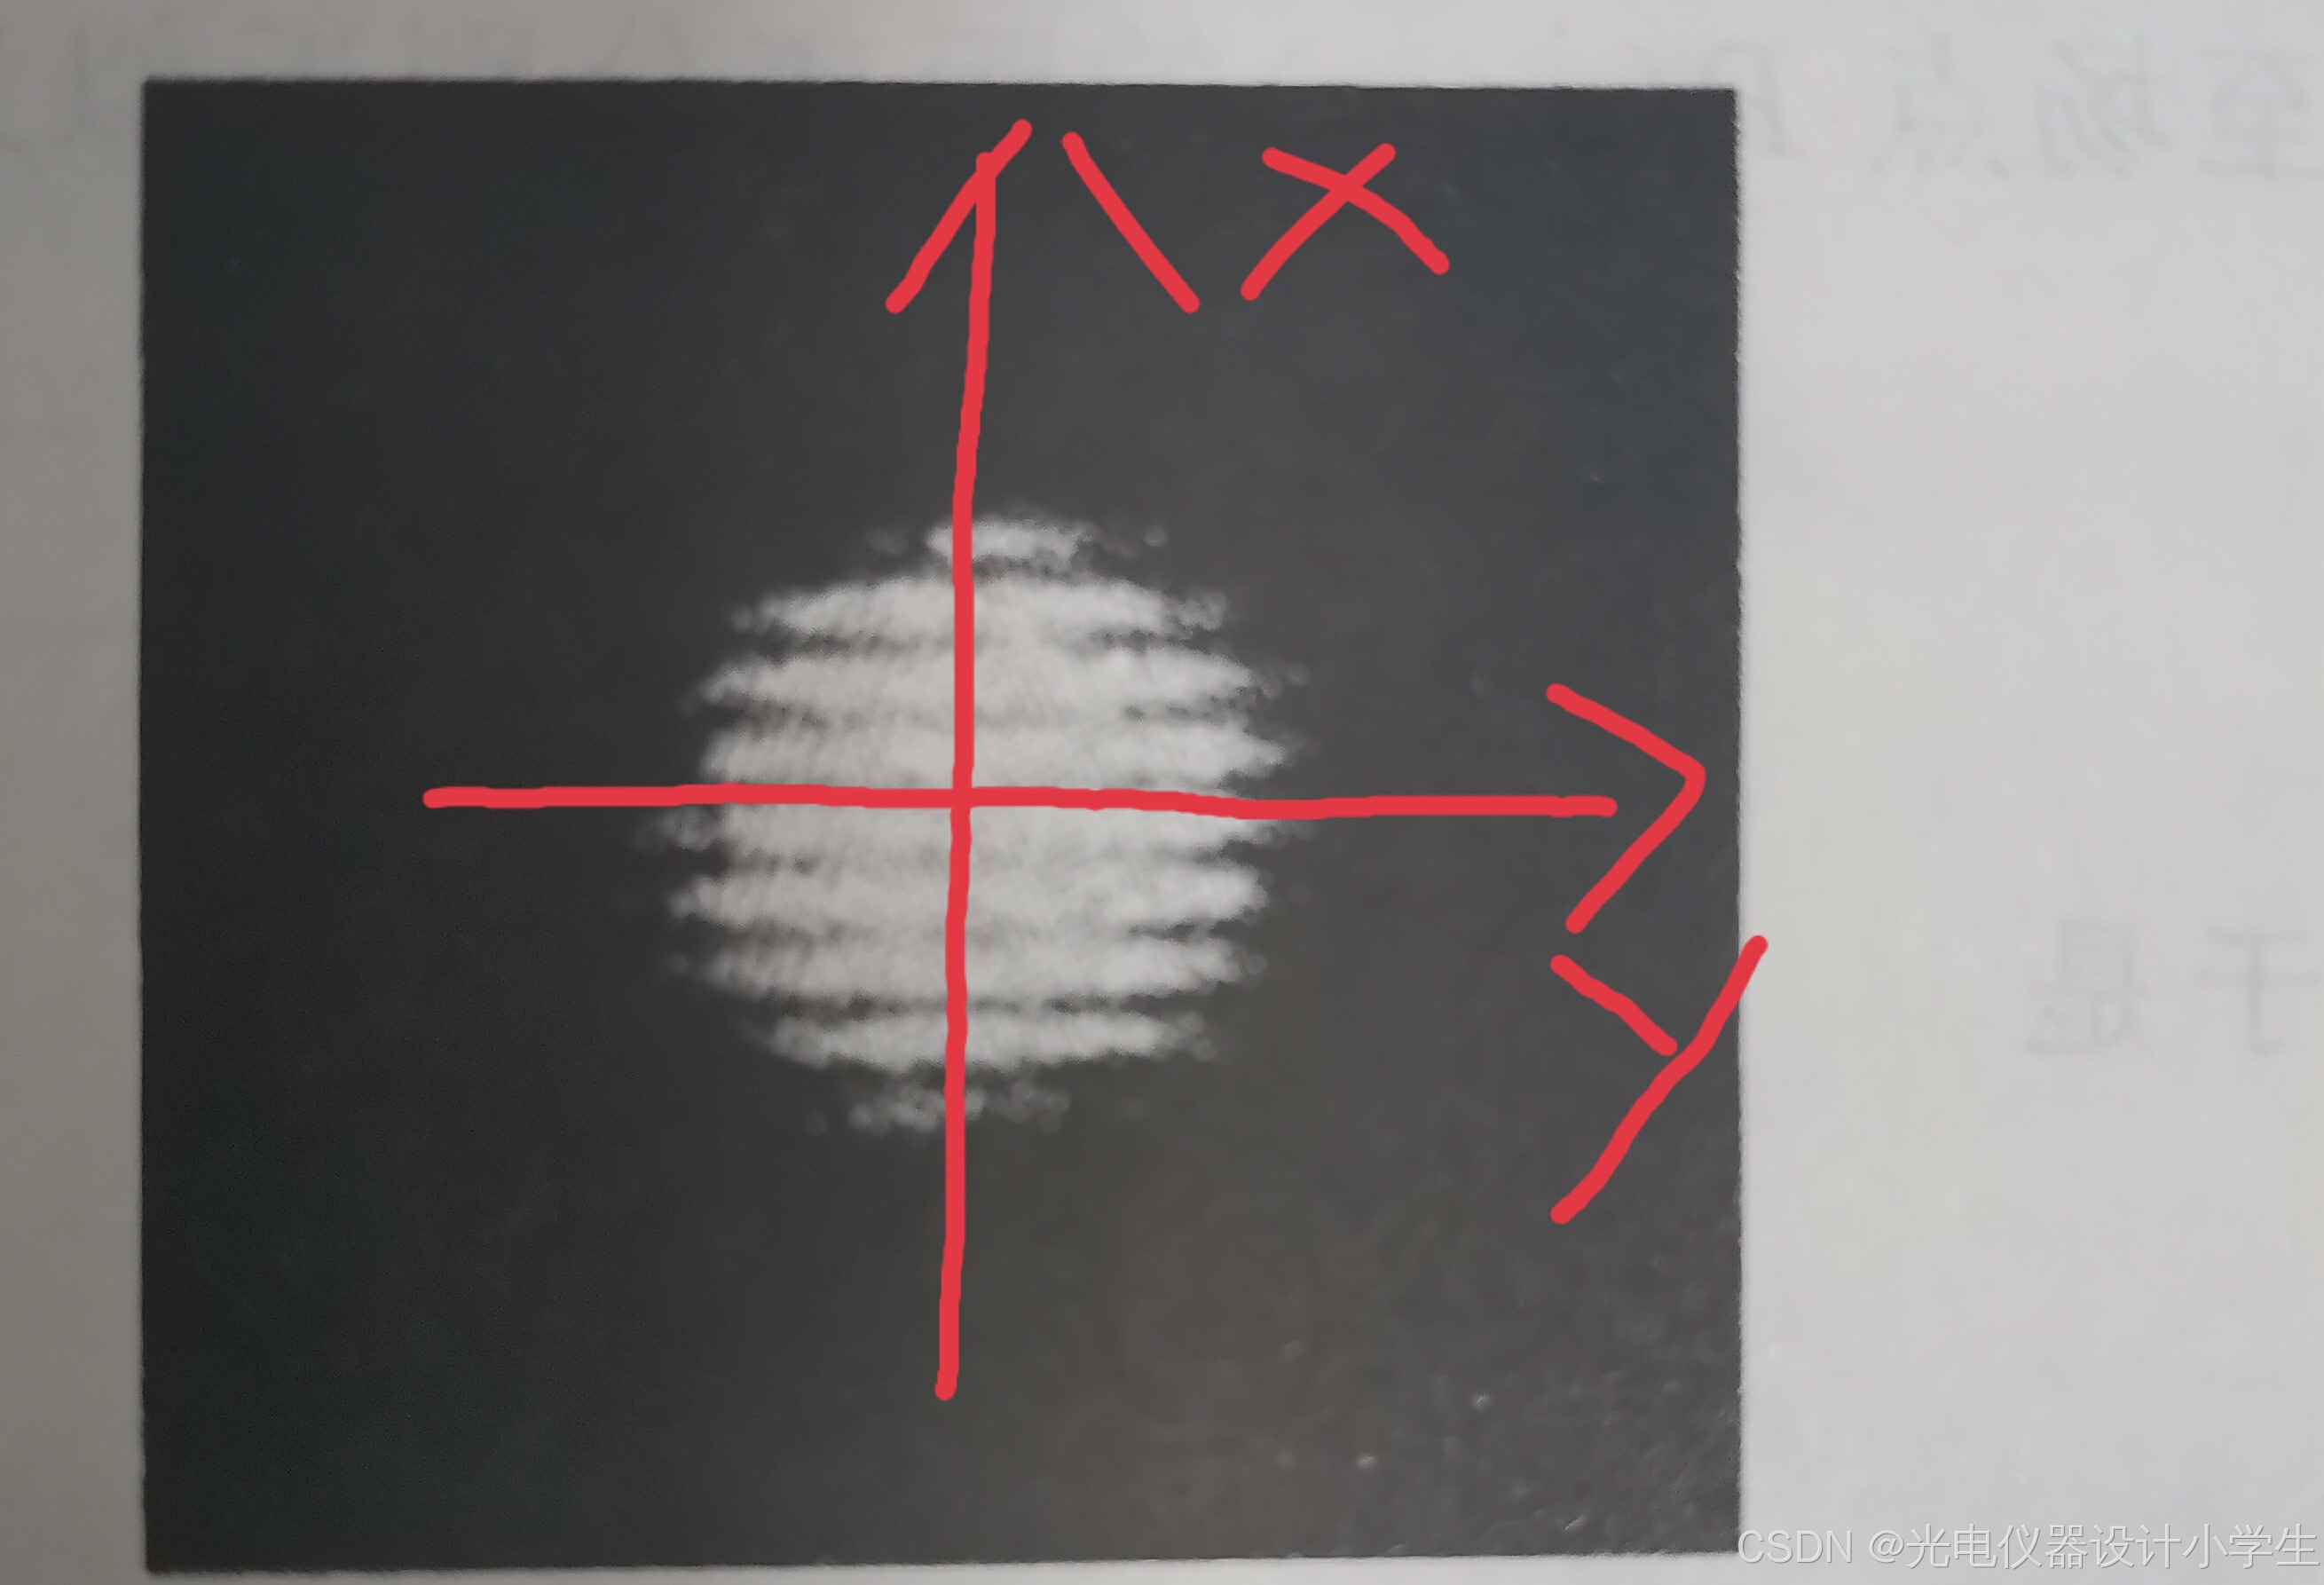
6.3杨氏双孔干涉实验
1)先欣赏一下杨氏双孔干涉实验,看它是如何消除相位随机高频变化带来的不稳定。实际是排除了自发辐射,用一束来自自发辐射的球面波Q,得到两束球面波Q1、Q2。
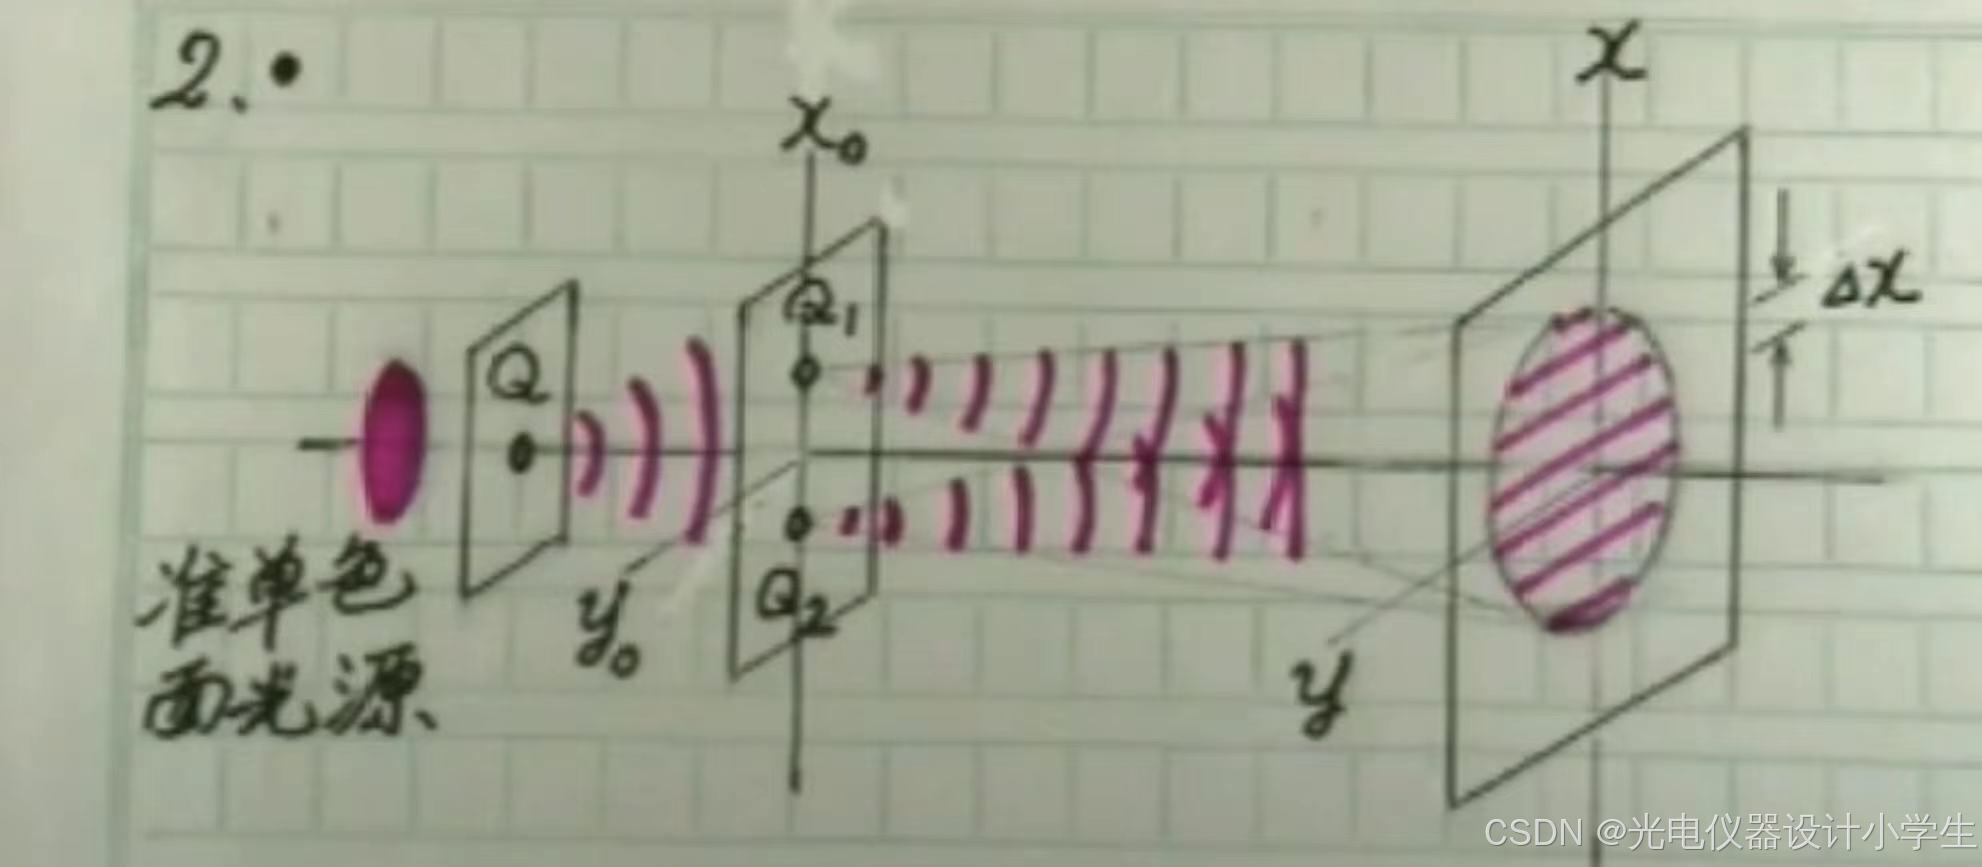
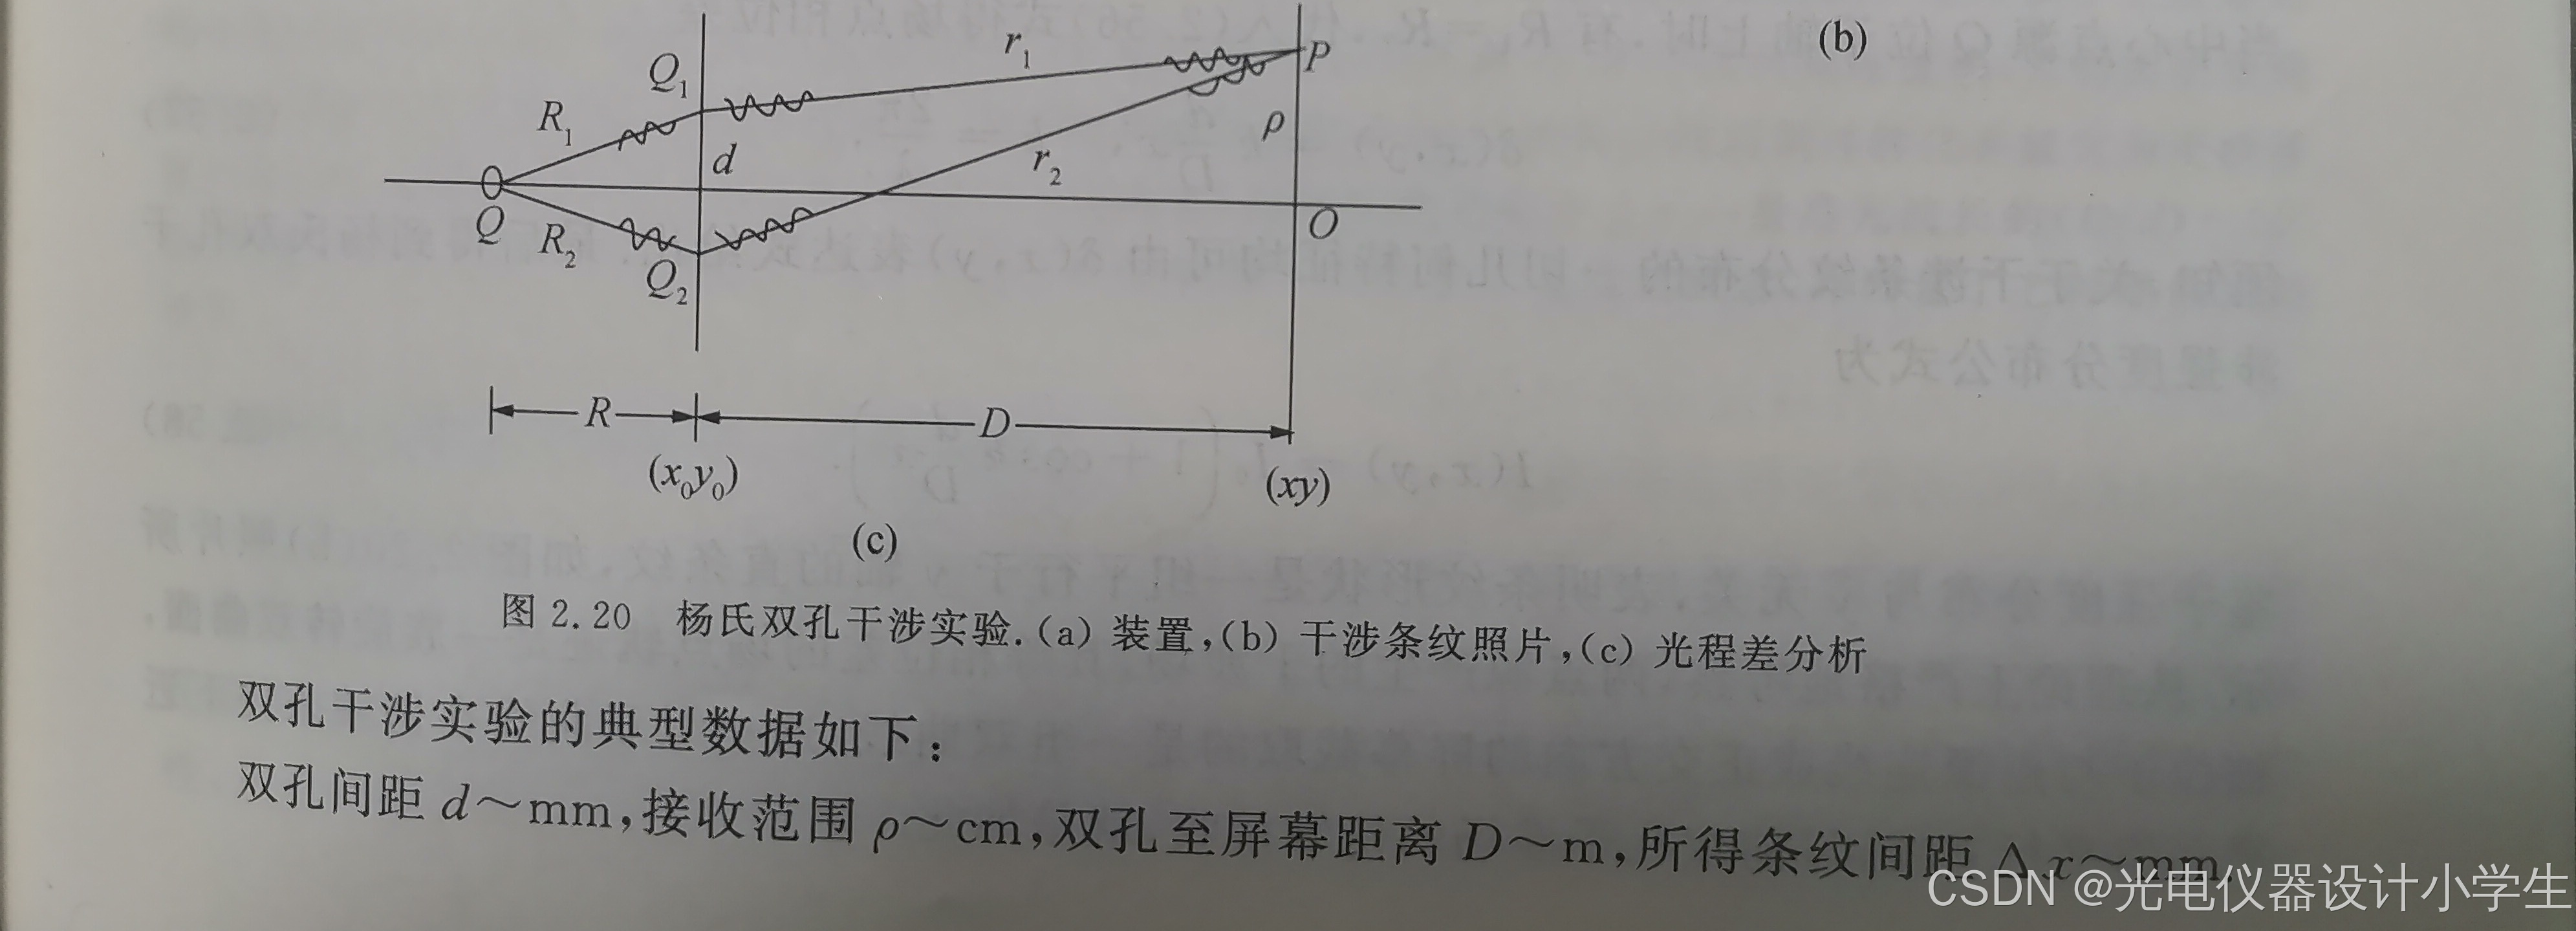
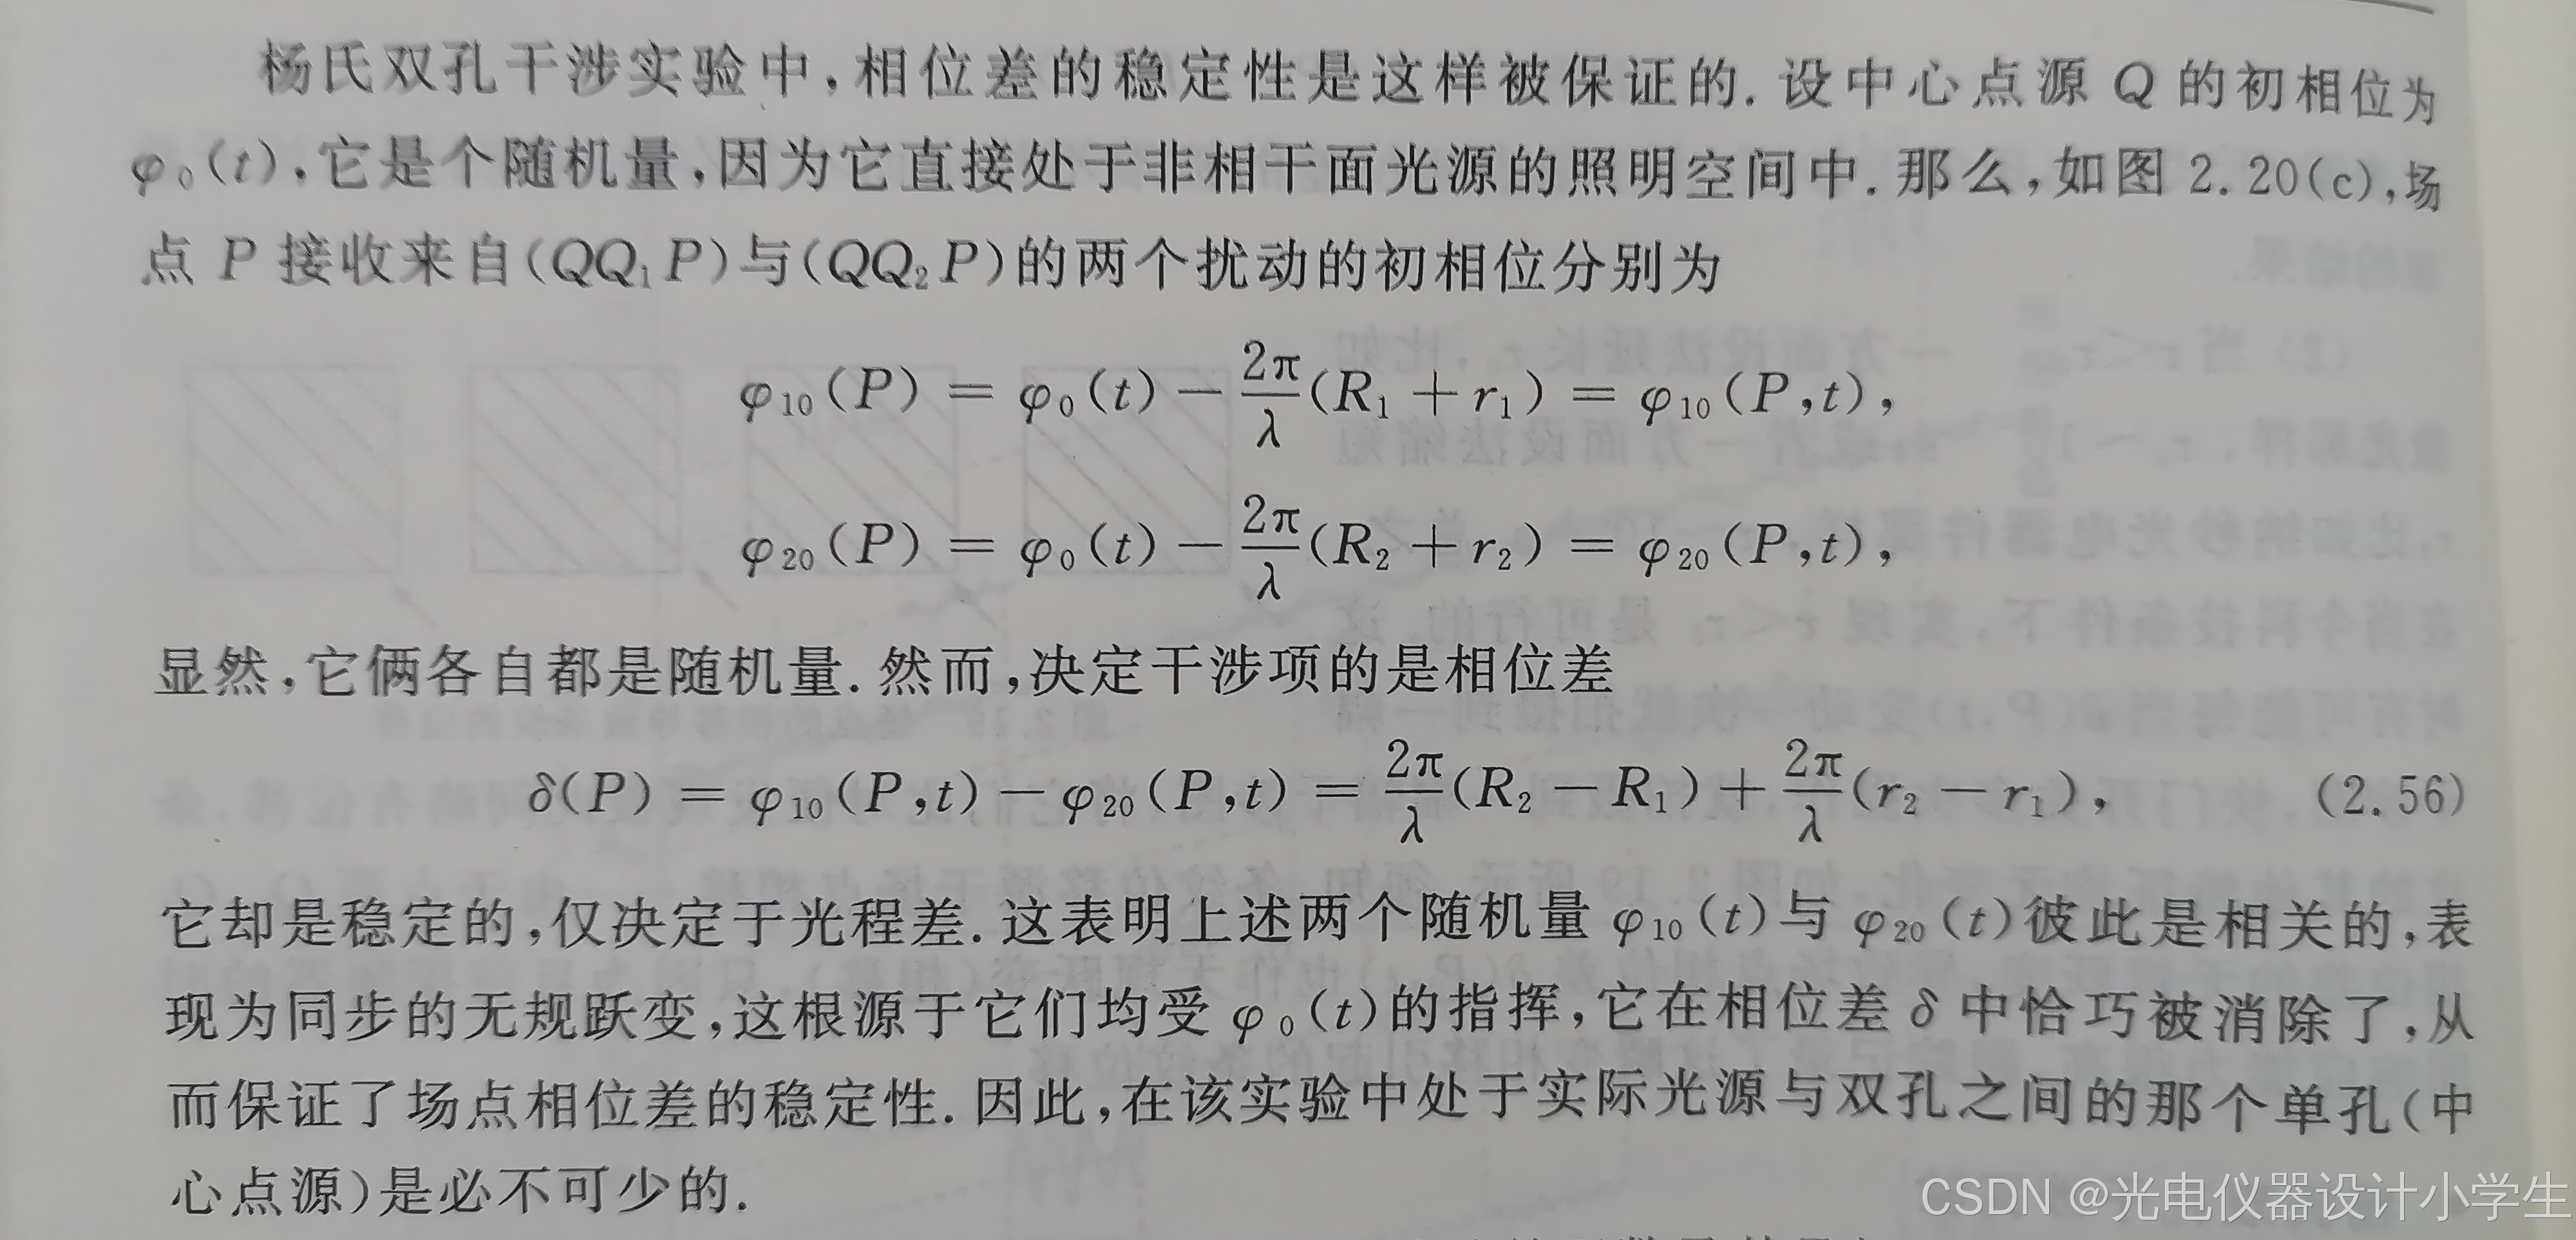
2)接着我们研究杨氏双孔干涉实验得到的条纹。即得到圆形的一个面(x,y)上各个点的光强。
a、我们对光强的观察周期为T,在周期T内光强大小(I),与用周期T内振幅(A)的平方的积分除以周期T的值成正比。
b、我们常常选择定态波,作为我们的研究对象,其特点:频率单一、振幅稳定。所以定态波每个周期T内振幅(A)的平方的积分也是稳定的。
c、衬比度可以用振幅表示,振幅可以表示光强,所以进过代换衬比度可以表示光强。

下图为干涉条纹照片。我们根据光强分布I(x,y),可以知道光强分布的大小的周期是2π。每隔2π取一次最大值或最小值。
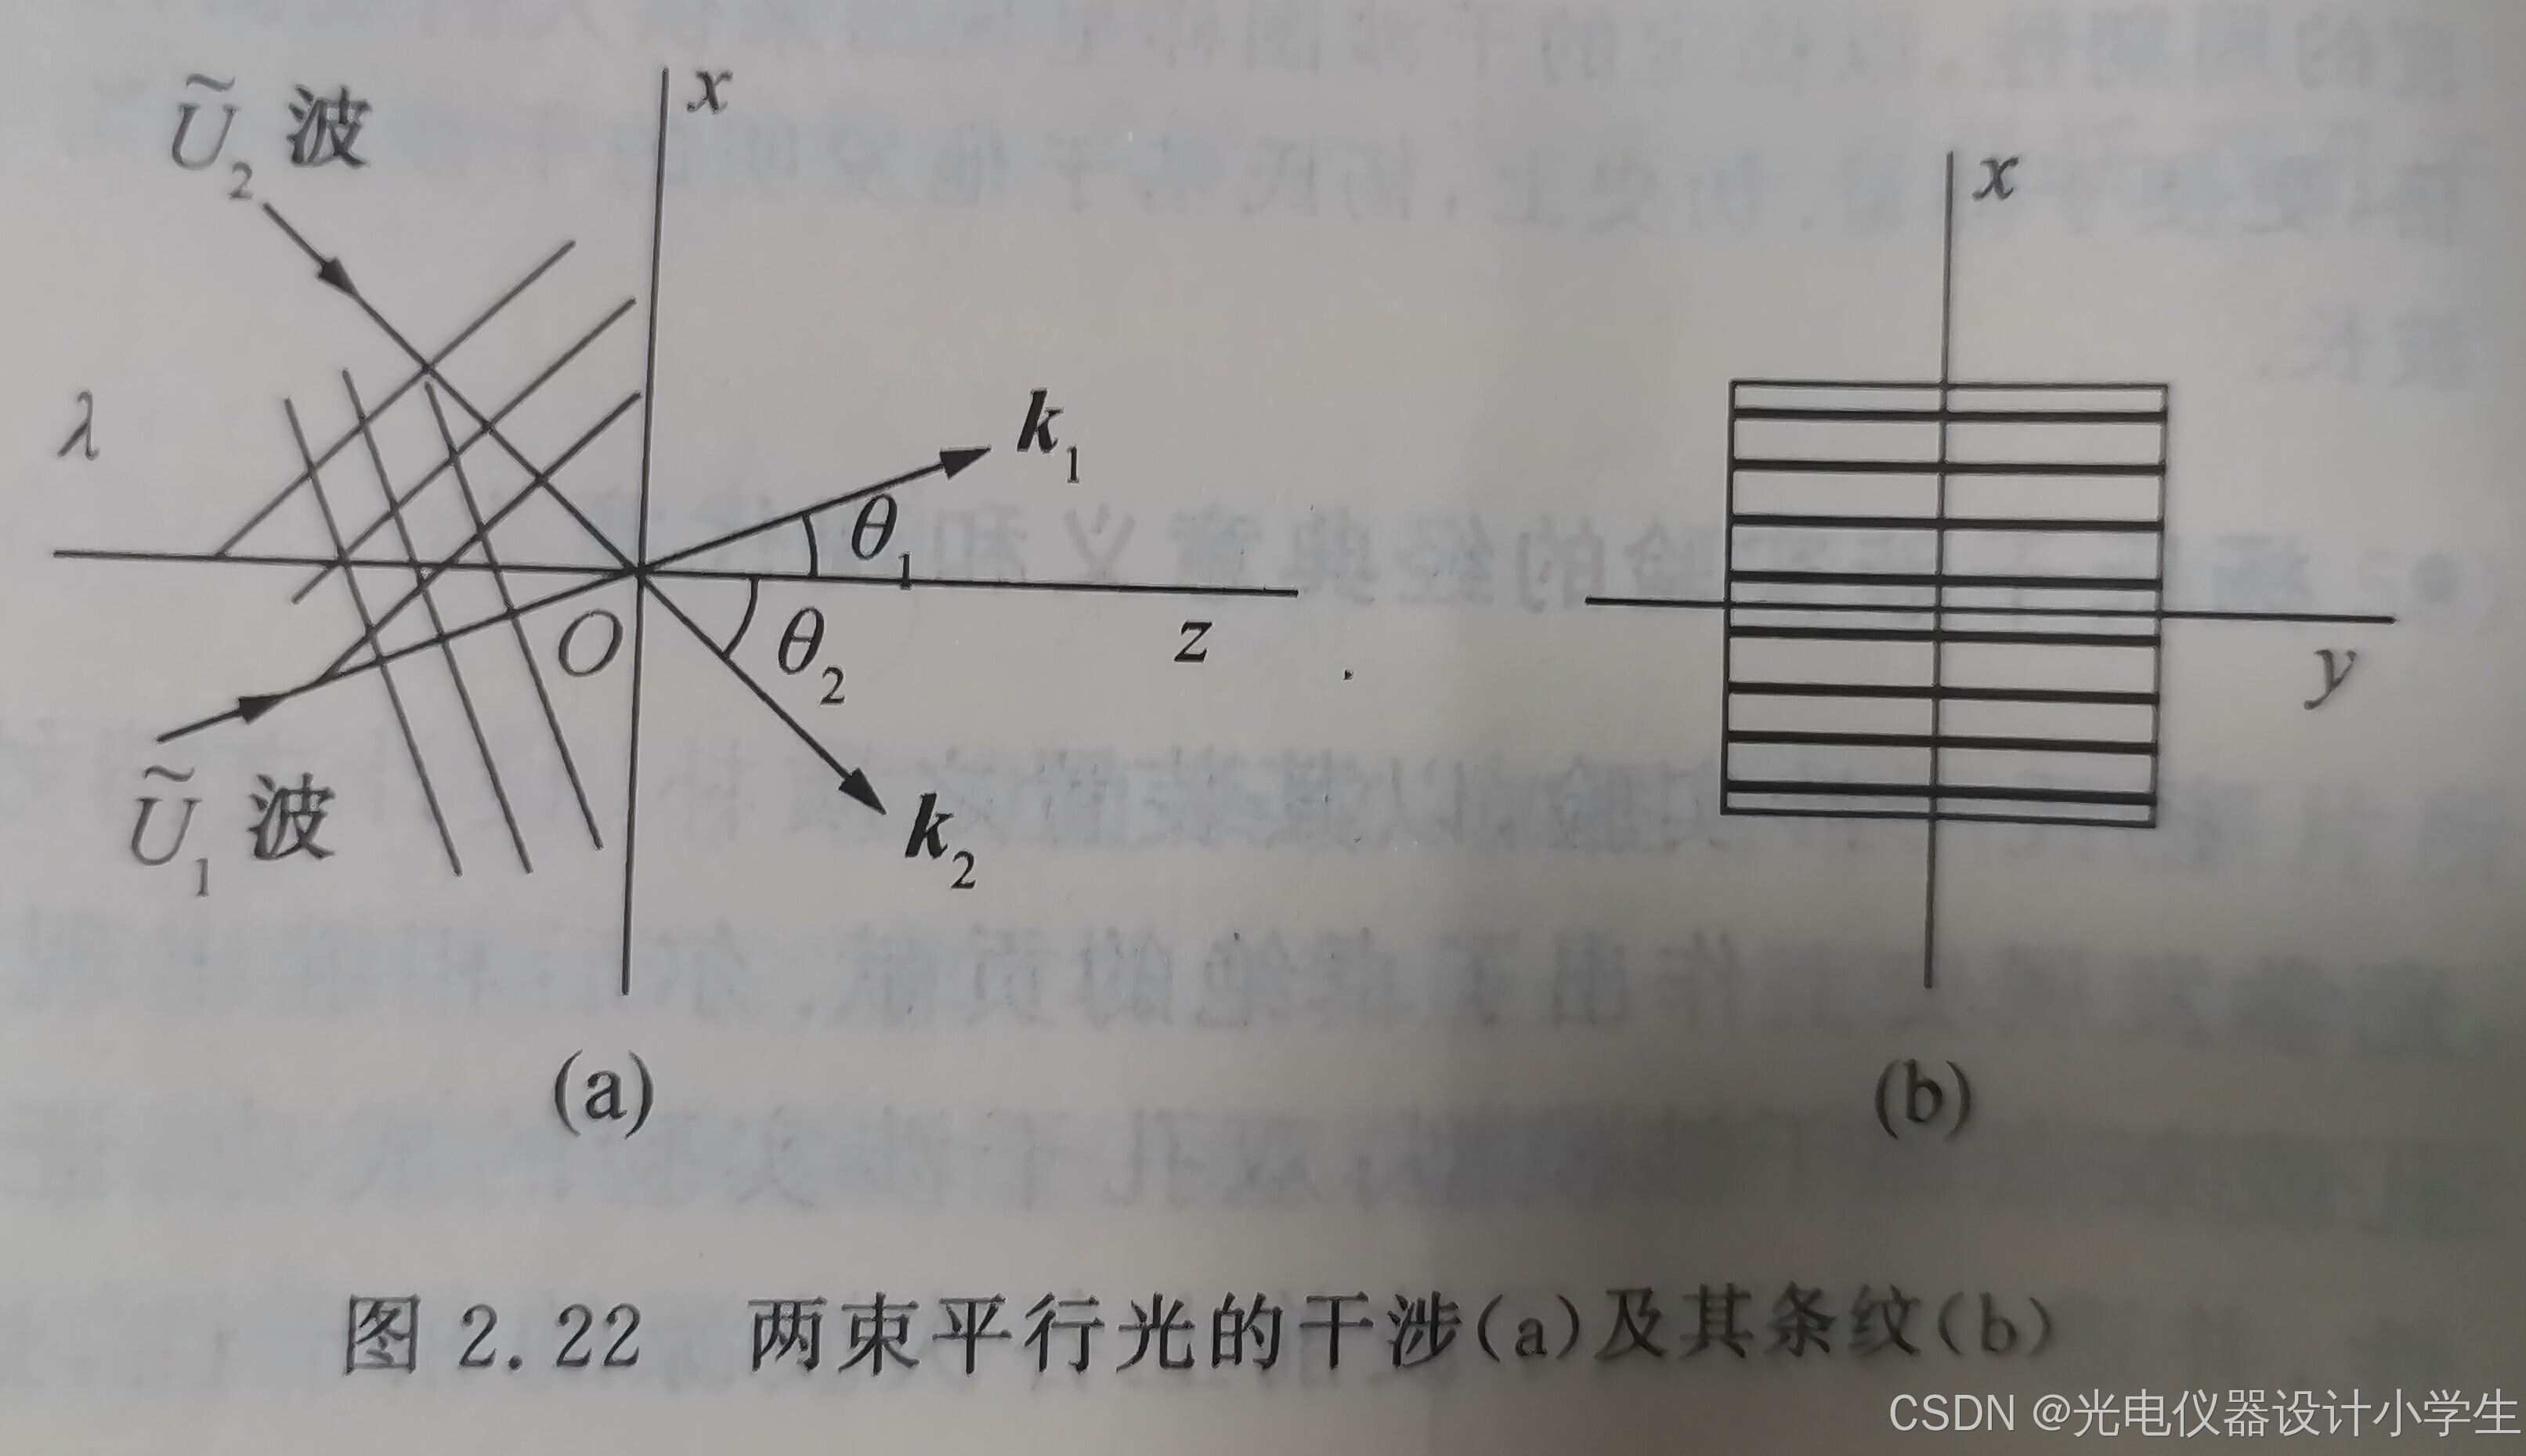
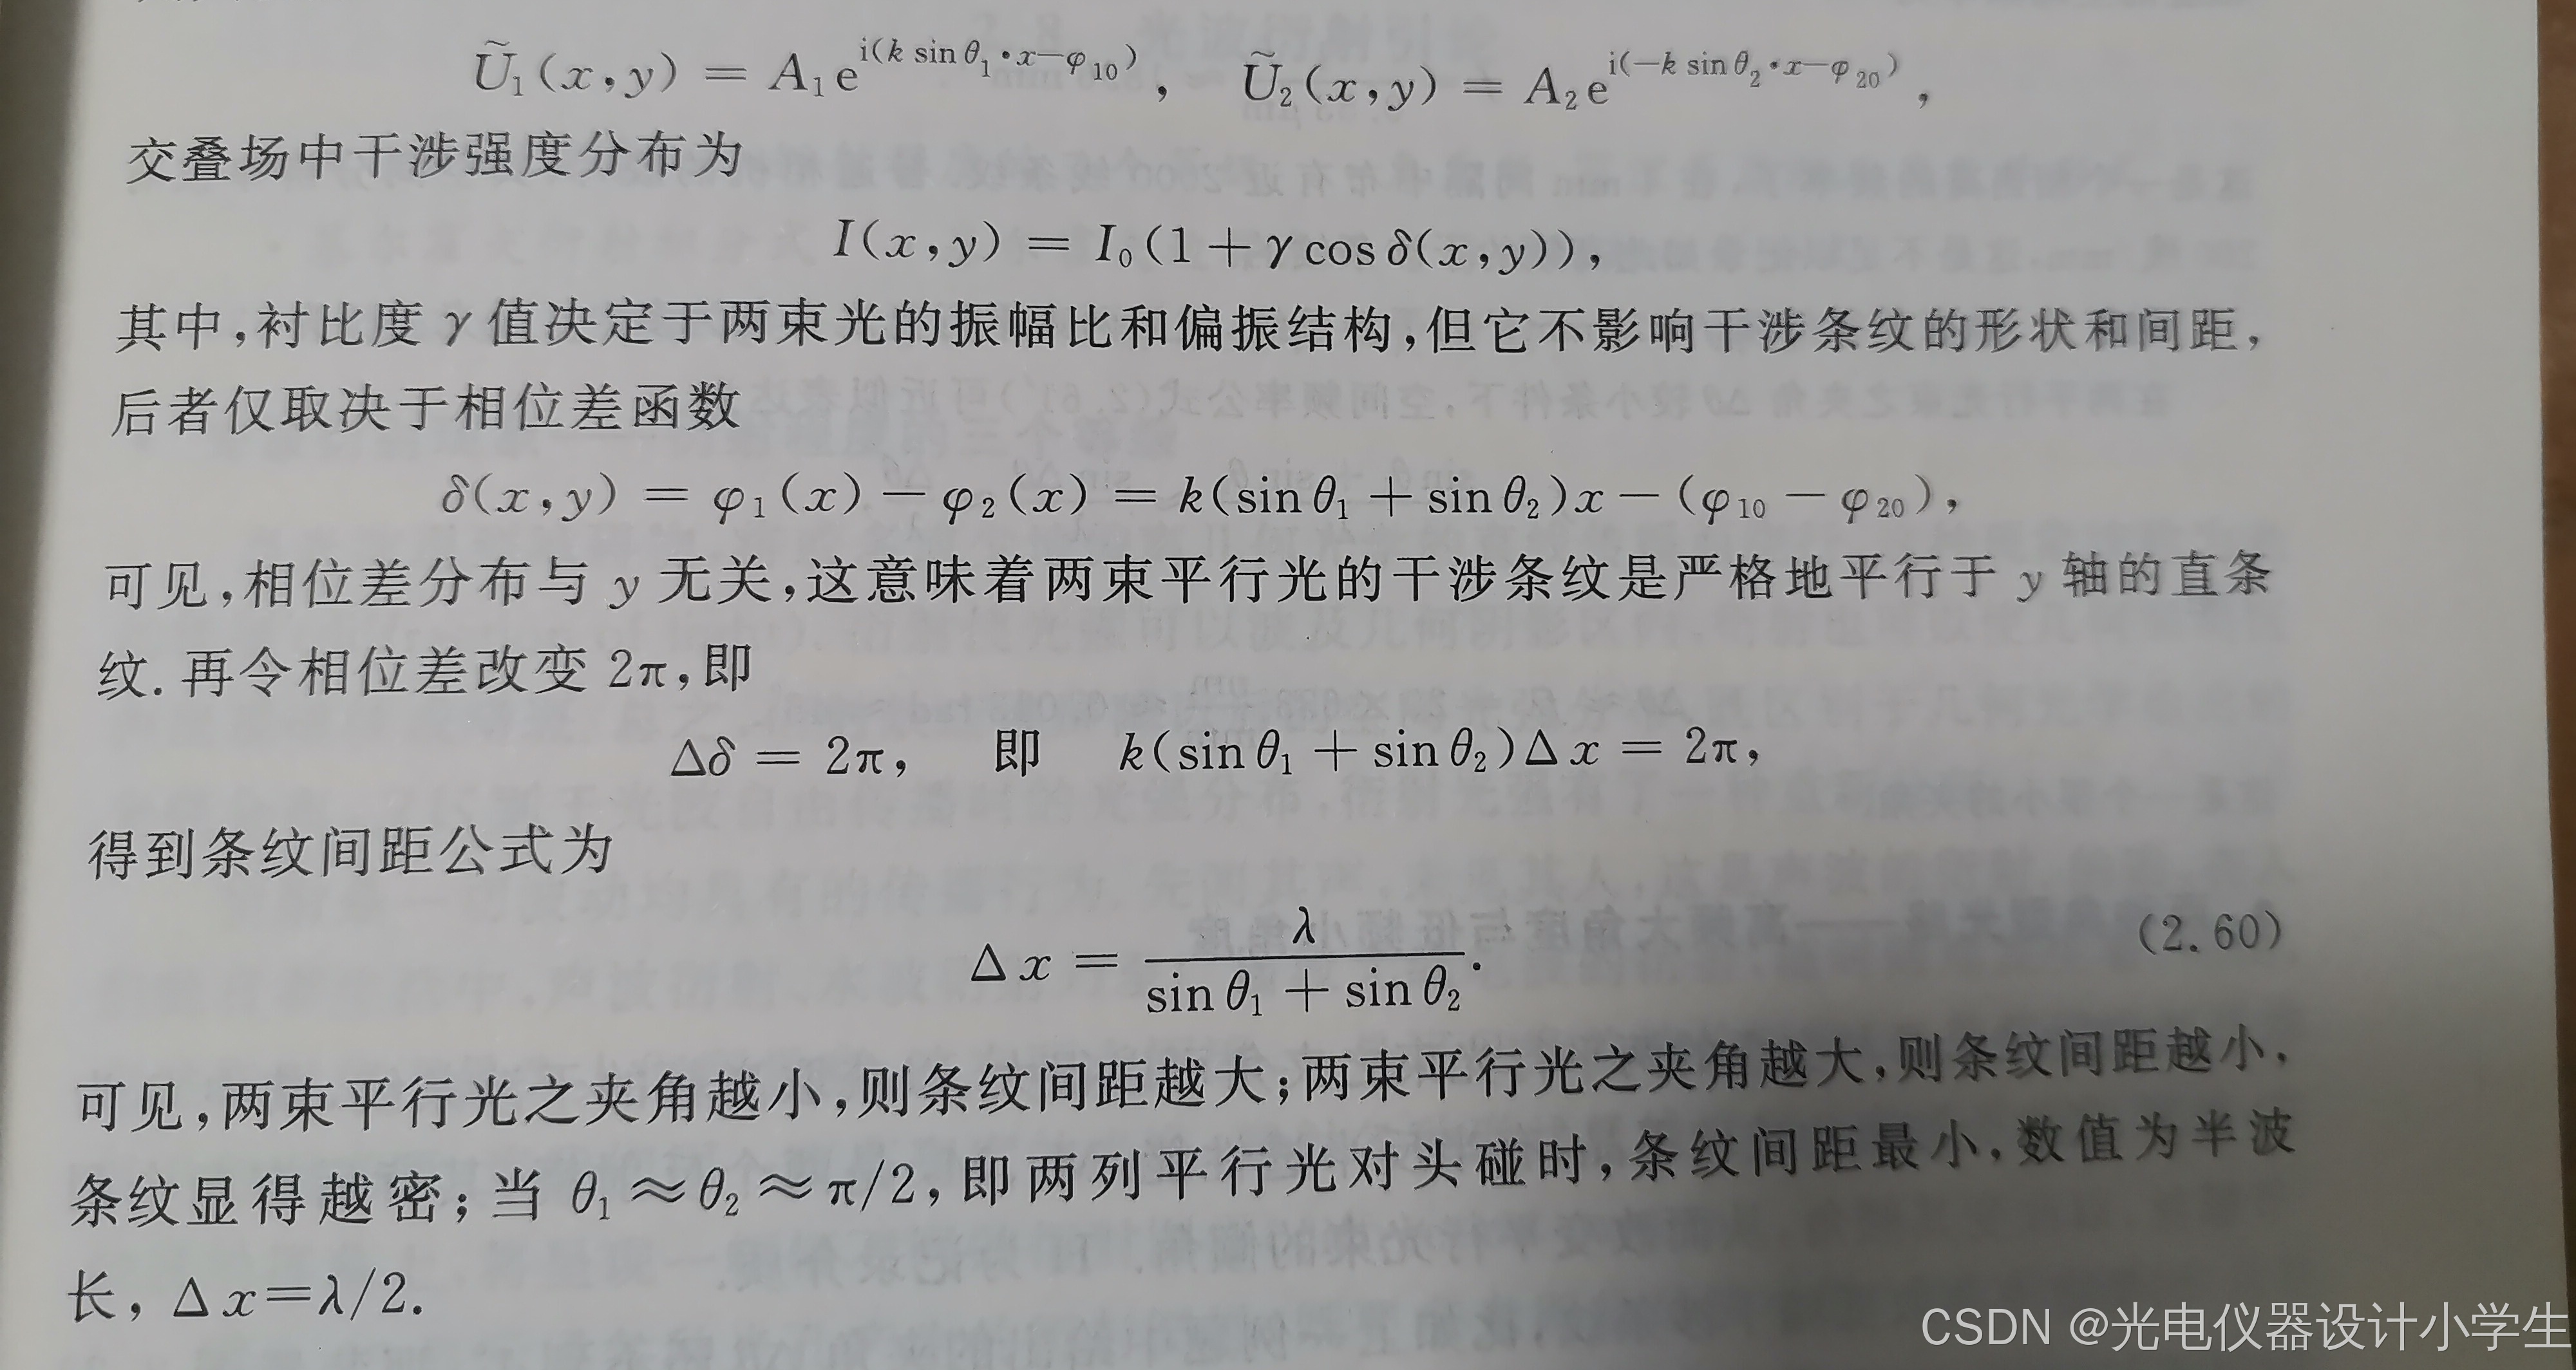
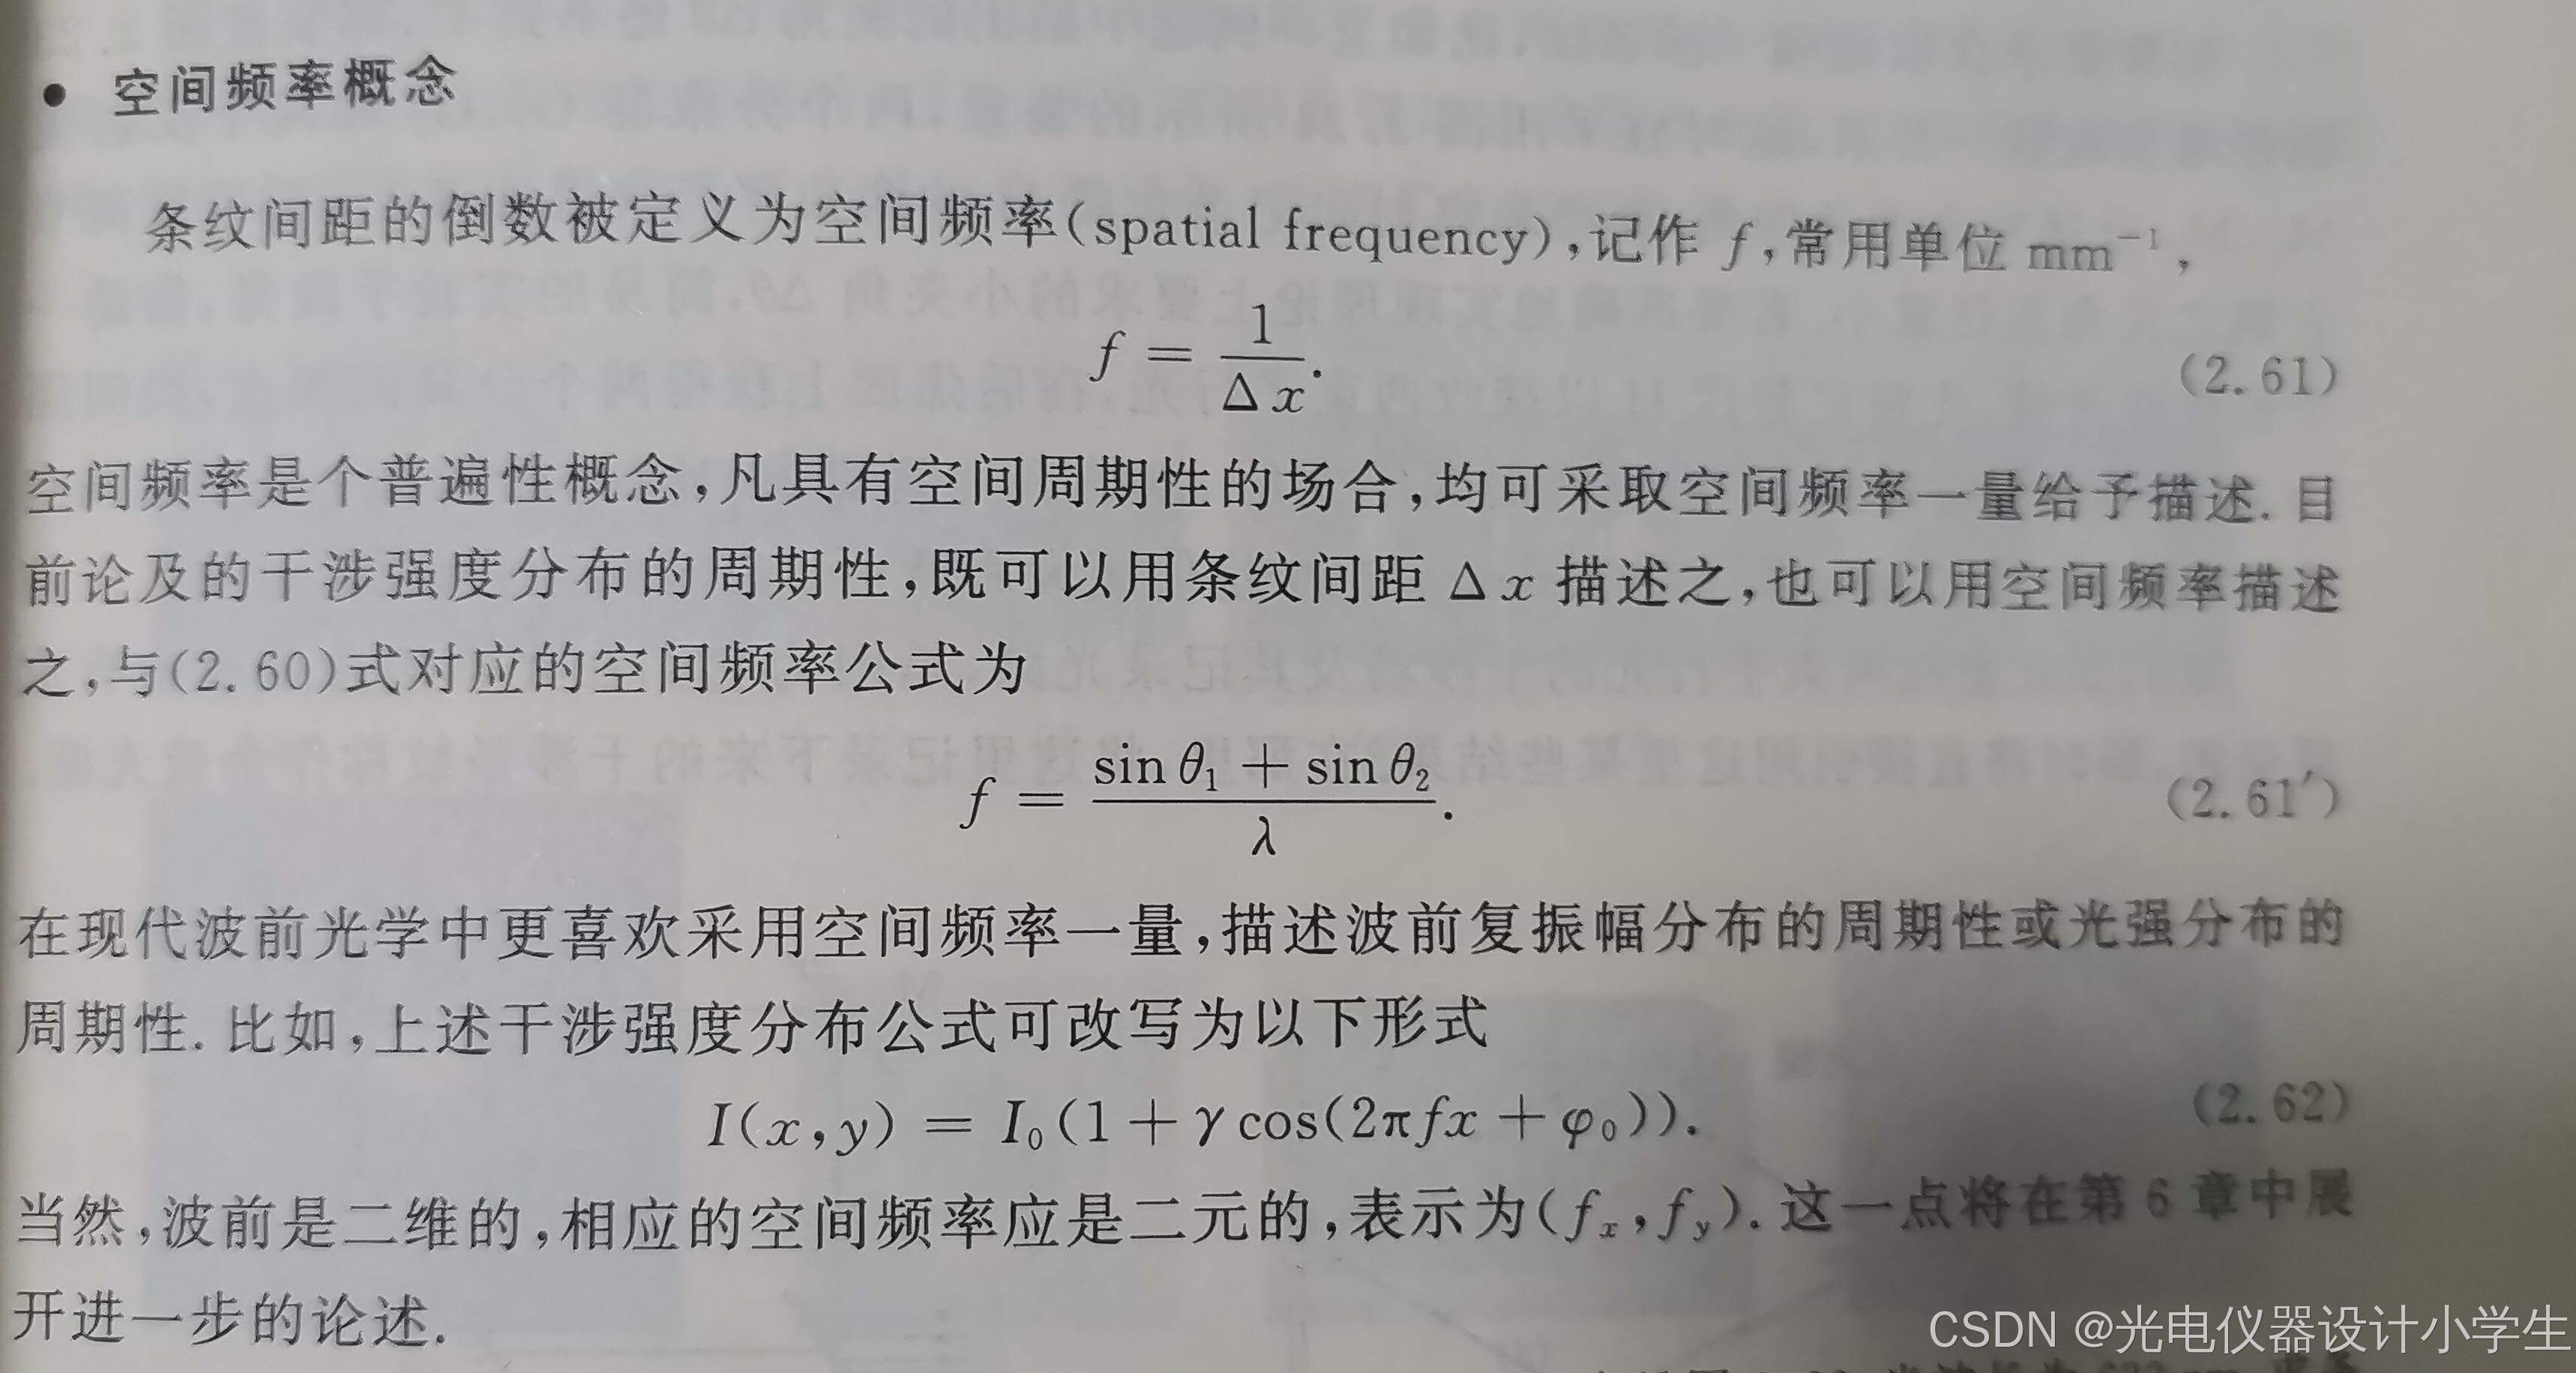
6.4两束平行光的干涉场
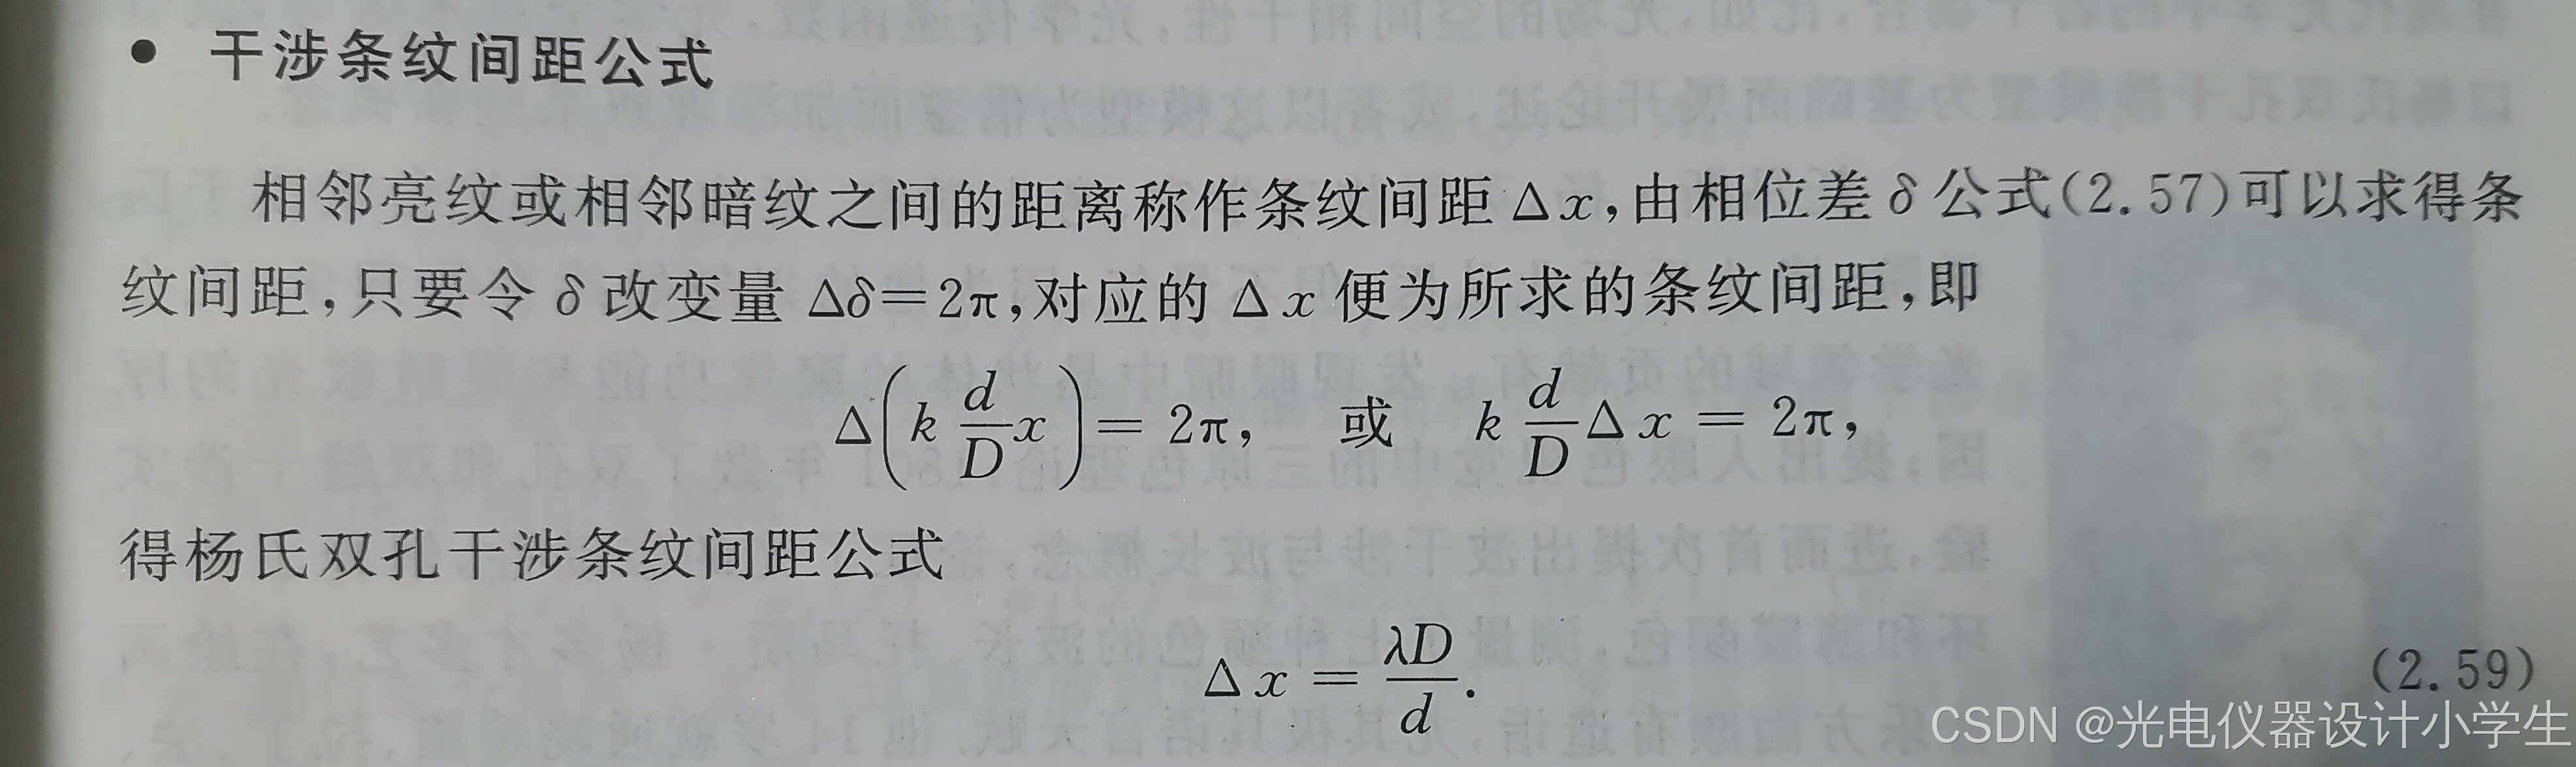
1)干涉条纹间距公式
2)空间频率的概念
7光波衍射引论
7.1什么是衍射
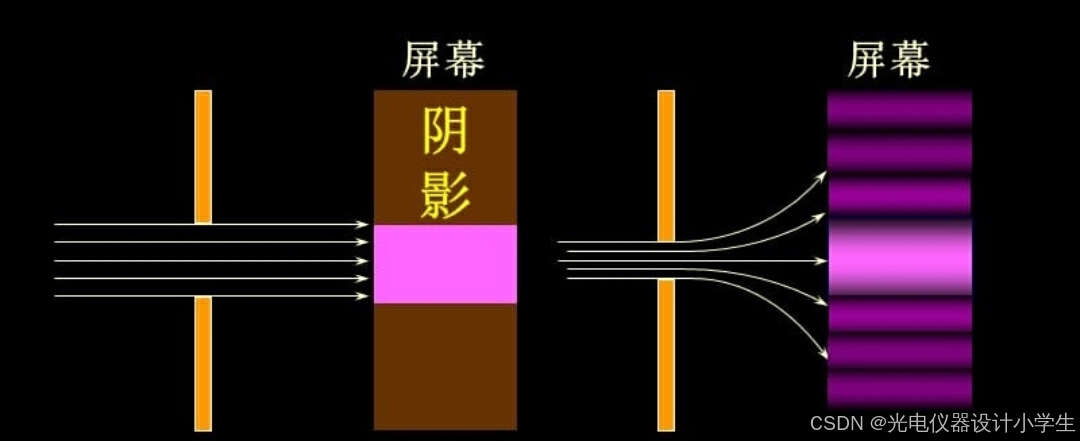
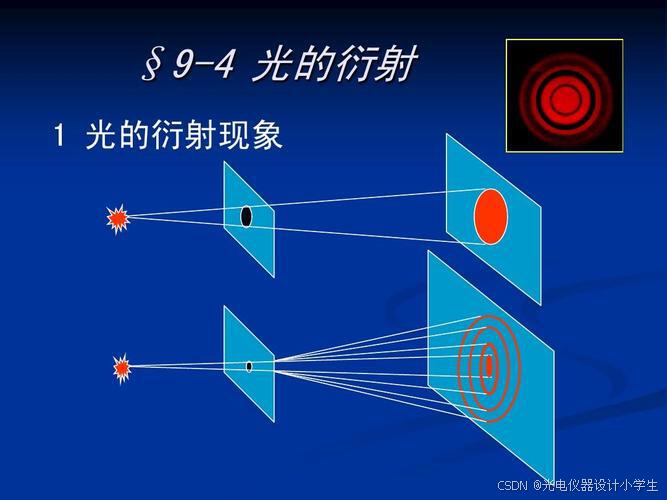
1)衍射是波在传播过程中遇到障碍物或小孔时,偏离原来直线传播路径,以达到绕过障碍物或绕小孔继续传播,最终会形成复杂的图样。
2)当我们用高亮度的光束,照射到很小的开孔上或照射到障碍物上,在较远的屏幕上,将会呈现衍射图样。
3)改变开孔或障碍物的形状,可以得到不同的衍射图样。
4)弗朗西斯科·格里马第于1665年以拉丁语词汇diffringere描述“衍射”,diffringere意为“成为碎片”,即波原来的传播方向被“打碎”、弯散至不同的方向。
5)衍射角又称绕射角。衍射角是指光线发生衍射时,光路改变的夹角。
6)光孔线度与光波长入之比是一个敏感因素,它直接决定着衍射效应的强弱程度。
ρ为孔的直径大小。
大致可分为三个等级:
a、ρ>10^3入,衍射效应很弱,衍射现象很不明显,光近乎直线传播。
b、10^3入>ρ>入,衍射现象显著,出现了与光孔形状对应的衍射图样。
c、ρ ≤入,衍射效应过于强烈,衍射现象过于明显,向散射过渡。
7)若孔不是圆形,而是一个多边形,则可以发现波具有顽强的反限制的行为特征。即越窄的地方,波衍射的越厉害。
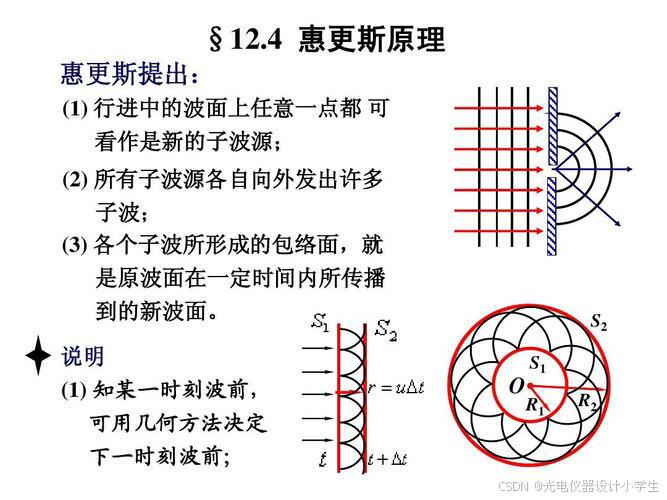
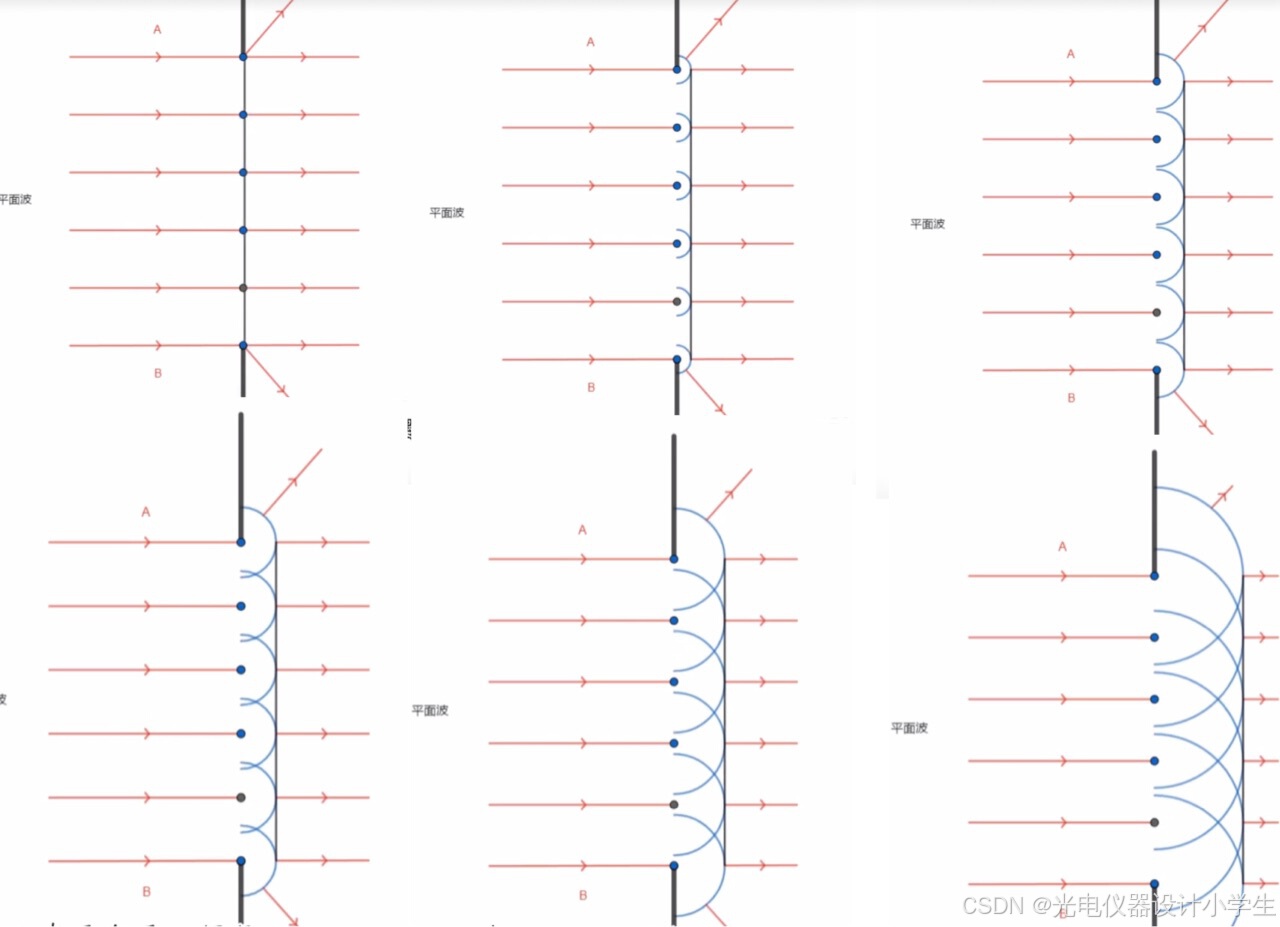
7.2惠更斯-菲涅耳原理
1)惠更斯-菲涅耳原理是第一个用于求解衍射场分布的理论。
2)广义波前概念:广义前人们将跑在波最前面的波面称为波前,广义后也将跑到接收波的装置的接收面,与接收装置发生相互作用的光扰动称为波前。
3)包络面是指波在传播过程中,同相位的点的几何轨迹形成的曲面。这些同相位的点组成的曲面称为波面,也称为包络面。在波的传播过程中,总可以找到同相位各点的几何位置,这些点的轨迹是一个等相位面,叫做波面(即包络面)。
4)波阵面是指波源发出的波在某一时刻所占据的空间区域。波阵面上的每一点都在以相同的速度传播,形成了一个连续的曲面。波阵面上的每一点都可以看作是一个子波源,这些子波源发出的子波在传播方向上最外围连成的面就是新的波阵面。
5)次级波源意思是指下一级波的波源,如果下一级波,是下一时刻的波,此时次级波源就是下一时刻的波的波源。
6)惠更斯原理:一个波阵面上的每个点,都可以看做是一个中心波源,中心波源是可以产生球面子波的次级球面波,次级波源的波速与频率等于初级波的波速与频率;而且,以后任何时刻波阵面的位置是所有这种子波的包络面。
7)计算数学:在计算数学中,通过将曲面分解成许多小的平面单元,可以对曲面进行更细致的分析和计算,这些平面单元被称作面元。
8)惠更斯-菲涅耳原理的文字描述:波前的每个面元可以看为次波源,它们向四周发射次波;波场中任一场点的扰动,是所有次波源贡献的次级扰动的相干叠加。
9)几何上,曲面二重积分∬Df(x,y)dσ是以积分区域 ( D ) 为底,积分区域是Z轴为零平面上的一个闭合面,曲面( z ,f(x,y) )为顶,得到的曲顶柱体的体积,也可以表示为∯Df(x,y)dσ。
10)惠更斯-菲涅耳原理的数学描述:
如果波阵面上的所以的点为P(x,y),则任意一个点产生的次级球面波为U(P(x,y)),所以所有次波源贡献的次级扰动的相干叠加为∯DU(P(x,y))dσ。
11)我们现在研究一下波阵面上任意一个点,产生的次级球面波U(P(x,y))。看看它的大小受哪些因素的影响:
a、因为微小的面元上的所有点,到达某个点的光程差几乎为零,所以U(P(x,y))大小正比于面元面积。
b、因为球面波的复振幅U( p )=a1/r·e^ i•K•r,所以U(P(x,y))大小正比于a1/r·e^ i•K•r。
c、因为因为面元到某点的直线路径与面元波失的夹角影响很大,所以考虑一个倾斜因子f(θ0,θ)。
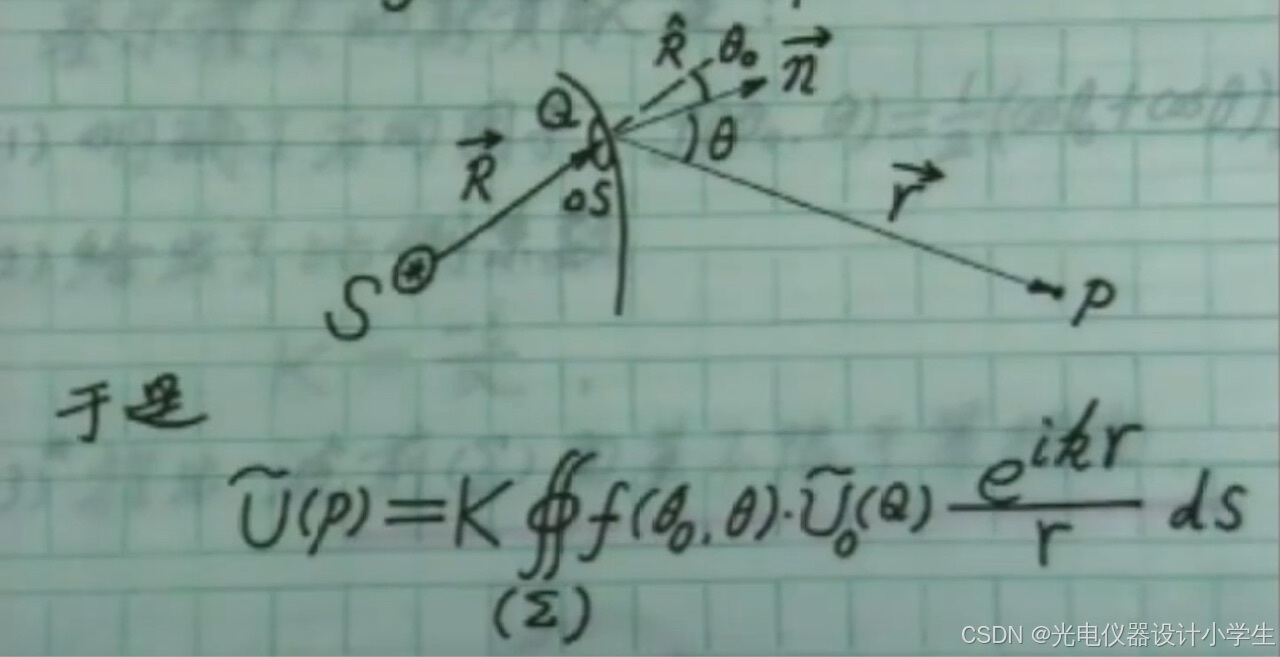
d、基尔霍夫确定了倾斜因子f(θ0,θ)=1/2(cosθ0+sinθ),比例系数K=-i/入。
7.3衍射问题即有障碍物时波如何传播
1)根据波场中任一场点的扰动,是所有次波源贡献的次级扰动的相干叠加,怎么求解衍射场分布。
2)次波源贡献的次级扰动是球面波。因为我们已经知道球面波扰动光强,即振幅与波源的强度成正比,与传播的距离成反比,但在距波源距离r相同的球面上,振幅仍然均匀相等,所以单个次级扰动我们已经可以量化。
3)但问题在于如何确定有哪些次波扰动?根据惠更斯-菲涅耳原理,我们知道积分面是波前面元。
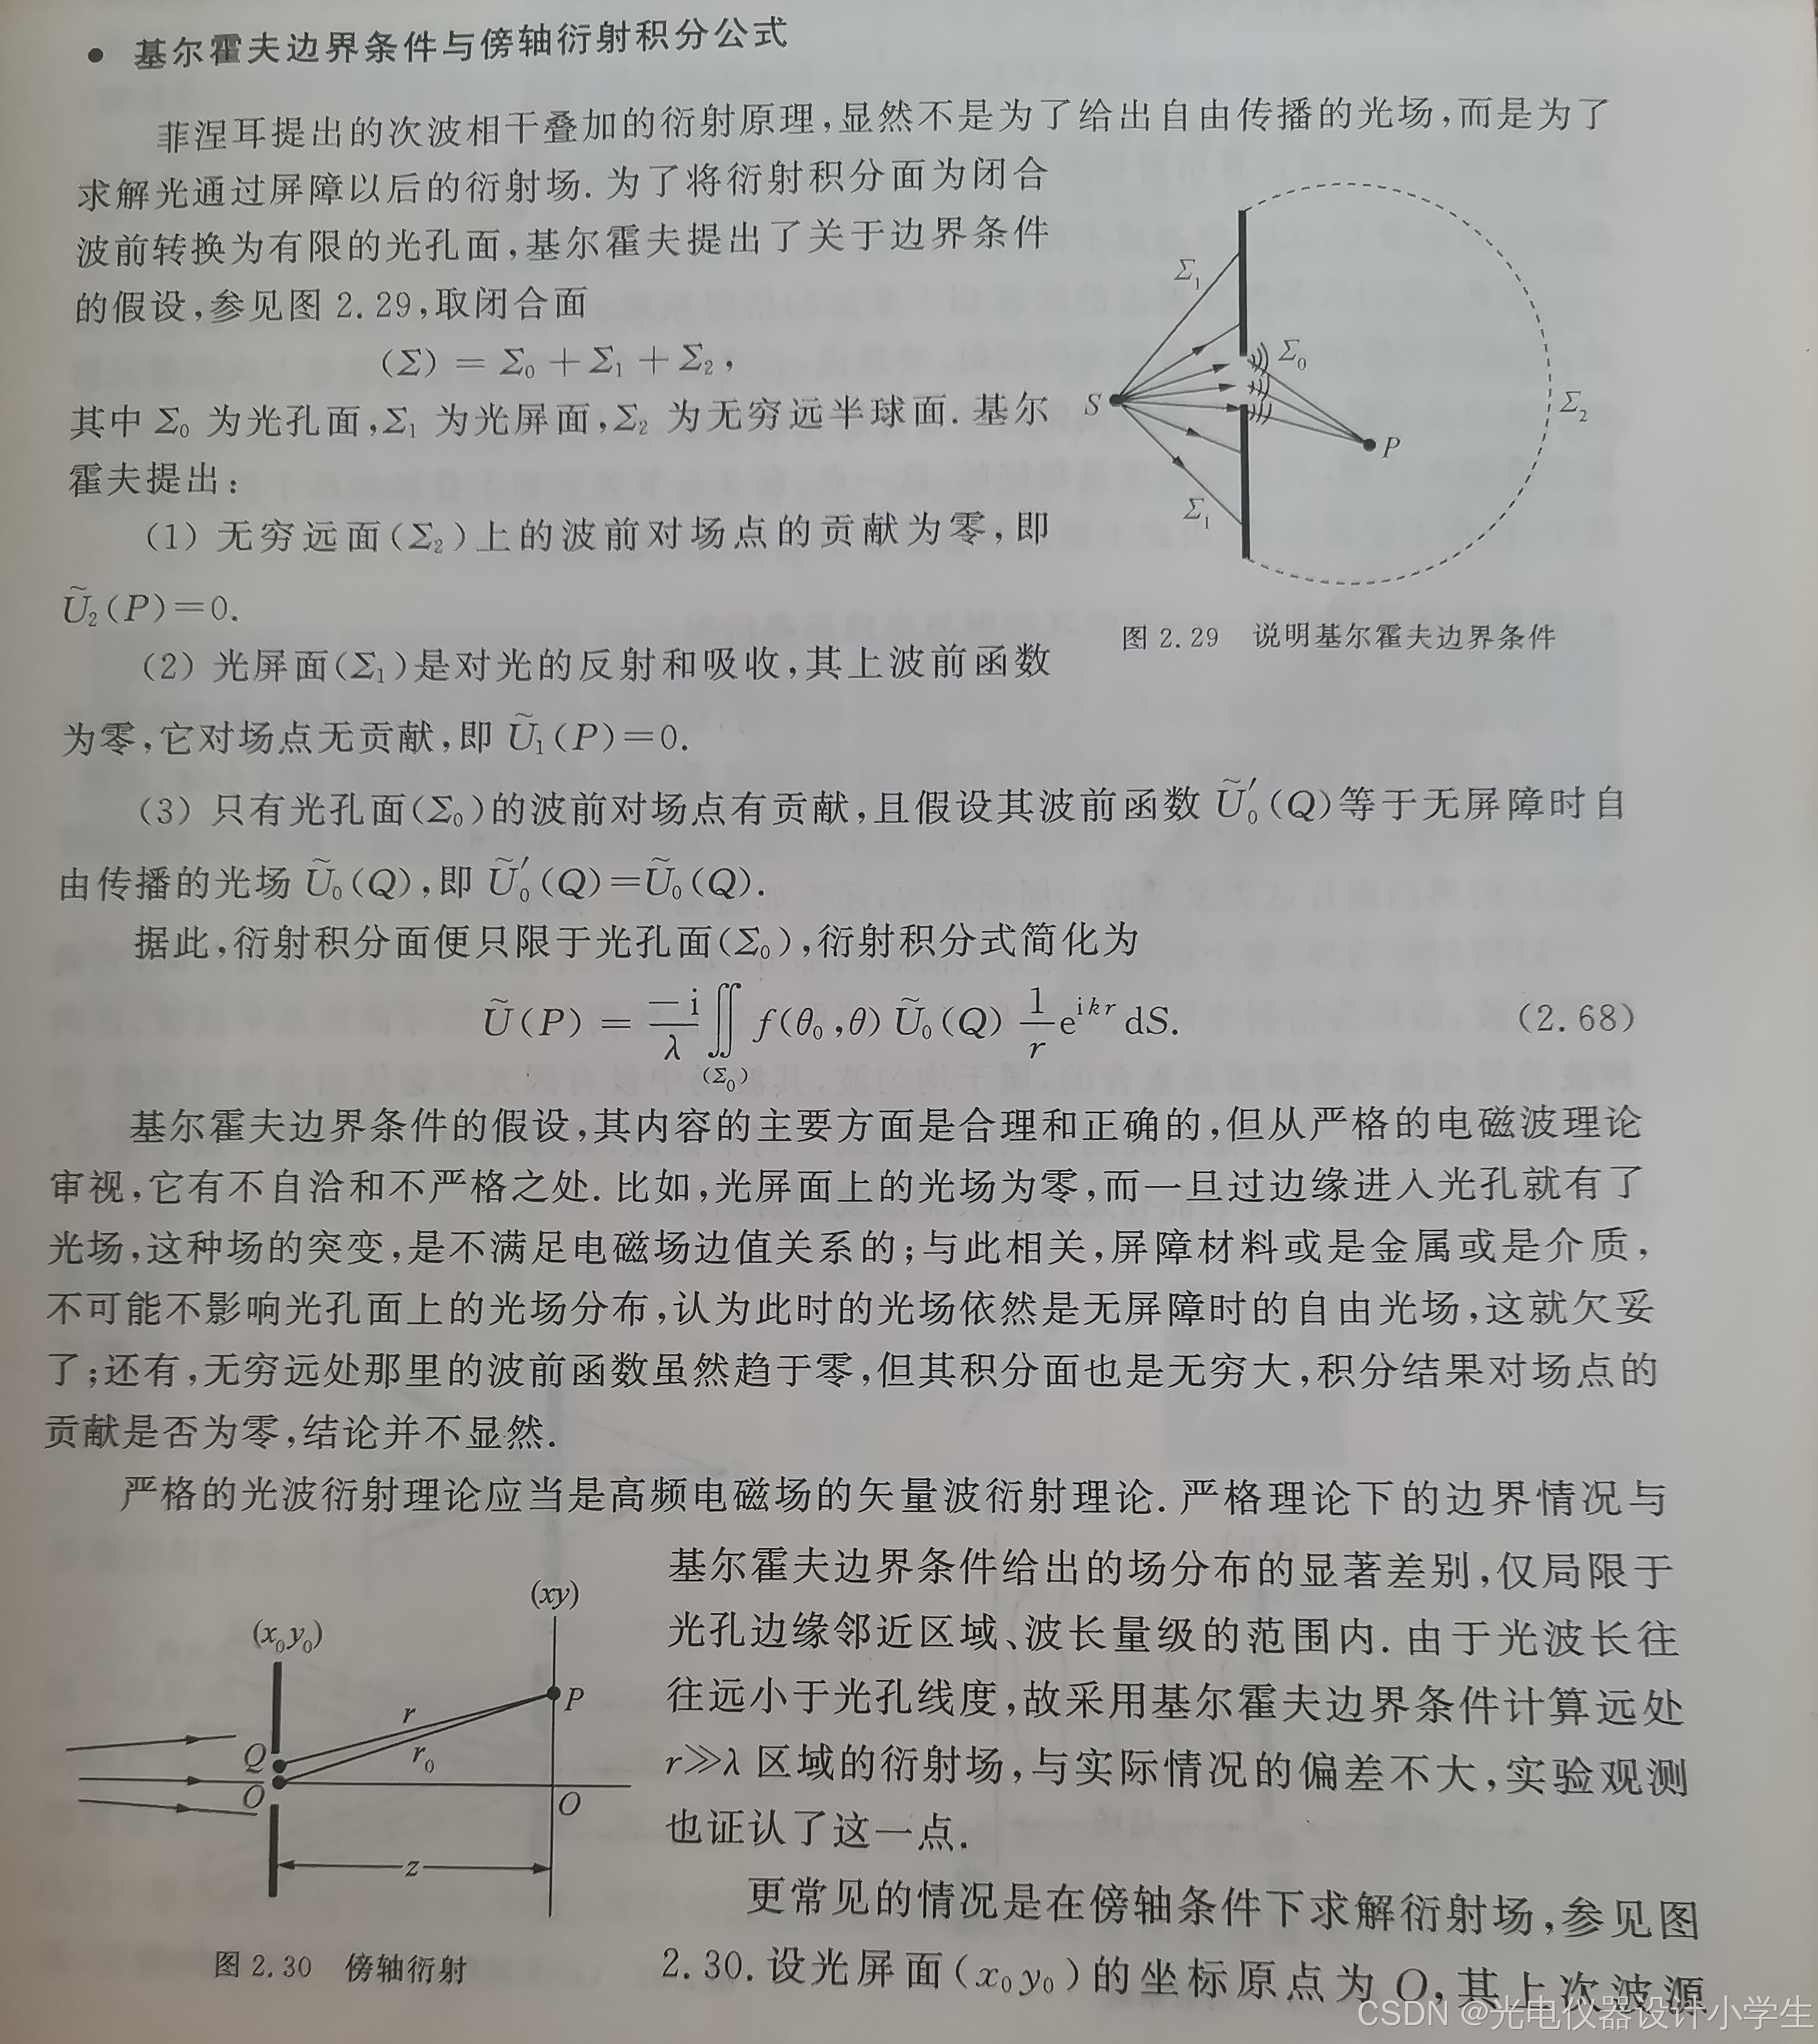
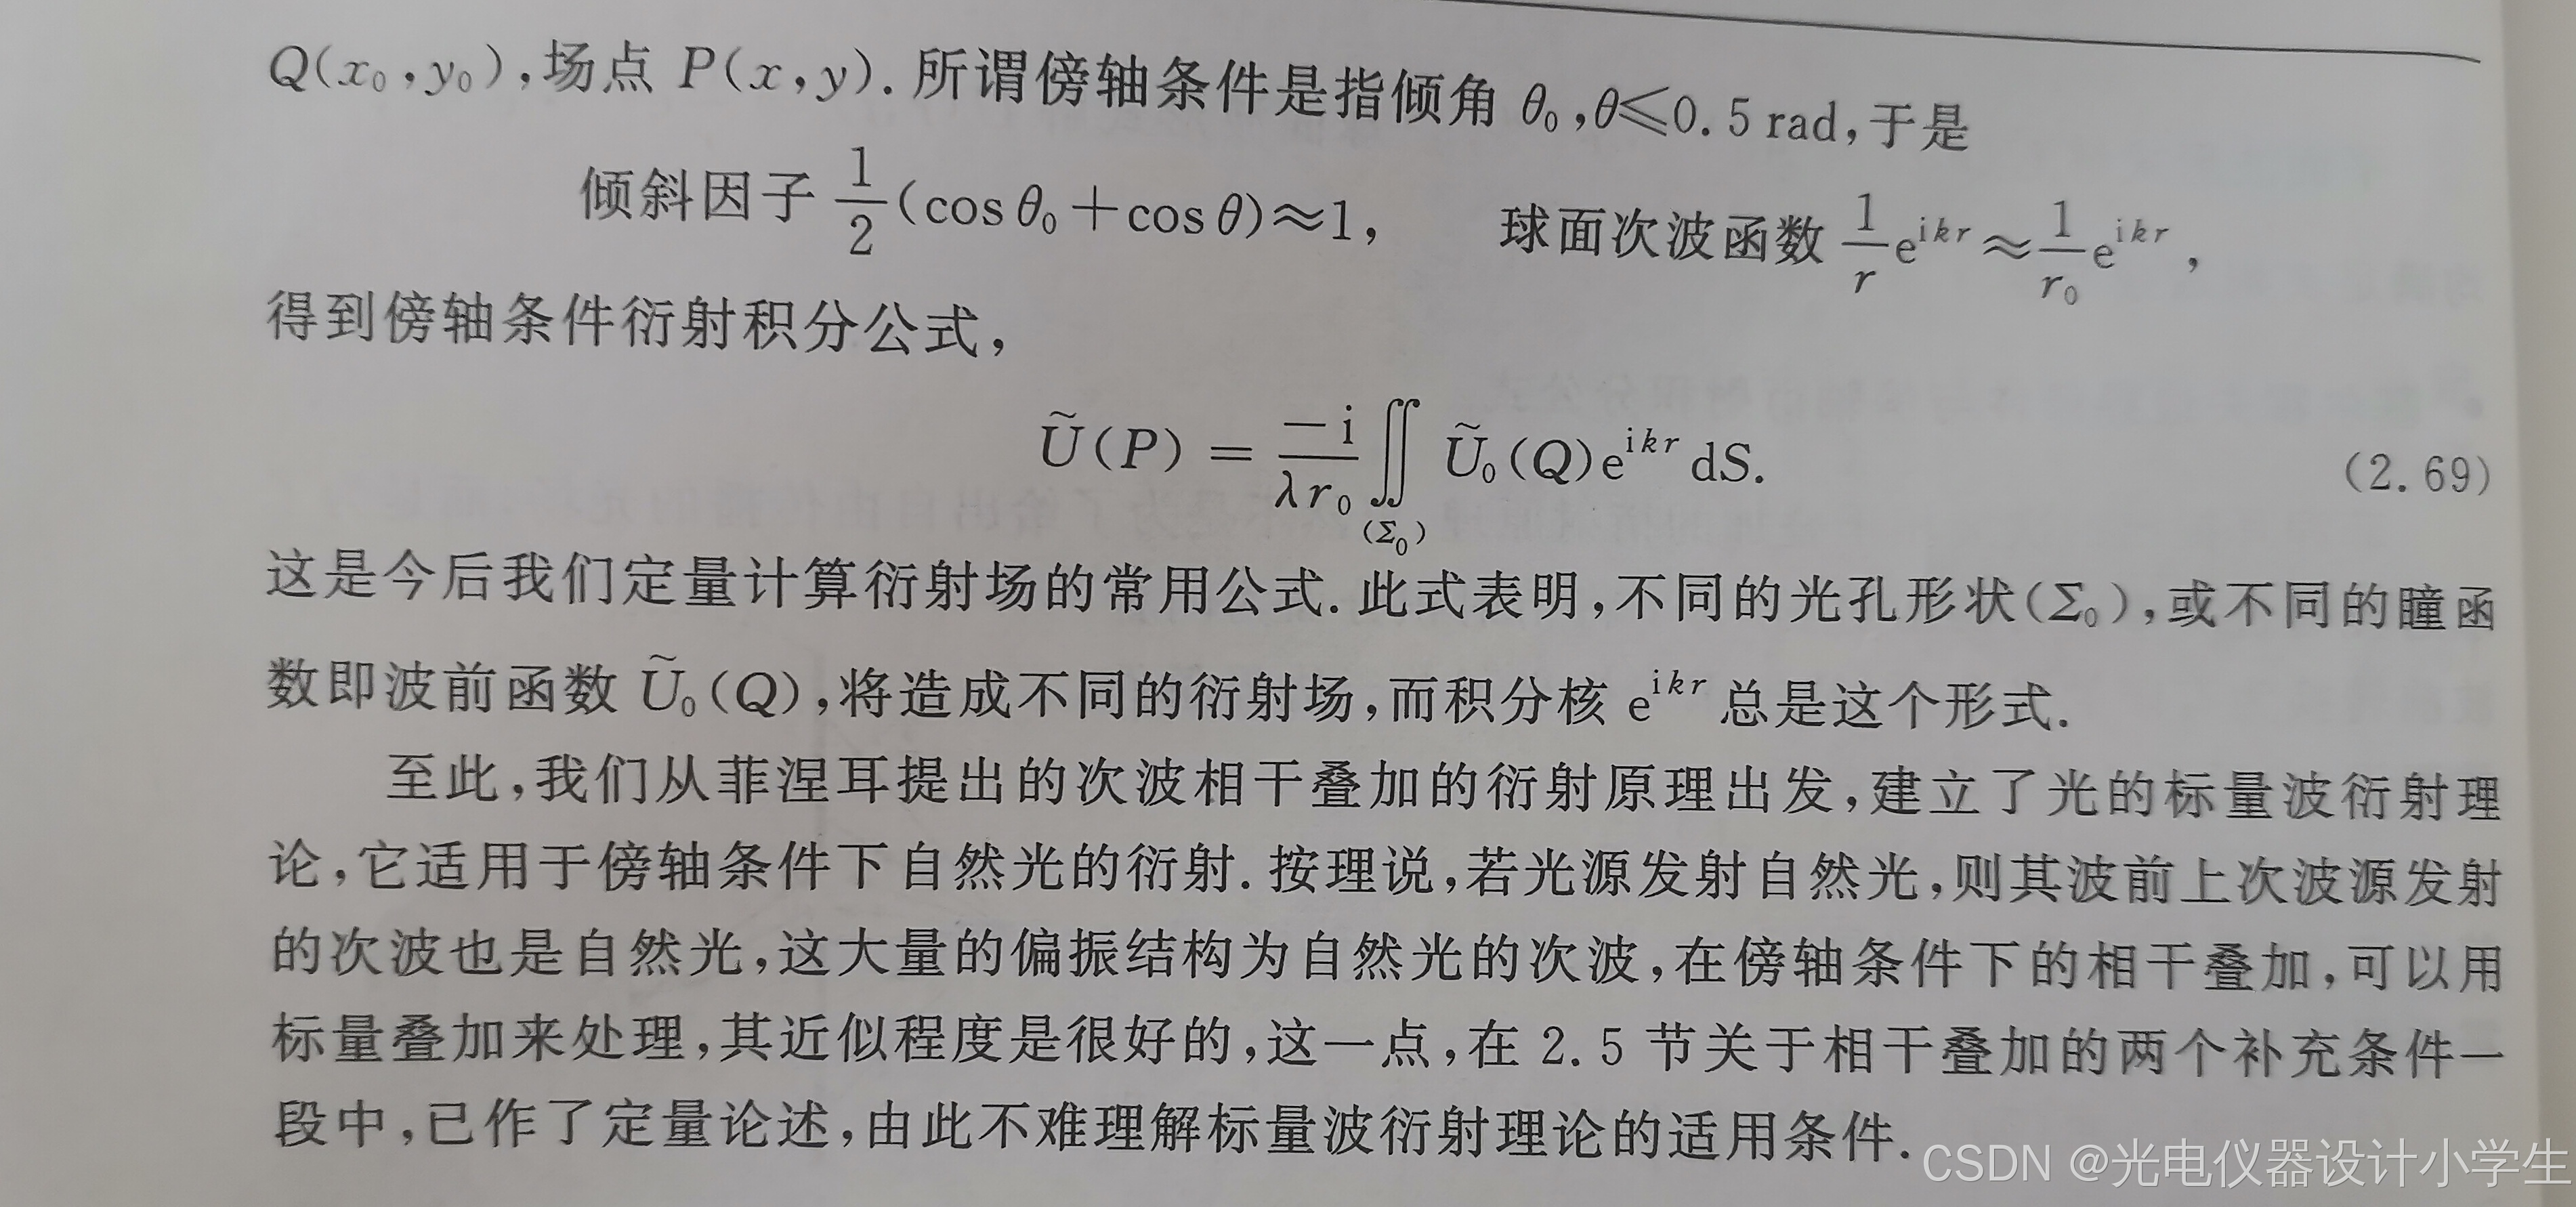
4)并且后来基尔霍夫指出:积分的波前面元并不用局限于等相面,而是只要在点光源与点光源外一点之间实实在在隔离,并且只露出有限大小的闭合面,这个闭合面就可以作为惠更斯-菲涅耳原理的积分面。
7.4菲涅耳衍射与夫良禾费衍射
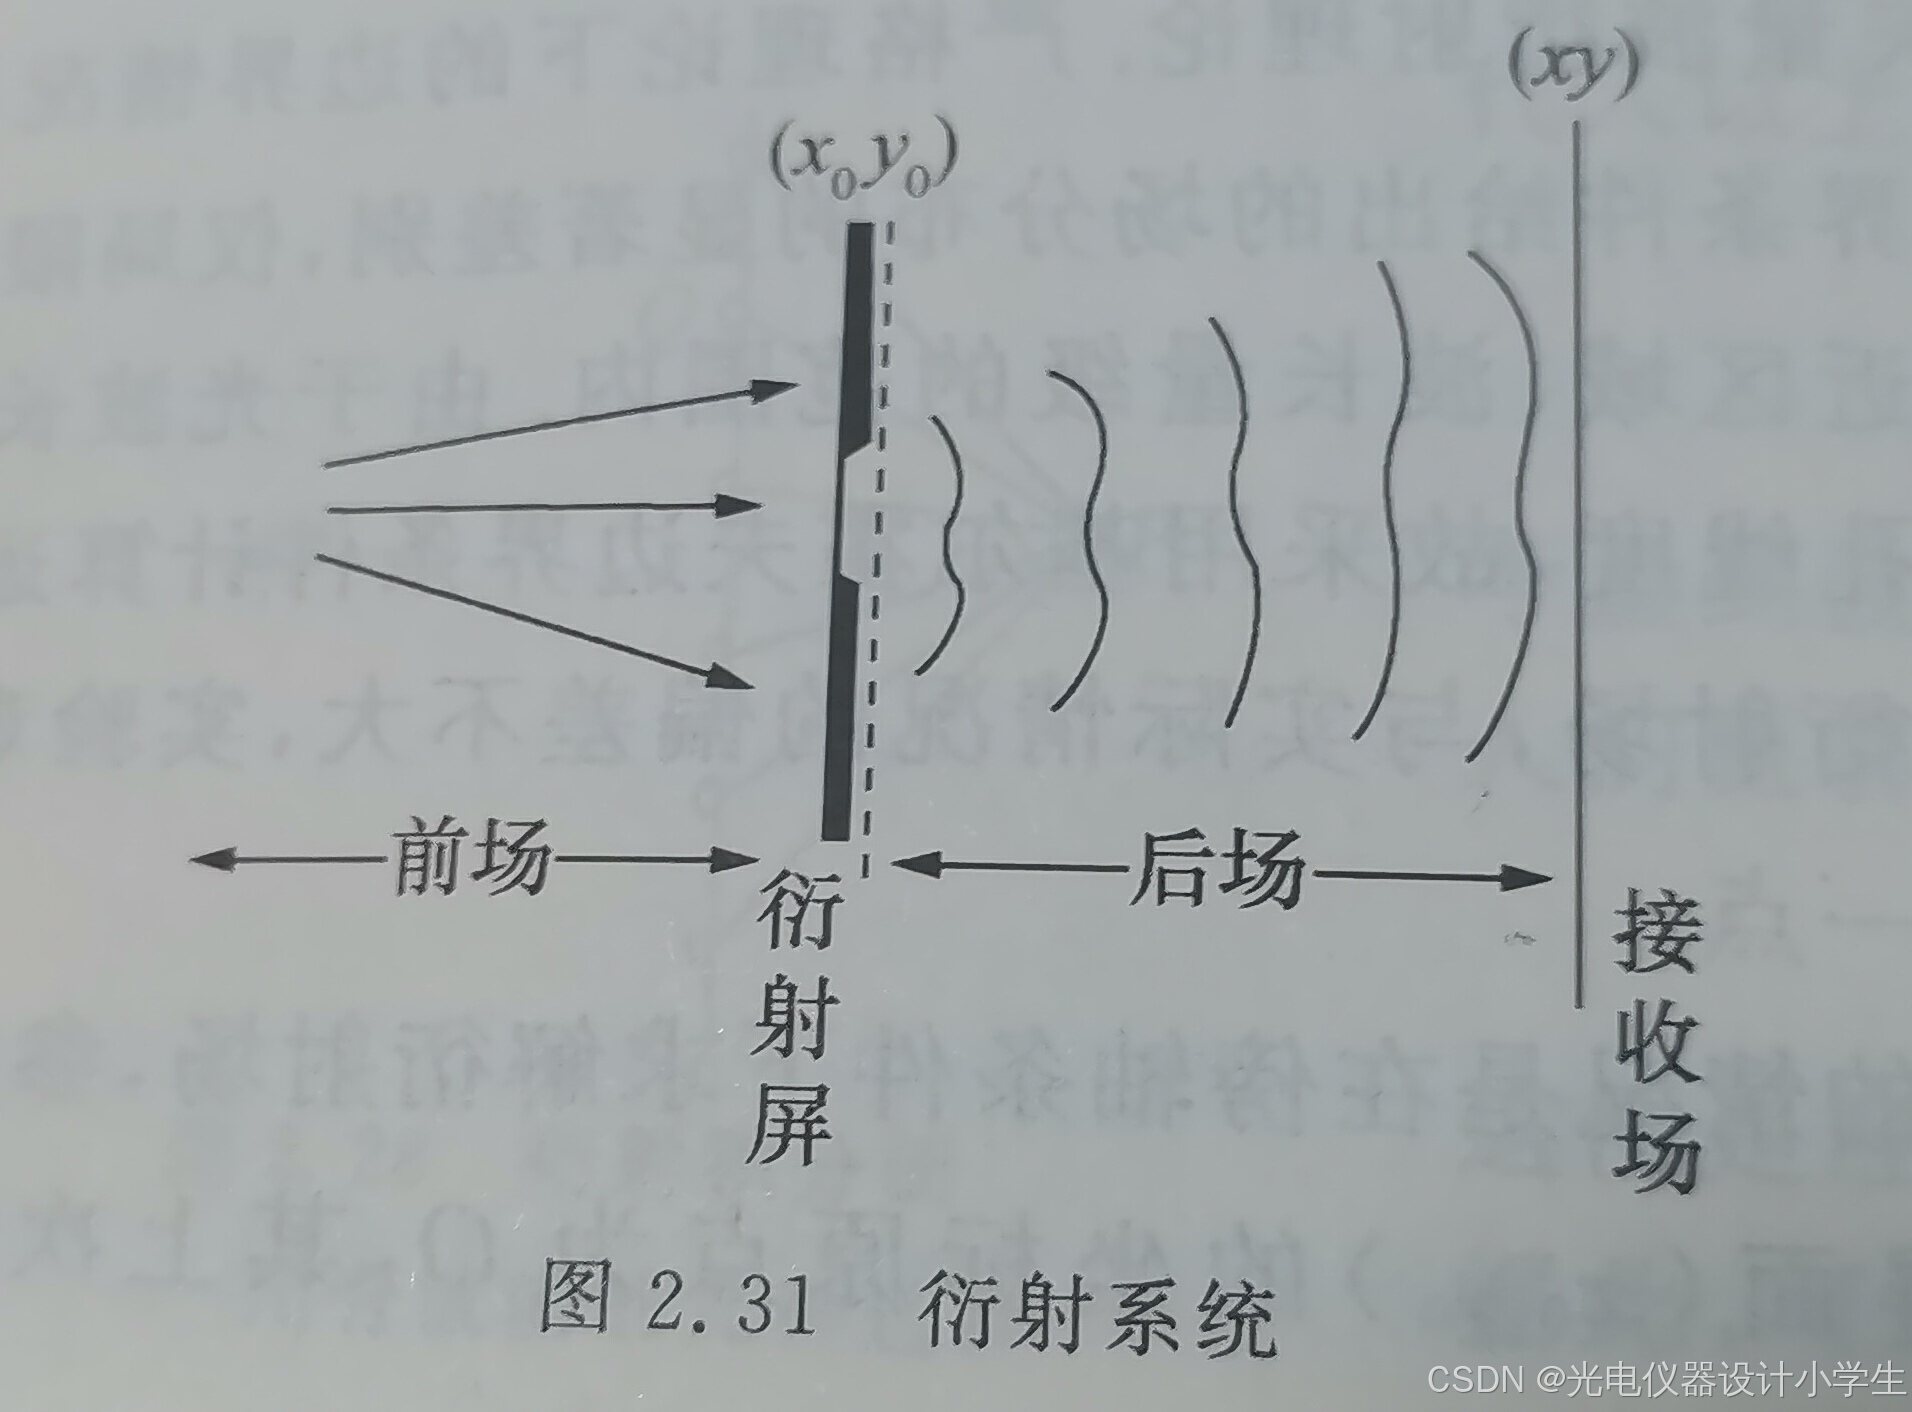
1)菲涅耳衍射:指光源和衍射屏间的距离、衍射屏和接收屏间的距离均为有限远。
2)夫良禾费衍射:指光源和衍射屏间的距离、衍射屏和接收屏间的距离均为无限远。
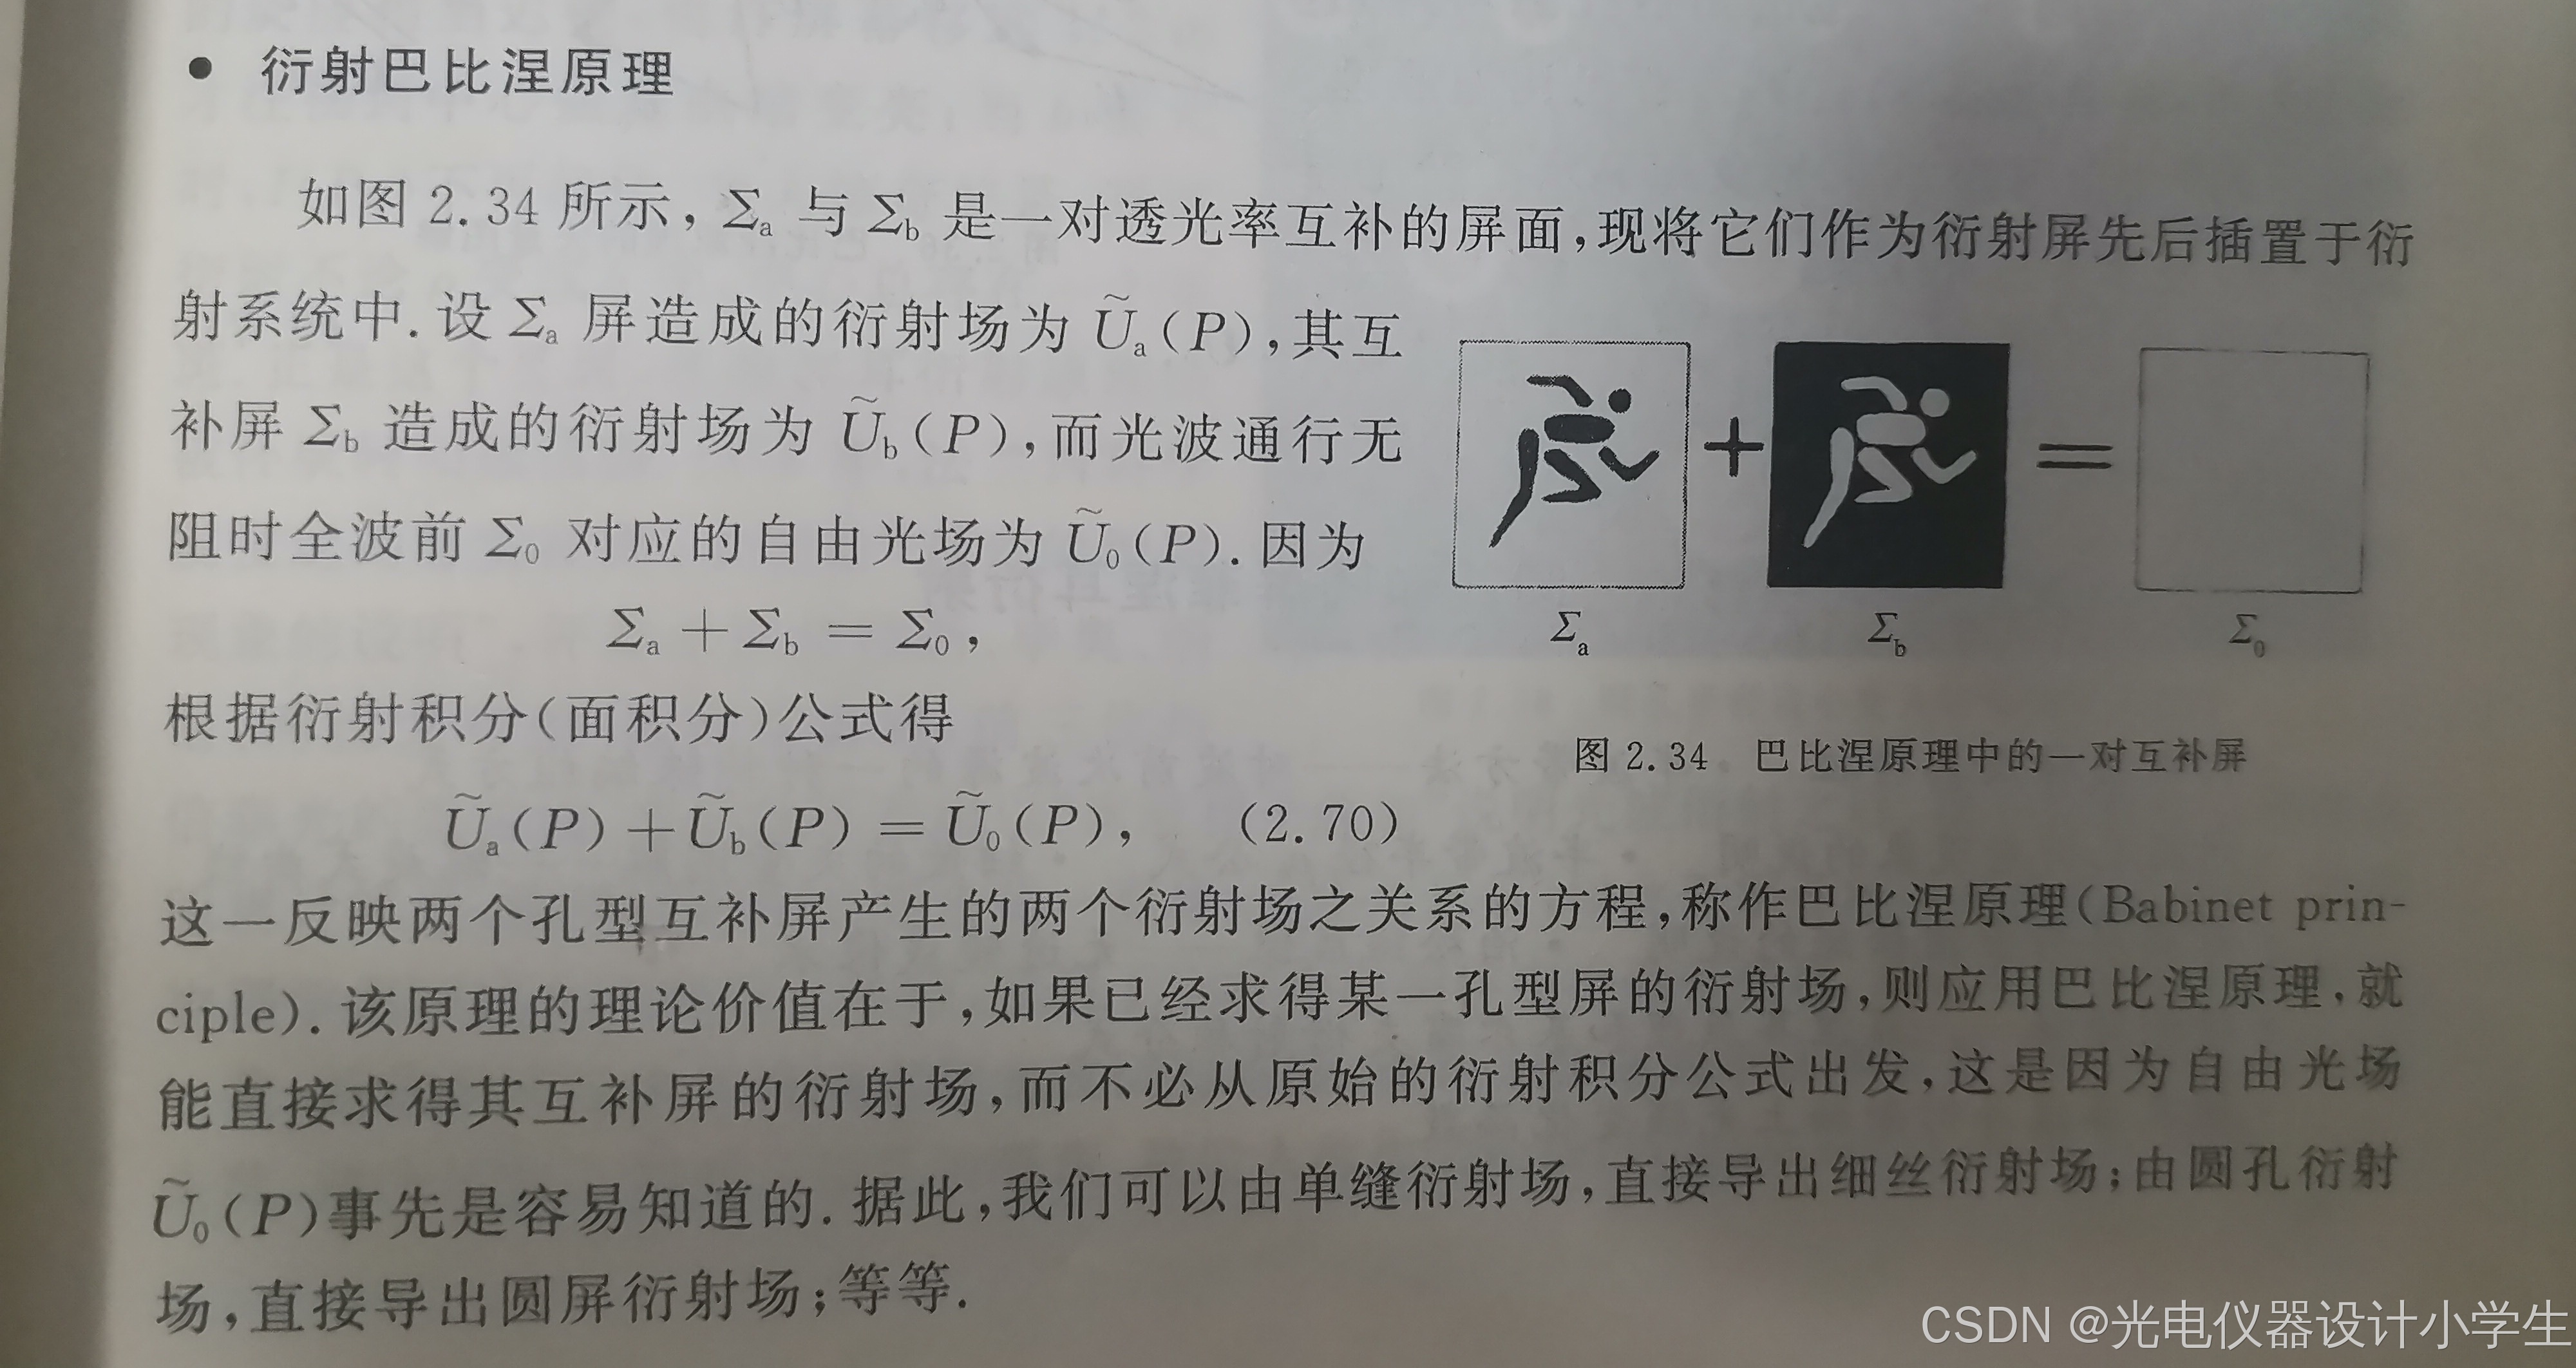
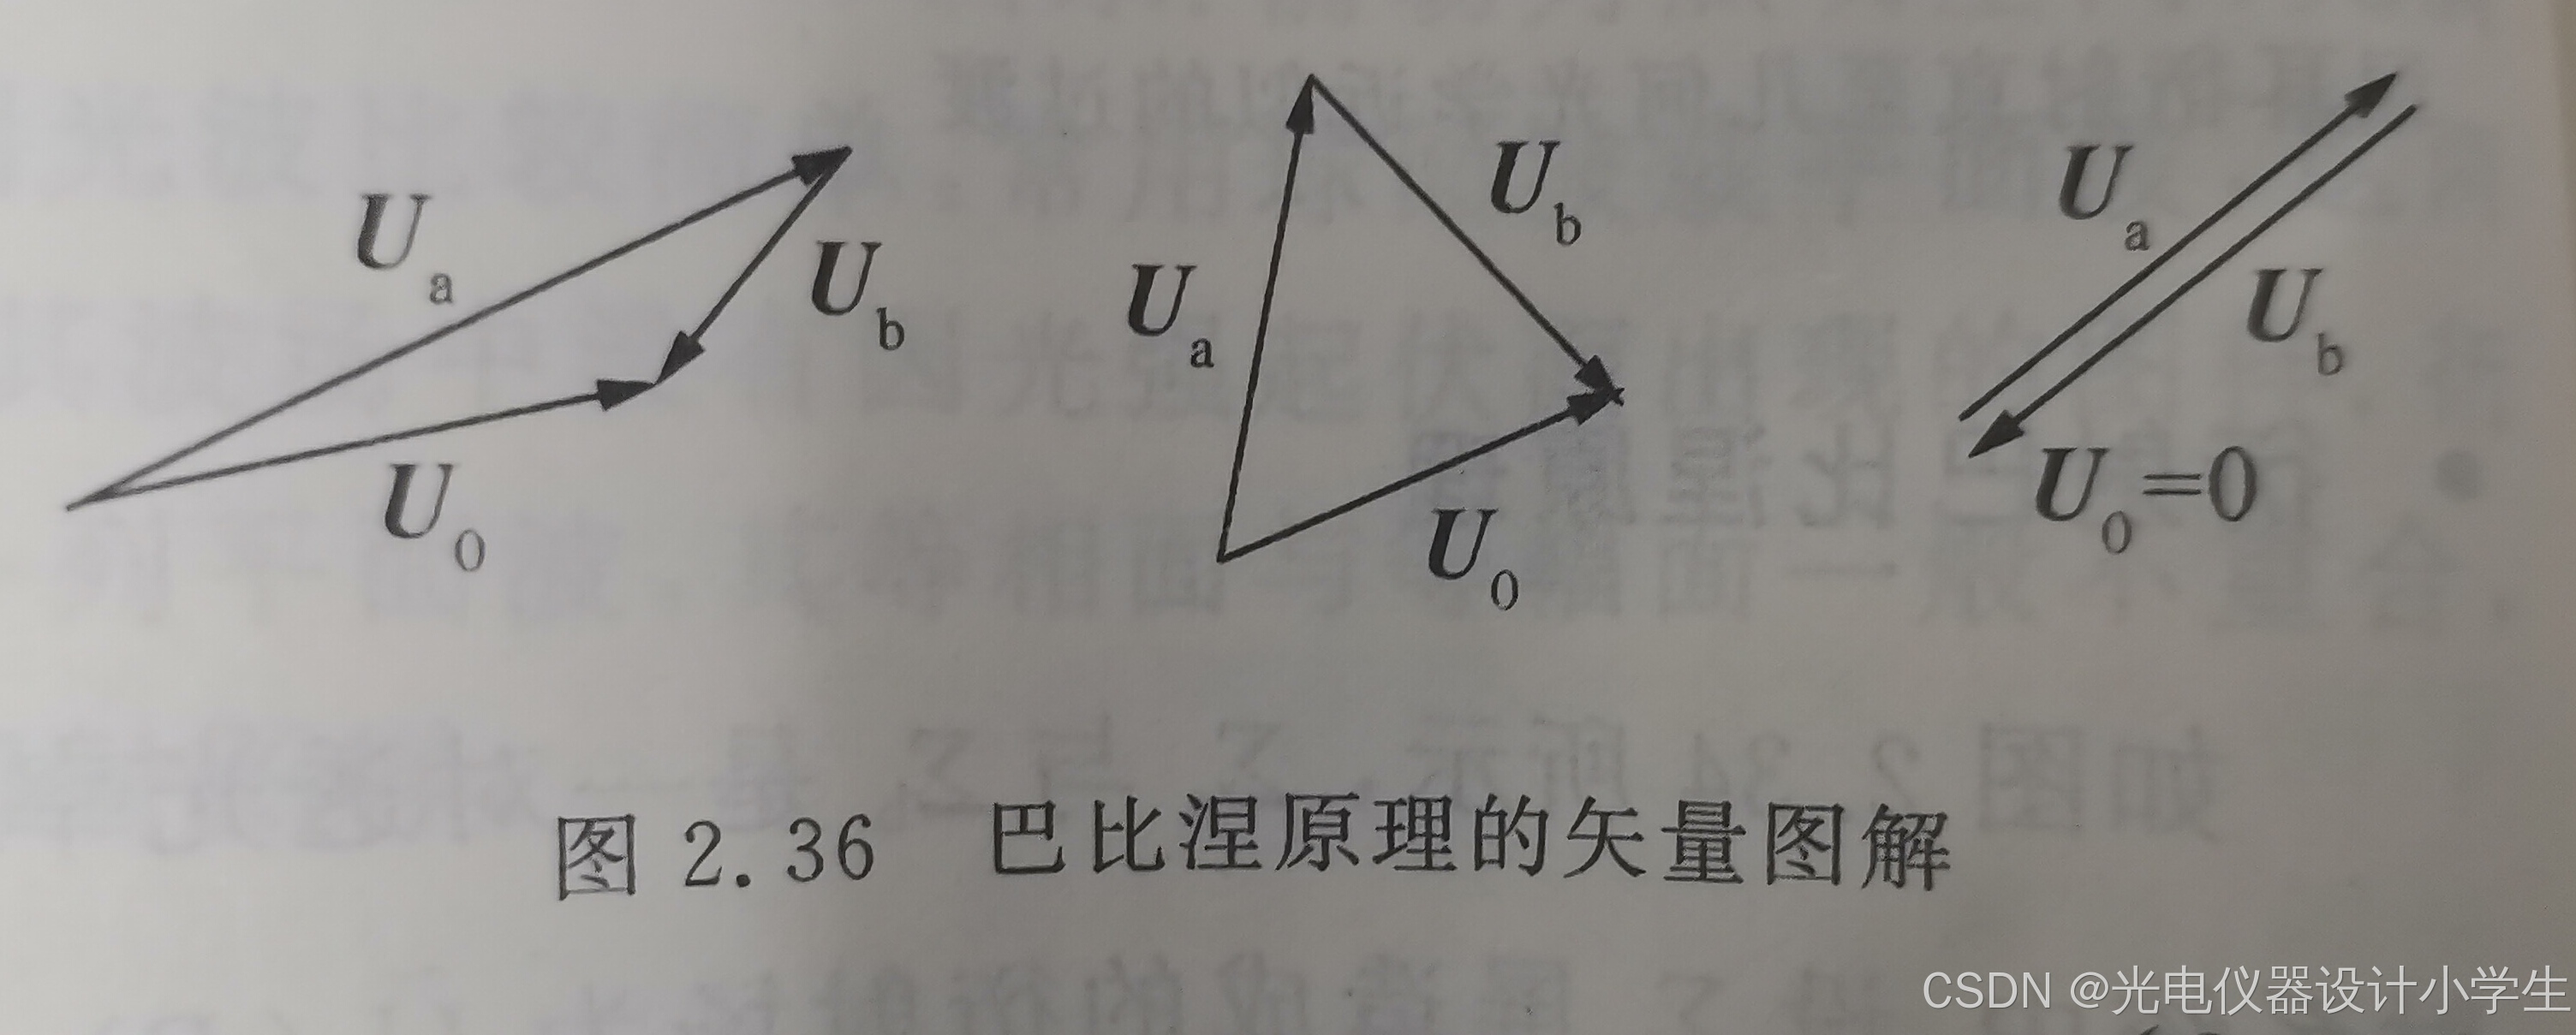
3)巴比涅原理:
8偏振光引论
1)偏振:指波的振动在与传播方向垂直的某些方向上振动较多;而另一些垂直方向,则较少,甚至没有振动。
2)光矢量,即电场强度E,光波是电磁波,在光波中,产生感光作用与生理作用的主要是电场强度E。
3)线偏振光:在光的传播方向上,光矢量E只沿一个固定的方向振动,这种光称为平面偏振光。
