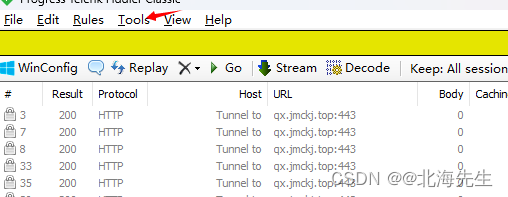
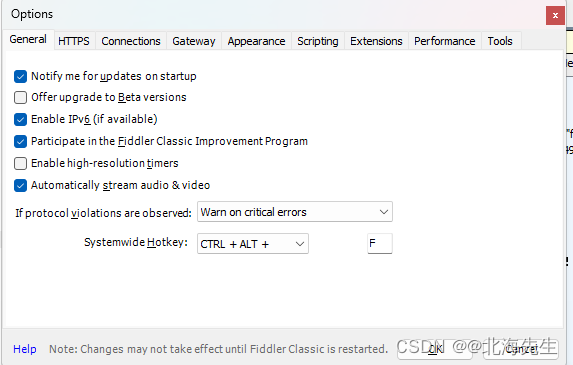
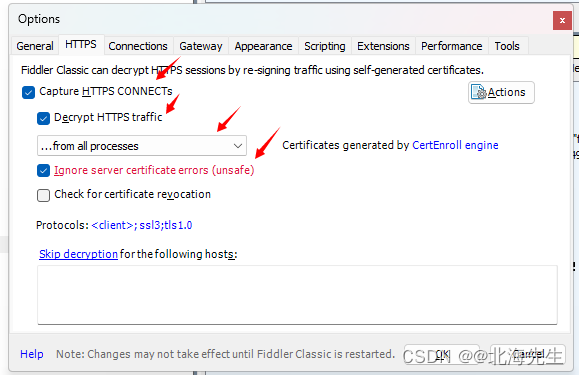
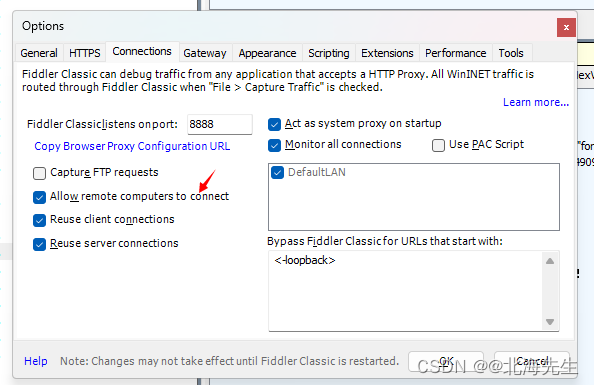
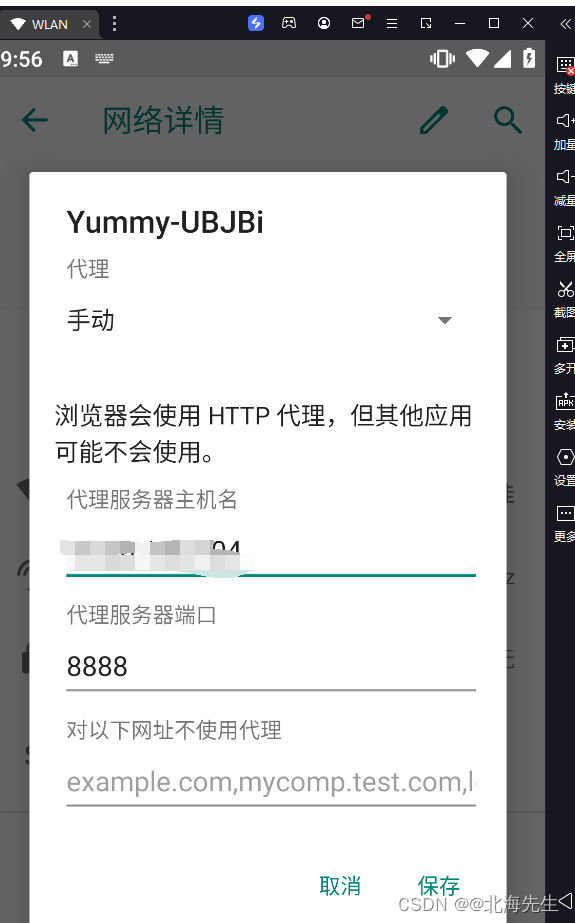
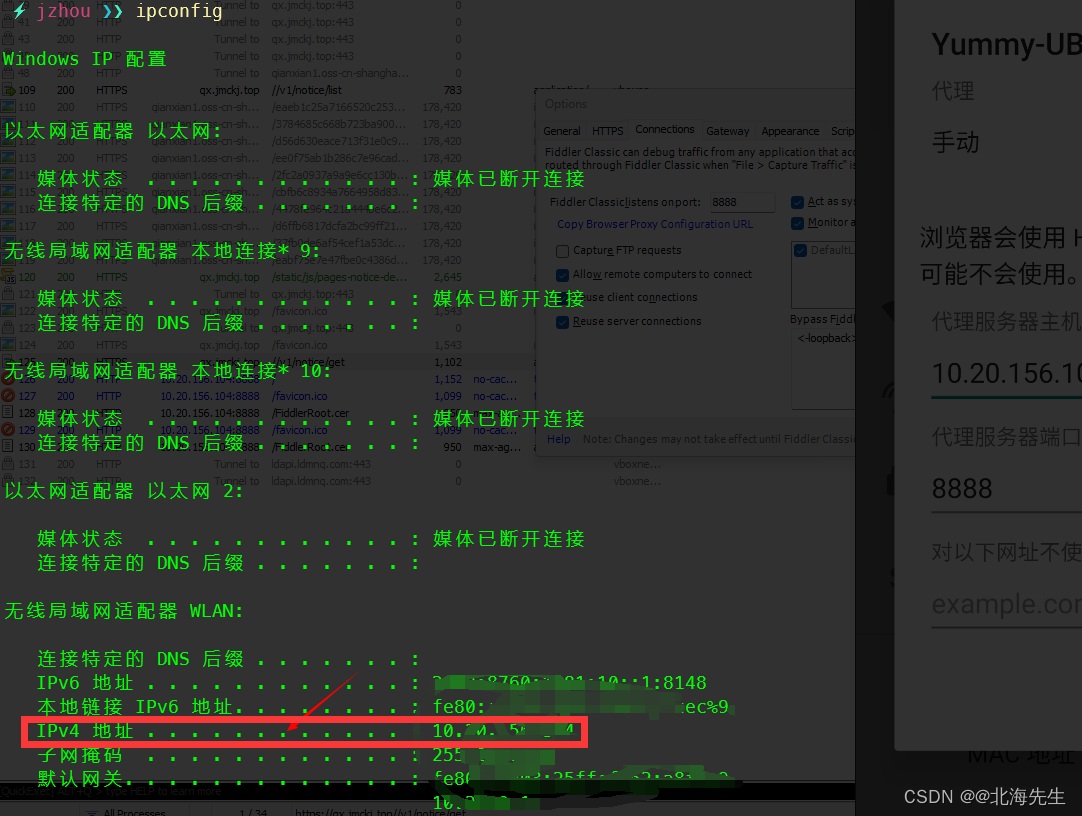
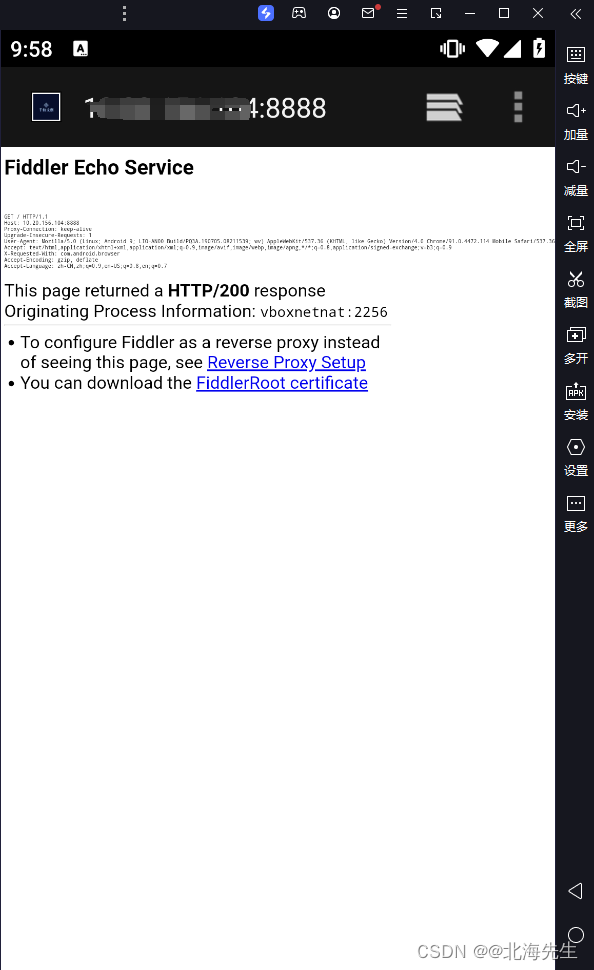
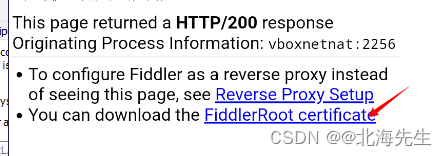
当前位置: 首页 > news >正文

什么是网站解析简单的网站架构

什么是网站解析,简单的网站架构,网站在哪设置关键词,seo百度快速排名项目介绍#xff1a; 飞书信息发送服务是指将飞书信息发送服务部署到一个Linux服务器上。飞书是一款企业级的即时通讯和协作工具#xff0c;支持发送消息给飞书的功能。通过部署飞书信息发送服务#xff0c;可以方便内网发送信息给外网飞书。 项目代码结构展示#xff1a; …项目介绍 飞书信息发送服务是指将飞书信息发送服务部署到一个Linux服务器上。飞书是一款企业级的即时通讯和协作工具支持发送消息给飞书的功能。通过部署飞书信息发送服务可以方便内网发送信息给外网飞书。 项目代码结构展示 文件结构解释 common文件夹保存了一些基础运行文件。 api.py通过调用飞书开放平台的API获取租户访问令牌其中调用了飞书的url接口。 logs.py将日志数据保存到文件夹logs中。 send_message.py实现使用飞书开放平台的API发送消息给指定用户。 logs文件夹保存的是消息传递过程中产生的日志信息。 other文件夹保存有可转换文件的部分程序供后续开发使用。 static文件夹保存有html文件需要调用的css、js和json文件等配置文件。 templates文件夹保存有index.html文件即网页运行文件。 app.py文件是整个项目的运行文件实现了一个简单的web应用程序用户可以通过表单提交消息并将消息发送给另一个模块进行处理。同时在后台记录了用户的IP地址、ID、消息和用户名等信息。  项目代码解释 1. api.py代码解释 该代码的作用是使用飞书开放平台的 API 获取应用的访问令牌tenant_access_token并将其打印出来。该代码通过发送HTTP POST请求获取飞书应用的访问令牌并将结果打印出来以便后续使用该令牌来访问飞书开放平台的其他API。 # 导入requests模块。 import requests# 飞书信息传入接口 # 定义了请求的URL该URL用于获取应用的访问令牌。 url https://open.feishu.cn/open-apis/auth/v3/tenant_access_token/internal# 定义了请求的头部指定Content-Type为application/json。 headers {Content-Type: application/json }# 定义了请求的数据包括应用的app_id和app_secret。 # 得从飞书集成平台上创建一个飞书服务从而获得其中的参数 data {# 请求参数从飞书内部app获得app_id: cli_a5cb1xxxxxxxxxxxxx,app_secret: qNFmmFTQqexxxxxxxxxxxxxxxxxxxxxxx }# 发送POST请求将URL、头部和数据传递给requests.post()函数并将返回的响应对象保存在response变量中。 response requests.post(url, headersheaders, jsondata)# 检查响应的状态码如果状态码为200则表示请求成功继续执行下一步否则打印请求失败的提示信息。 if response.status_code 200:# 请求成功# 将响应的内容解析为JSON格式保存在result变量中。result response.json()# 处理返回结果print(result) else:# 请求失败print(请求失败, response.status_code) 2. logs.py代码解释 该代码是一个日志收集的函数。函数名为log接受四个参数ip、user_id、message和username。代码的作用是将传入的日志信息保存到以年份为文件名的文件夹中的以日期为文件名的文件中。import os import datetime# log 日志收集 def log(ip,user_id,message,username):# 获取当前时间格式为小时-分钟-秒钟保存到变量date中。date datetime.datetime.now().strftime(%H-%M-%S)data fip:{ip}, username:{username}, user_id:{user_id}, date:{date}, message:{message}\n# 创建保存年文件夹的文件夹# 根据当前时间获取年份并创建保存年份文件夹的文件夹路径保存到变量year_folder_name中。year_folder_name f./logs/datetime.datetime.now().strftime(%Y)# 创建保存数据的文件夹和文件名# 根据当前时间获取日期并创建保存数据的文件夹路径保存到变量folder_name中。folder_name f./{year_folder_name}/datetime.datetime.now().strftime(%m-%d)# 如果年份文件夹路径不存在则创建年份文件夹。if not os.path.exists(year_folder_name):os.makedirs(year_folder_name, exist_okTrue)# 如果数据文件夹路径不存在则创建数据文件夹。if not os.path.exists(folder_name):os.makedirs(folder_name, exist_okTrue)# 根据当前时间获取文件名并将文件路径保存到变量filepath中。file_name datetime.datetime.now().strftime(%H-%M) .txt# 检查文件是否存在# - 如果存在则以追加模式打开文件并将日志信息写入文件中。# - 如果不存在则以写入模式创建新文件并将日志信息写入文件中。filepath os.path.join(folder_name, file_name)if os.path.exists(filepath):with open(filepath, a) as file:file.write(data)else:with open(filepath, w) as file:file.write(data) 3. send_message.py代码解释 该代码实现了使用飞书开放平台的API发送消息给指定用户。 import json import requests# get_access_token函数用于获取tenant_access_token即应用的访问令牌通过传入应用的app_id和app_secret作为参数向飞书的API发送请求并返回响应结果。 def get_access_token(app_id, app_secret):自建应用获取 tenant_access_tokenhttps://open.feishu.cn/document/server-docs/authentication-management/access-token/tenant_access_token_internal:param app_id: 应用唯一标识:param app_secret: 应用秘钥:return:{code: 0,msg: success,tenant_access_token: t-xxx,expire: 7140}url https://open.feishu.cn/open-apis/auth/v3/tenant_access_token/internalparams {app_id: app_id,app_secret: app_secret}res requests.post(url, paramsparams)return res.json()# send_message函数用于发送消息通过传入访问令牌、消息体和查询参数作为参数向飞书的API发送请求并返回响应结果。 def send_message(access_token, body, params):发送消息https://open.feishu.cn/document/server-docs/im-v1/message/create:param access_token::param body: 消息体:param params: 查询参数 {receive_id_type:open_id}:return:url https://open.feishu.cn/open-apis/im/v1/messagesheaders {Authorization: Bearer access_token}res requests.post(url, paramsparams, headersheaders, jsonbody)return res.json()# run函数是主函数用于执行发送消息的操作。首先获取访问令牌然后设置查询参数为user_id接下来构造消息体包含接收消息的用户ID和消息内容。最后调用send_message函数发送消息并输出响应结果。 def run(message,user_id):# App IDapp_id cli_a5cb1xxxxxxxxxxxxxxxx# App Secretapp_secret qNFmmFTQqecZtgjbxxxxxxxxxxxxxxxtoken get_access_token(app_id, app_secret)params {receive_id_type: user_id}# 发送接口消息payload {receive_id: user_id,msg_type: text,content: json.dumps({text: message})}# 获取tenant_access_tokenres send_message(token[tenant_access_token], payload, params)print(res) 4. app.py代码解释 该代码是一个简单的Flask应用程序用于接收用户的表单数据记录日志并发送消息给用户。用户可以通过根路径访问一个包含表单的页面并填写表单后提交数据到/process路径。服务器接收到数据后记录日志并向用户发送消息。from flask import Flask, request, render_template from common import send_message, logs# - Flask用于创建Web应用程序的框架。 # - request用于处理HTTP请求的模块。 # - render_template用于渲染模板的模块。 # - send_message自定义的模块用于发送消息。 # - logs自定义的模块用于记录日志。# 定义全局变量 user_id message # 创建Flask应用程序实例 app Flask(__name__)# 定义路由和视图函数 # - 定义根路径/的视图函数index。 # - 使用render_template函数渲染名为index.html的模板并传递icon_path参数。 app.route(/) def index():icon_path /static/icon.icoreturn render_template(index.html, icon_pathicon_path)# 定义/process路由和视图函数 # - 定义/process路径的视图函数process。 # - 通过request.form.get方法获取POST请求中的字段值。 # - 获取用户ID、消息内容、用户名和IP地址。 # - 调用logs.log方法记录日志。 # - 调用send_message.run方法发送消息。 # - 返回收到的用户ID、消息内容和IP地址。 app.route(/process, methods[POST]) def process():user_id request.form.get(user_id)message request.form.get(message)username request.form.get(username)ip request.remote_addrlogs.log(ip,user_id,message,username)send_message.run(message, user_id)return fReceived: {user_id},{message},{ip}# 启动应用程序 # - 判断当前模块是否为主模块。 # - 如果是主模块则调用app.run方法启动应用程序监听0.0.0.0:80地址。 # - 0.0.0.0表示监听所有的IP地址80为端口号。 if __name__ __main__:app.run(host0.0.0.0, port80) 5. excel_to_json.py代码解释 import openpyxl import json import io # excel表格转json文件 def excel_to_json(excel_file, json_file_name):# 加载工作薄book openpyxl.load_workbook(excel_file)# 获取sheet页sheet book[文件名xxxxxxxxx]# 行数max_row sheet.max_row# 列数max_column sheet.max_columnprint(max_row: %d, max_column: %d % (max_row, max_column))# 结果数组存储result []heads []# 解析表头for column in range(max_column):# 读取的话行列是从11开始heads.append(sheet.cell(1, column 1).value)# 遍历每一行for row in range(max_row):if row 0:continueone_line {}for column in range(max_column):# 读取第二行开始每一个数据k heads[column]cell sheet.cell(row 1, column 1)value cell.valueone_line[k] valueprint(one_line)new_one_line {人员ID: one_line[人员ID],工号: one_line[工号],员工类型:one_line[员工类型],人员姓名: one_line[人员姓名],职务:one_line[职务] }result.append(new_one_line)book.close()# 将result通过大括号包裹起来result_json {data: result}# 将json保存为文件save_json_file(result_json, json_file_name)# 将json保存为文件 def save_json_file(jd, json_file_name):file io.open(json_file_name, w, encodingutf-8)# 把对象转化为json对象# indent: 参数根据数据格式缩进显示读起来更加清晰# ensure_ascii True默认输出ASCII码如果把这个该成False, 就可以输出中文。txt json.dumps(jd, indent2, ensure_asciiFalse)file.write(txt)file.close()if __main__ __name__:# 运行该程序使Excel文件内容转换为json文件excel_to_json(uExcel文件.xlsx, ../static/json/result.json) 6. index.css代码解释 这段代码实现了一个基于弹性布局的聊天界面。代码中使用了CSS样式来设置页面的布局和样式。 padding和box-sizing为border-box来统一元素的盒模型。 .text类来设置文本的样式包括字体大小、字重、字体样式和颜色。 .box类来设置聊天界面的背景样式和弹性布局。背景采用了渐变色并设置了背景动画。同时设置了最小高度和居中对齐。 keyframes规则来设置背景动画的关键帧。 .box h2类来设置标题样式。 .chat-message类来设置聊天消息框的样式包括宽高、边框样式、背景样式、字体大小和颜色等。 .chat-message .new-message类来设置新消息框的样式包括外边距、内边距、背景样式、字体大小和颜色等。 .chat-message .new-message .daytime和.chat-message .new-message .messagebox类来设置新消息框中的日期和消息内容的样式。 .inputBox类来设置输入框的样式包括宽度和位置。 .inputBox textarea类来设置文本输入框的样式包括宽高、边框样式、背景样式、字体大小和颜色等。 .inputBox span类来设置输入框中的提示文字的样式。 :valid和:focus来设置输入框验证状态下的样式。 .buttonBox button类来设置按钮的样式包括内边距、边框样式、背景样式、字体大小和颜色等。 :hover来设置鼠标悬停状态下按钮的样式。 .selectBox类来设置下拉选框的样式包括字体大小、边框样式和颜色等。 *{padding: 0;box-sizing: border-box; } .text {font-size: 20px;font-weight: 100;font-style: italic;color:rgb(136, 204, 244);padding-bottom: 3px; } /* 弹性布局 水平垂直居中 */ .box{background-image: linear-gradient(125deg,#0d98d3,#27ae60,#1782ca,#a720e0,#e74c3c);background-size: 400%;animation: bgmove 30s infinite;min-height: 100vh;display: flex;justify-content: center;align-items: center;flex-direction: column;user-select: none;padding: 1.5rem;gap: 15px; }keyframes bgmove {0%{background-position: 0% 50%;}50%{background-position: 100% 50%;}100%{background-position: 0% 50%;}50%{background-position: 100% 50%;}0%{background-position: 0% 50%;} }.box h2{color: rgb(136, 204, 244);font-style: oblique;font-size: 30px;padding-top: 60px; }.chat-message {width: 700px; /* 设置宽度 */height: 400px; /* 设置高度 */border: 2px solid rgba(255, 255, 255, 0.5);background: #ffffff00;border: 5px;outline: none;font-size: 1em;color: white;box-shadow: 0px 0px 10px #b3bed3 inset;font-family: Arial, sans-serif; /* 字体 */border-radius: 5px; /* 边框圆角 */transform: translateX(20px); /* 将div元素向右移动50像素 */overflow: auto; }.chat-message .new-message{margin: 10px;padding: 3px;margin-top: 20px;margin-bottom: 23px;width: fit-content;background: #ffffff00;border: 5px;outline: none;font-size: 1em;color: white;font-family: Arial, sans-serif; /* 字体 */border-radius: 5px; /* 边框圆角 */-webkit-user-select: text; /* Safari */-moz-user-select: text; /* Firefox */-ms-user-select: text; /* IE10/Edge */user-select: text; /* Standard */position: relative; }.chat-message .new-message .daytime{font-size: 13px;position: absolute;top: -15px; /* 上移10像素 */ }.chat-message .new-message .messagebox{font-size: 21px; }.inputBox{position: relative;width: 300px; }.inputBox textarea {width: 700px; /* 设置宽度 */height: 200px; /* 设置高度 */resize: none; /* 禁止拖拽改变大小 */border: 2px solid rgba(255, 255, 255, 0.5);background: #ffffff00;border: 5px;outline: none;font-size: 1em;transition: 0.3s;color: white;box-shadow: 0px 0px 10px #b3bed3 inset;font-family: Arial, sans-serif; /* 字体 */border-radius: 5px; /* 边框圆角 */margin-left: -180px;}.inputBox span{position: relative;top: -10px;position: absolute;left: -180px;padding: 20px;pointer-events: none;font-size: 1em;color: #fefefefe;text-transform: uppercase;transition: 0.3s; }.inputBox textarea:valid~span, .inputBox textarea:focus~span{color: #15dede;transform: translateX(15px) translateY(-7px);font-size: 0.65em;padding: 0 5px;background: #15acde5c;letter-spacing: 0.1em; }.inputBox textarea:valid, .inputBox textarea:focus{border: 1px solid #20bdce00; }/* 按钮样式 */ .buttonBox button{padding: 10px;border-radius: 5px;background: rgba(13, 98, 132, 0);font-size: 1em;color: rgba(255, 255, 255, 0.5);border: 1px solid rgba(255, 255, 255, 0.5);font-weight: 600;box-shadow: 0px 0px 10px #dadfeb inset;}.buttonBox button:hover{color: #d5dede;border: 1px solid #50c9c3; }.selectBox{color: rgba(255, 255, 255, 0.5);border: 1px solid rgba(255, 255, 255, 0.5);letter-spacing: 0.1em;font-size: 1em;border: 5px;text-overflow: ellipsis;overflow: hidden;white-space: nowrap; }.selectBox span{font-size: 20px;color: white;margin: 13px -5px 0px 20px; }.selectBox .select{font-size: 1em;background-color: rgba(254, 254, 254, 0.055);color: #f9f7c7;width: 160px;height: 35px;margin: 10px 0 0 10px;padding-left: 10px;border: none;box-shadow: 0px 0px 10px #b4c0d6 inset;font-family: Arial, sans-serif; /* 字体 */border-radius: 5px; /* 边框圆角 */ }.selectBox option {background-color: #3ebaef; } 7. result.json代码解释 目的是用于保存发送人员数据信息 {data: [{人员ID: 417xxx,工号: 22xx,部门列表: xx,直属上级: xx,职务: xxxx}] } 实现飞书信息发送服务在Linux服务器上部署 1. 准备环境确保你的Linux服务器满足以下系统要求 系统CentOS 7.x 或更高版本 内存4GB 以上 存储至少 1GB 可用硬盘空间 网络能够访问互联网目的是能够访问飞书接口可以是外网虚拟机 2. Linux配置项目环境 检查是否已安装Python 3.6 $ python3 --version 如果返回Python 3.6.x的版本信息说明已安装Python 3.6。 如果未安装Python 3.6可使用以下命令来安装 $ sudo apt update$ sudo apt install python3.6 检查是否安装成功 $ python3.6 --version 确认Python安装路径 $ which python3.6 默认路径为:/usr/bin/python3.6。 安装Python包管理工具pip $ sudo apt install python3-pip 检查是否安装成功  $ pip3 --version 现在Python 3.6环境已在Linux系统上安装完毕。 您可以使用python3.6命令来启动Python 3.6解释器并使用pip3来安装/管理Python包。 项目依赖需求导入 将项目所需的依赖需求导入requirements.txt文件中方便后续在Linux环境下下载配置在终端运行 pip freeze requirements.txt 该命令可以将当前pycharm使用的也可以在linux系统中使用 python解释器中的依赖包全部收集到requements.txt 文件中为了避免收集无用的依赖包建议给 目标项目使用虚拟环境解释器这样就只会收集到当前项目的依赖包了。最好在哪里创建项目就在那里使用 3.项目部署 通过Xshell连接Linux虚拟机再通过Xftp传输文件到Linux虚拟机上去 Xshell官方下载网站https://www.xshell.com/zh/all-downloads/ Xshell通过ssh的方式连接的Xftp通过ftp的方式连接的可以在网上下载使用也可用其他软件替代 将项目移动到指定项目文件夹可以使用mv命令来实现 mv python_Project /usr/local/feishuconnect/ 查看效果 [rootproxy-cuhnj-local admin]# ls /usr/local/feishuconnect/ python_Project 项目Linux环境依赖安装 安装项目的依赖包requements.txt为项目收集的依赖包地址 pip install -r requements.txt 如果对应的Linux环境中未配置国内镜像源导致依赖包安装缓慢可以通过命令 pip install -i 国内镜像源地址 -r requements.txt 安装项目依赖包 国内比较常用的镜像 pip 默认源https://pypi.python.org/simple 1.豆瓣(douban) Simple Indexhttps://pypi.douban.com/simple 2.清华大学 Simple Indexhttps://pypi.tuna.tsinghua.edu.cn/simple 3.阿里云 Simple Indexhttps://mirrors.aliyun.com/pypi/simple 4.中国科技大学 Simple Indexhttps://pypi.mirrors.ustc.edu.cn/simple 项目依赖安装完成后打开防火墙并运行测试效果 打开服务器的防火墙8081端口 Sudo firewall-cmd --add-port443/tcp --permanent # 打开服务器8081端口 sudo firewall-cmd --reload # 刷新防火墙策略 sudo firewall-cmd --list-all # 查看 firewall 防火墙允许访问端口列表 Sudo firewall-cmd --remove-port443/tcp --permanent # 关闭服务器8081端口 通过python3 app.py命令来测试效果 python3 app.py # 运行程序测试效果 展示如上效果并且没有报错则为运行成功如果报错可以查看系统日志文件找出错误 journalctl -xe #查看系统日志信息 查看项目进程信息运行状态 netstat -anpult|grep python 项目Service服务配置 创建一个Systemd服务配置文件: sudo vim /etc/systemd/system/feishuconnect.service 在该文件中添加以下内容 [adminproxy-cuhnj-local python_Project]$ cat /etc/systemd/system/feishuconnect.service [Unit] DescriptionMy FeishuConnect Server[Service] ExecStart/usr/bin/python3 /usr/local/feishuconnect/python_Project/app.py WorkingDirectory/usr/local/feishuconnect/python_Project/ Restartalways Useradmin Groupadmin[Install] WantedBymulti-user.target [adminproxy-cuhnj-local python_Project]$ 保存并关闭文件 使用以下命令来启用并启动Systemd服务 sudo systemctl enable feishuconnect.service sudo systemctl start feishuconnect.service 这将使您的FeishuConnect服务器在系统启动时自动启动并且您可以使用Systemd命令来管理它例如启动、停止、重启或查看状态。 sudo systemctl stop feishuconnect.service # 停止服务 sudo systemctl restart feishuconnect.service # 重启服务 sudo systemctl status feishuconnect.service # 查看服务状态 修改将Service服务修改为80端口 首先先停止Service服务 sudo systemctl stop feishuconnect.service # 停止服务 修改项目内的运行程序app.py (将端口port 修改为 80 端口)  修改Service服务的权限 由于将服务端口修改为了80host0.0.0.0port80而80端口只有特权用户例如root用户才能占用。这是因为在低于1024的端口上进行绑定时只有root用户才有权限。 刷新Service服务查看Service服务状态 sudo systemctl daemon-reload # 更新Service配置 sudo systemctl restart feishuconnect.service # 重启服务 sudo systemctl status feishuconnect.service # 查看服务状态 测试项目效果 项目代码下载 链接https://pan.baidu.com/s/1B7H_3ZZA100aqJnI6p1DwA?pwdfwvg  提取码fwvg
http://www.dnsts.com.cn/news/60335.html

相关文章:

  • 网页设计怎么建站点厦门推广公司
  • 淄博做网站的公司wordpress 教育
  • 免费网站模板之家网站建设前期需要准备什么资料
  • 学网站开发与维护有用吗如何做微信个人网站
  • react用于做PC网站朋友圈广告推广
  • 专门做艺术字的网站查询公司的网站备案信息查询
  • 泉州做外贸网站网站集约化建设方案
  • 谷歌网站站长指南运城网站建设运城天气
  • 如何注册一家投资公司西安优化官网公司
  • 部门将网站建设的需求网站建设与管理教学设计
  • 网站背景图片素材姓名域名网站
  • 用层还是表格做网站快雄安网建 网站建设
  • 网站seo百度百科湖州市建设局网站6
  • 郑州网站建设找智巢全球品牌网
  • 如何做网站的外链百度一下网页搜索
  • 深圳网站制作880手机网站建站系统
  • 温州网站建设推广百度网页浏览器
  • 地区性门户网站是什么意思网站内容包括哪些
  • 手机网站怎么打开管理网站
  • 广州市外贸网站建设企业哪些网站是响应式的
  • 外贸淘宝网站建设智能网站建设软件有哪些
  • wordpress你访问的网站不存在wordpress 我爱水煮鱼
  • 南宁网站建设找哪家好苏州知名网站建设建站公司
  • 公司网站一般用什么软件做做任务送科比网站
  • 酒业公司网站模板wordpress主题在线检测工具
  • 怎么做不花钱的网站做黑彩网站赚钱吗
  • 招商银行官网首页 网站餐饮logo免费设计
  • 个人网站建设大全厦门做网站推广
  • 海南省交通建设局网站东莞市保安公司排名
  • 定制公司网站软件开发就业前景走向