产品做推广都有那些网站起飞页自助建站平台
目录
1、Future
1.1、Callable和Runnable的不同
1.2、Future的主要功能
1.3、常用方法
1.4、Future使用注意事项
1.5、CompletableFuture(旅游平台问题)
1.5.1、需求
1.5.2、解决方案1:串行
1.5.3、解决方案2:线程池
1.5.4、解决方案3:CountDownLatch
1.5.4、解决方案4:CompletableFuture(推荐)
2、线程协作
2.1、信号量
2.2、CountDownLatch(闭锁)
2.2.1、场景一:一个线程等待多个线程
2.2.2、场景二:多个线程等待一个线程
2.3、CyclicBarrier(栅栏)
2.3.1、原理
2.3.2、构造函数
2.3.3、CyclicBarrier和CountDownLatch的区别
3、Java内存模型
3.1、Java内存模型(JMM)
3.2、指令重排序
3.3、Java原子操作的注意事项
3.3.1、Java中的原子操作
3.3.2、long和double的原子性
3.4、内存可见性
3.5、主内存和工作内存的关系
3.6、happens-before原则
3.6.1、定义
3.6.2、规则
3.7、volatile作用
3.8、单例模式的双重检查锁模式
3.8.1、实现代码
3.8.2、实体对象为什么要加volatile?
4、CAS原理
4.1、CAS是什么
4.2、优点
4.3、CAS应用场景
4.4、CAS导致的问题
5、死锁问题
5.1、定义
5.2、条件
5.3、命令行定位死锁(jstack)
5.4、如何解决死锁
5.4.1、线上死锁
5.4.2、避免死锁
5.4.3、检测与恢复策略(先允许系统发生死锁,然后再解除)
5.4.4、鸵鸟策略
6、final关键字和不变性
6.1、用法
6.2、为什么String被设计成不可变的
7、AQS框架
7.1、原理
7.2、线程协同工具类(AQS实现)
1、Future
1.1、Callable和Runnable的不同
- Callable:有返回对象(Future),可以抛出受检异常,需实现call方法。
- Runnable:无返回值,不能抛出受检异常,需实现run方法。
1.2、Future的主要功能
通过 Future 可以了解任务执行情况,或者取消任务的执行,还可获取任务执行的结果。
1.3、常用方法
- get():获取任务的执行结果。
任务已经结束:get()方法直接返回执行结果;
任务未开始或运行中:get()方法会阻塞当前线程;
任务抛出异常:get()方法会抛出ExecutionException异常;
任务被取消:get()方法会抛出CancellationException异常;
任务超时:get()方法会抛出TimeoutException异常。
- isDone():判断当前任务是否执行完毕。
成功执行和异常情况,都会返回true。
- cancle():取消任务执行。
任务还未开始:
调用cancle(),任务取消,返回true。
任务已经完成,或已经被取消:
调用cancle(),取消失败,返回false。
任务正在执行:
调用cancle(boolean mayInterruptIfRunning)
mayInterruptIfRunning = true:执行任务的线程就会收到一个中断的信号,正在执行的任务可能会有一些处理中断的逻辑,进而停止。
mayInterruptIfRunning = false:代表不中断正在运行的任务,也就是说,本次 cancel 不会有任何效果,同时 cancel 方法会返回 false。
- isCancelled:判断能否被取消。
1.4、Future使用注意事项
- 当 for 循环批量获取 Future 的结果时容易 block,get 方法调用时应使用 timeout 限制。
- 带超时参数的 get(long timeout, TimeUnit unit) 方法。如果在限定的时间内没能返回结果的话,那么便会抛出一个 TimeoutException 异常,随后就可以把这个异常捕获住,或者是再往上抛出去,这样就不会一直卡着了。
- Future 的生命周期不能后退
- Future 并没有产生新的线程。
- 在把 Callable 提交到线程池后,真正执行 Callable 的其实还是线程池中的线程,而线程池中的线程是由 ThreadFactory 产生的,这里产生的新线程与 Callable、Future 都没有关系,所以 Future 并没有产生新的线程。
1.5、CompletableFuture(旅游平台问题)
1.5.1、需求
需要获取各航空公司的机票信息,汇总后展示给用户。
1.5.2、解决方案1:串行
串行获取:耗时多,不可取。
1.5.3、解决方案2:线程池
线程池并行获取:必须等待3s。

1.5.4、解决方案3:CountDownLatch
CountDownLatch并行获取。

1.5.4、解决方案4:CompletableFuture(推荐)

2、线程协作
2.1、信号量
- 作用
控制那些需要限制并发访问量的资源。
- 原理
信号量会维护“许可证”的计数,而线程去访问共享资源前,必须先拿到许可证。线程可以从信号量中去“获取”一个许可证,一旦线程获取之后,信号量持有的许可证就转移过去了,所以信号量手中剩余的许可证要减一。
- 示例

- 主要方法
Semaphore(int permits, boolean fair):初始化许可证
第一个参数是许可证的数量,另一个参数是是否公平。
acquire():获取许可证,可响应中断。
acquireUninterruptibly(): 获取许可证,不可响应中断。
release():释放许可证。
- 注意事项
获取和释放的许可证数量尽量保持一致
信号量支持跨线程、跨线程池。
合理的情况下,可由线程A获取,线程B释放。
- 信号量能被 FixedThreadPool 替代吗?
不能。考虑如下场景:
在调用慢服务之前需要有个判断条件,比如只想在每天的零点附近去访问这个慢服务时受到最大线程数的限制(比如 3 个线程),而在除了每天零点附近的其他大部分时间,我们是希望让更多的线程去访问的。所以在这种情况下就应该把线程池的线程数量设置为 50 ,甚至更多,然后在执行之前加一个 if 判断,如果符合时间限制了(比如零点附近),再用信号量去额外限制,这样做是比较合理的。
2.2、CountDownLatch(闭锁)
CountDownLatch不能重用。
2.2.1、场景一:一个线程等待多个线程
一个线程等待其他多个线程执行完毕,才会继续往下执行。在主线程里await(),在任务线程里countDown()。
public static void main(String[] args) throws InterruptedException {CountDownLatch latch = new CountDownLatch(5);ExecutorService service = Executors.newFixedThreadPool(5);for (int i = 0; i < 5; i++) {final int no = i + 1;Runnable runnable = new Runnable() {@Overridepublic void run() {try {Thread.sleep((long) (Math.random() * 10000));System.out.println(no + "号运动员完成了比赛。");} catch (InterruptedException e) {e.printStackTrace();} finally {latch.countDown();}}};service.submit(runnable);}System.out.println("等待5个运动员都跑完.....");latch.await();System.out.println("所有人都跑完了,比赛结束。");}2.2.2、场景二:多个线程等待一个线程
多个线程等待某一个线程的信息,同时开始执行。在主线程countDown(),在任务线程里await()。
public static void main(String[] args) throws InterruptedException {System.out.println("运动员有5秒的准备时间");CountDownLatch countDownLatch = new CountDownLatch(1);ExecutorService service = Executors.newFixedThreadPool(5);for (int i = 0; i < 5; i++) {final int no = i + 1;Runnable runnable = new Runnable() {@Overridepublic void run() {System.out.println(no + "号运动员准备完毕,等待裁判员的发令枪");try {countDownLatch.await();System.out.println(no + "号运动员开始跑步了");} catch (InterruptedException e) {e.printStackTrace();}}};service.submit(runnable);}Thread.sleep(5000);System.out.println("5秒准备时间已过,发令枪响,比赛开始!");countDownLatch.countDown();}2.3、CyclicBarrier(栅栏)
2.3.1、原理
内部有一个正数计数器,初始化时指定一个正数,每当有一个线程使用await()方法时,计数器加1,当前线程阻塞,直到计数器的值为初始化的正数时,打开栅栏。
2.3.2、构造函数
- CyclicBarrier(int parties)
指定一个正整数parties,在线程中调用await(),阻塞当前线程;
当有parties个线程都调用await()时,唤醒之前阻塞的所有线程,继续往下执行。
- CyclicBarrier(int parties, Runnable barrierAction)
parties:等待的线程数
barrierAction:预定数量的线程数到达后需要执行的操作
2.3.3、CyclicBarrier和CountDownLatch的区别
- 相同点
都能阻塞一个或一组线程,直到某个预设的条件达成发生,再统一出发。
- 不同点
作用对象不同:
CyclicBarrier 要等固定数量的线程都到达了栅栏位置才能继续执行,作用于线程;
CountDownLatch 只需等待数字倒数到 0,作用于事件;
CountDownLatch 是在调用了 countDown 方法之后把数字倒数减 1,而 CyclicBarrier 是在某线程开始等待后把计数减 1。
可重用性不同:
CountDownLatch不可重用,锁打开后就不能重用了;
CyclicBarrier可重用,满足线程数量后可自动重新计数,也可调用reset方法进行重置CyclicBarrier。
执行动作不同:
CyclicBarrier 有执行动作 barrierAction,而 CountDownLatch 没这个功能。
3、Java内存模型
3.1、Java内存模型(JMM)
- JVM内存模型
和Java虚拟机的运行时区域有关。
程序计数器、Java堆、虚拟机栈、方法区、运行时常量池。
.java文件->编译(.class文件)->机器指令->CPU运行机器指令
- Java内存模型(JMM)
和Java的并发编程有关。
JMM 是一组规范,保证同一个程序在不同虚拟机上运行可得到相同的结果。
实现java程序在各种不同的平台上都能达到内存访问的一致性。
重排序、原子性、内存可见性。
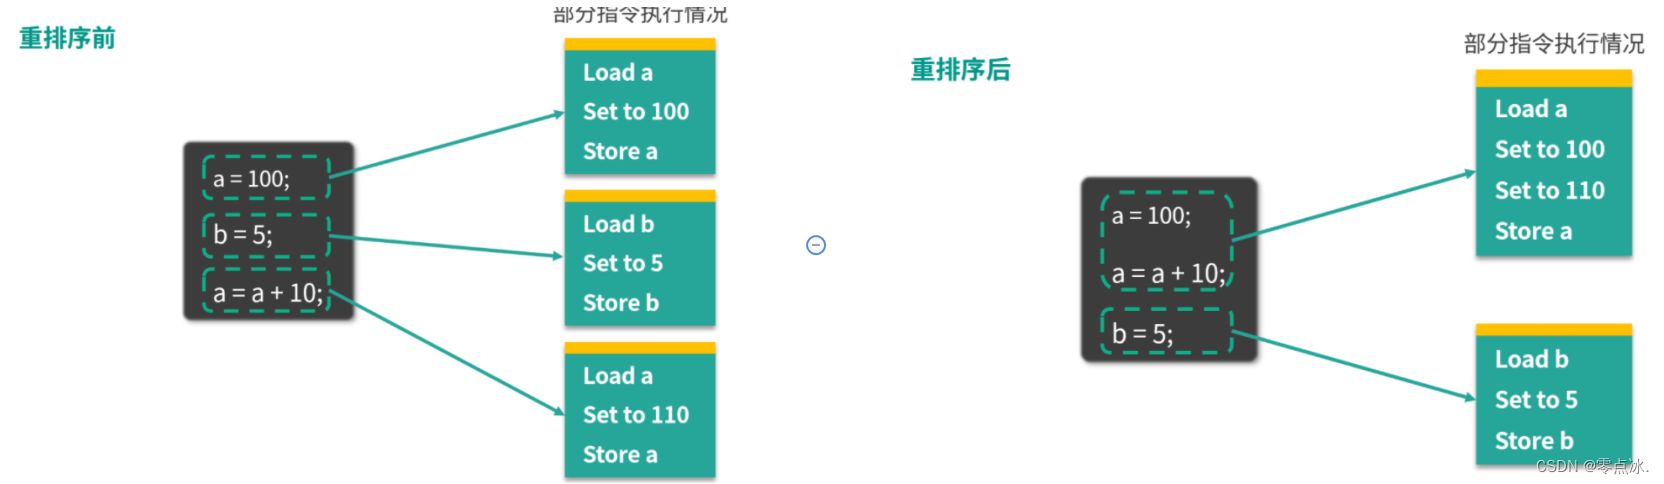
3.2、指令重排序
在保证业务逻辑不变的前提下,对指令执行的顺序进行调整,进而提高处理速度。
重排序的时机:
编译器优化、CPU重排序、内存重排序
3.3、Java原子操作的注意事项
3.3.1、Java中的原子操作
- 除了 long 和 double 之外的基本类型(int、byte、boolean、short、char、float)的读/写操作,都天然的具备原子性
- 所有引用 reference 的读/写操作
- 加了 volatile 后,所有变量的读/写操作(包含 long 和 double)。这也就意味着 long 和 double 加了 volatile 关键字之后,对它们的读写操作同样具备原子性
- volatile修饰的变量只能保证读/写的原子性,不能保证组合操作的原子性。
- 在 java.concurrent.Atomic 包中的一部分类的一部分方法是具备原子性的,比如 AtomicInteger 的 incrementAndGet 方法。
3.3.2、long和double的原子性
long 和 double 的值需要占用 64 位的内存空间,而对于 64 位值的写入,可以分为两个 32 位的操作来进行。
而在目前各种平台下的主流虚拟机的实现中,几乎都会把 64 位数据的读写操作作为原子操作来对待,因此我们在编写代码时一般不需要为了避免读到“半个变量”而把 long 和 double 声明为 volatile 的。
3.4、内存可见性
工作内存保存的是主内存的副本。
线程变量更改后,不能立即更新到主内存,导致其他线程不能及时获取最新的数据。
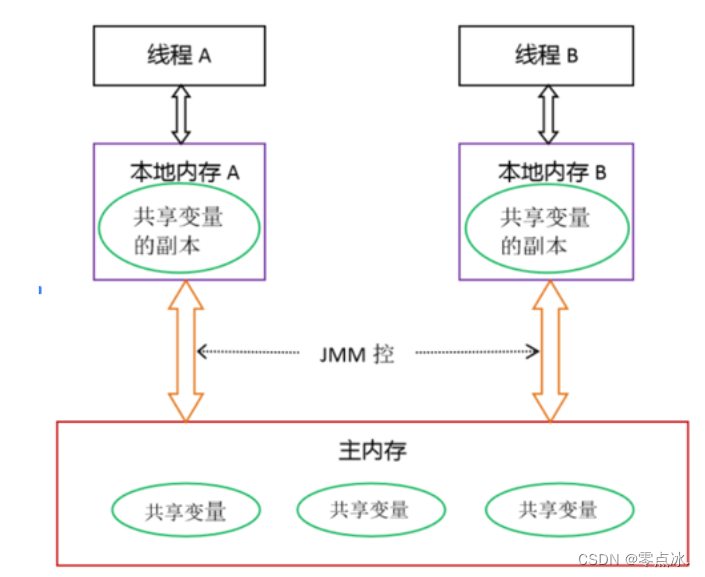
3.5、主内存和工作内存的关系
- 所有的变量都存储在主内存中,同时每个线程拥有自己独立的工作内存,而工作内存中的变量的内容是主内存中该变量的拷贝
- 线程不能直接读 / 写主内存中的变量,但可以操作自己工作内存中的变量,然后再同步到主内存中,这样,其他线程就可以看到本次修改
- 主内存是由多个线程所共享的,但线程间不共享各自的工作内存,如果线程间需要通信,则必须借助主内存中转来完成
3.6、happens-before原则
3.6.1、定义
如果第一个操作 happens-before 第二个操作,那么我们就说第一个操作对于第二个操作一定是可见的,也就是第二个操作在执行时就一定能保证看见第一个操作执行的结果。
如果有操作 x 和操作 y,用 hb(x, y) 来表示 x happens-before y。
3.6.2、规则
- 锁操作的 happens-before 规则
操作 A 是解锁,而操作 B 是对同一个锁的加锁,那么 hb(A, B) 。
线程 A 在解锁之前的所有操作,对于线程 B 的对同一个锁的加锁之后的所有操作而言,都是可见的。
- volatile 的 happens-before 规则
对一个 volatile 变量的写操作 happen-before 后面对该变量的读操作。
如果变量被 volatile 修饰,那么每次修改之后,其他线程在读取这个变量的时候一定能读取到该变量最新的值。
3.7、volatile作用
保证可见性
volatile修饰的变量直接写入到主内存中,不存在主内存和工作内存同步造成的数据延迟。
禁止重排序
由于编译器或 CPU 的优化,代码的实际执行顺序可能与我们编写的顺序是不同的,这在单线程的情况下是没问题的,但是一旦引入多线程,这种乱序就可能会导致严重的线程安全问题。
3.8、单例模式的双重检查锁模式
3.8.1、实现代码
public class Singleton {private static volatile Singleton singleton;private Singleton() {}public static Singleton getInstance() {if (singleton == null) {synchronized (Singleton.class) {if (singleton == null) {singleton = new Singleton();}}}return singleton;}
}
3.8.2、实体对象为什么要加volatile?

- 不加volatile时可能发生指令重排序,顺序如上图所示;
- 在第二步时,对象就不为null了;
- 此时,另一个线程进行第一个ifnull判断,不为空,返回对象;
- 但此时的对象还没有进行初始化,在使用时就可能发生问题。
4、CAS原理
4.1、CAS是什么
Compare-And-Swap:比较并交换,是乐观锁的底层原理。避免使用互斥锁。
CAS 有三个操作数:内存值 V、预期值 A、要修改的值 B。CAS 最核心的思路就是,仅当预期值 A 和当前的内存值 V 相同时,才将内存值修改为 B。
4.2、优点
- 当多个线程同时使用 CAS 更新同一个变量时,只有其中一个线程能够操作成功,而其他线程都会更新失败,但更新失败的线程并不会被阻塞,而是被告知这次由于竞争而导致的操作失败,但还可以再次尝试;
- 原子性: CAS 相关的指令是具备原子性的,这个组合操作在执行期间不会被打断,这样就能保证并发安全。
4.3、CAS应用场景
- 并发容器:ConcurrentHashMap、ConcurrentLinkedQueue
- 数据库:更新前检查版本号:
在更新数据时,我们可以利用 version 字段在数据库中实现乐观锁和 CAS 操作,而在获取和修改数据时都不需要加悲观锁
- 原子类:Unsafe类
4.4、CAS导致的问题
- ABA问题(可以通过添加版本号解决)
假设有两个线程——线程1和线程2,两个线程按照顺序进行以下操作:
线程1读取内存中数据为A;
线程2将该数据修改为B;
线程2将该数据修改为A;
线程1对数据进行CAS操作
第4步中的A已经不是第1步中的A值了。
比如栈顶问题->一个栈的栈顶经过两次(或多次)变化又恢复了原值,但是栈可能已发生了变化
- 高竞争下的开销问题
在并发冲突概率大的高竞争环境下,CAS一直失败,会一直重试,导致CPU开销较大。
解决方法:增加重试阈值
5、死锁问题
5.1、定义
死锁就是两个或多个线程(或进程)被无限期地阻塞,相互等待对方手中资源的一种状态。
5.2、条件
- 互斥
共享资源,同一时间只能被一个线程使用。
- 请求与条件保持
当一个线程因请求资源而阻塞时,则需对已获得的资源保持不放。如果在请求资源时阻塞了,并且会自动释放手中资源(例如锁)的话,那别人自然就能拿到我刚才释放的资源,也就不会形成死锁。
- 不剥夺条件
线程已获得的资源,在未使用完之前,不会被强行剥夺
- 循环等待条件
多个线程,分别持有对方所需的资源,并形成环路。
比如:
线程1:持有锁A,尝试获取锁B;
线程2:持有锁B,尝试获取锁C;
线程3:持有锁C,尝试获取锁A。
5.3、命令行定位死锁(jstack)
- 查询当前Java程序的pid:${JAVA_HOME}/bin/jps
- 获取线程获取锁的信息:${JAVA_HOME}/bin/jstack pid
5.4、如何解决死锁
5.4.1、线上死锁
立刻保存JVM信息、日志信息,然后立刻重启服务。
5.4.2、避免死锁
- 顺序加锁,锁嵌套时,保证多个Lock以相同的顺序请求加锁
- 超时放弃,Lock接口的tryLock(long time, TimeUnit unit),按照固定时长等待锁,获取锁超时后,主动释放已经获得的锁
- 尽量避免同一个线程对多个Lock进行锁定
5.4.3、检测与恢复策略(先允许系统发生死锁,然后再解除)
- 终止线程
线程优先级:先终止优先级低的线程;
占用资源:先终止占用资源少的线程;
运行时间:先终止运行时间少的线程。
- 资源抢占
剥夺某个线程已经获取的资源,供其他线程使用。(线程回退、释放资源)
5.4.4、鸵鸟策略
死锁发生概率极小时,允许死锁发生,发生后再人工处理死锁,比如重启服务等。
6、final关键字和不变性
6.1、用法
- 修饰变量
该变量一旦被赋值就不能修改
成员变量:声明变量时直接赋值;构造函数中赋值、类的构造代码块中赋值。
静态变量:声明变量时直接赋值;静态代码块中赋值。
局部变量:在使用前进行赋值即可。
修饰入参
在方法内部不能修改该参数
修饰对象时,该对象的引用不可变,该对象的内容是可变的。
- 修饰方法:被final修饰的方法不能被重写,即不能被override
- 修饰类:该类不能被继承
6.2、为什么String被设计成不可变的
- 节省大量内存空间
使用字符串常量池,两个字符串变量内容一致,就会指向同一个对象,而不需要创建新对象。
- 保证hash值的唯一性
用作HashMap的key,保证对同一个String进行hash能获得相同的hash值。
- 避免重复计算hash值:
String中有个hash成员变量,用以缓存hashcode,不用每次都计算hash值。
- 线程安全
7、AQS框架
是一个用于构建锁、同步器等线程协作工具类的框架。
应用:ReentrantLock、ReentrantReadWriteLock、Semaphore(信号量-许可证)、CountDownLatch(闭锁)
7.1、原理
三大核心:状态(status)、队列、期望协作工具类去实现的获取/释放等重要方法。
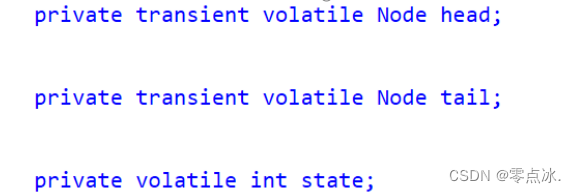
State变量可以理解成同步资源的锁状态,值为0时表示当前资源未被线程占用,值不为0时表示当前共享资源已被线程获取锁。
AQS就是基于CLH队列,用volatile修饰共享变量state,线程通过CAS去改变状态符,成功则获取锁成功,失败则进入等待队列,等待被唤醒。
AQS是一个多线程访问同步资源的的同步器框架。该框架维护了一个volatile int state(共享资源)和一个FIFO(CLH双向队列)线程等待队列(多线程争夺共享资源时会进入此队列)。
AQS一般以继承的方式被使用,重入锁ReentrantLock、闭锁、栅栏等都用到了AQS。
AQS的实现依赖内部的同步队列(FIFO双向队列),如果当前线程获取同步状态失败,AQS会将当前线程以及等待状态等信息构造成一个Node,将其加入同步队列的尾部,同时阻塞当前线程,当同步状态释放时,唤醒队列的头节点。
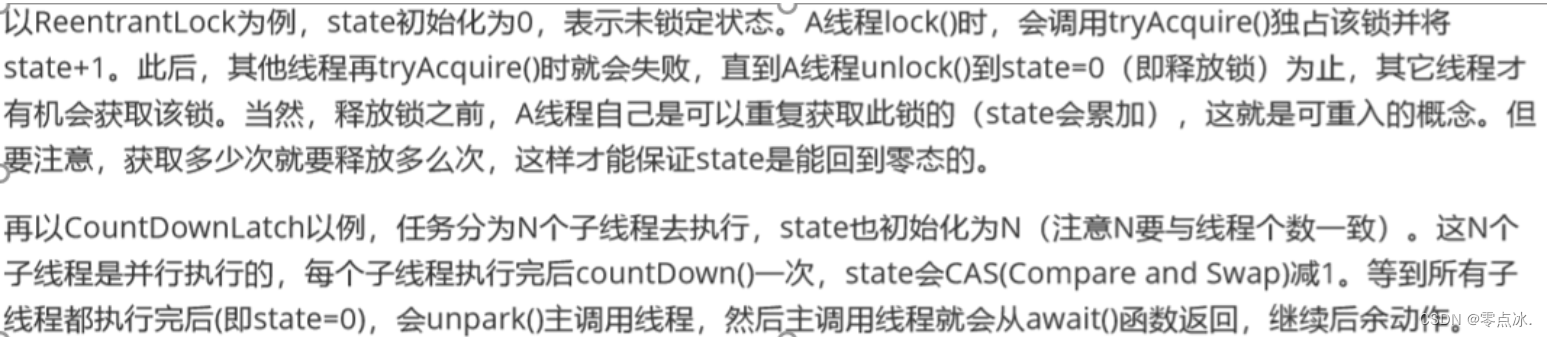
- 状态(status)
一个volatile int state(共享资源)。表示线程协作工具类的业务逻辑和状态。
信号量里表示许可证的数量
CountDownLatch里表示倒数的数量
ReentrantLock中表示锁的占有情况
CAS乐观锁实现:通过compareAndSetState 及 setState两个方法修改status的值。
- FIFO队列
存储等待的线程。充当线程的“排队管理器”。
如果当前线程获取同步状态失败,AQS会将该线程以及等待状态等信息构造成一个Node,将其加入同步队列的尾部,同时阻塞当前线程,当同步状态释放时,唤醒队列的头节点。
- 获取/释放方法
获取方法
ReentrantLock 中的 lock 方法,status=0获取成功;
Semaphore 中的 acquire 方法,status=正数获取成功;
CountDownLatch 获取方法就是 await 方法,status=0获取成功。
释放方法
ReentrantLock的unLock方法;
Semaphore的release方法;
CountDownLatch 的countDown方法。
7.2、线程协同工具类(AQS实现)
实现类只需要实现共享资源state的获取和释放方式即可。
独占:只有一个线程能执行->ReentrantLock
共享:多个线程可以同时执行->Semaphore、CountDownLatch、CyclicBarrier
独占和共享:ReentrantReadWriteLock
以上内容为个人学习理解,如有问题,欢迎在评论区指出。
部分内容截取自网络,如有侵权,联系作者删除。