青岛做公司网站的公司南京网络推广外包
目录
- 开发环境要求
- 运行方法
- 《彩图版飞机大战》程序使用说明
- 源码示例
- 源码及说明文档下载路径
开发环境要求
本系统的软件开发及运行环境具体如下。
操作系统:Windows 7、Windows 10。
Python版本:Python 3.7.1。
开发工具:PyCharm 2018。
Python内置模块:sys、random、codecs。
第三方模块:pygame。
注意:在使用第三方模块时,首先需要使用pip install命令安装该模块,例如,安装pygame模块,可以在Python命令窗口中执行以下命令:
pip install pygame
运行方法
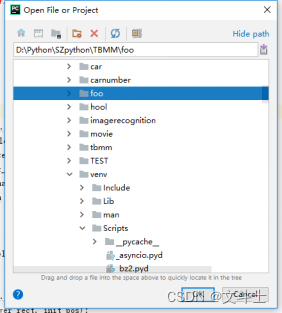
打开PyCharm开发环境,然后在主菜单上选择File→Open菜单项,在打开的Open File or Project对话框中,选择项目foo,如图1所示。
图1 Open File or Project对话框
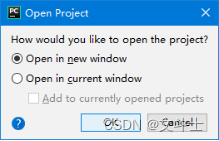
单击OK按钮,将弹出 Open Project对话框,在该对话框,如果想要在新的窗体中打开项目,则选中Open in new window单选按钮,否则在当前窗体中打开,则选中Open in current window单选按钮。这里在新窗体中打开文件,如图2所示。
图2 Open Project对话框
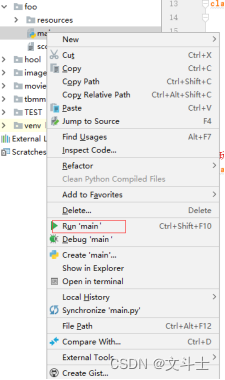
打开项目后,在右侧的Project面板中选中程序的主文件main.py,并且单击鼠标右键,在弹出的快捷菜单中选择“Run ’ main’”菜单项运行项目,如图3所示。
图3 选择“Run ’ main’”即可运行程序
《彩图版飞机大战》程序使用说明
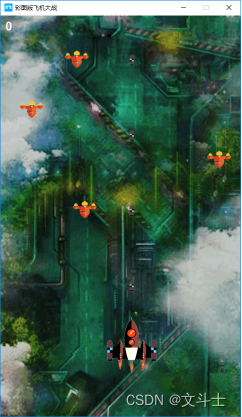
在PyCharm中运行《彩图版飞机大战》即可进入如图4所示的游戏界面。
图4 游戏主界面
具体的操作步骤如下:
(1)玩游戏。在游戏主界面中,从屏幕的顶部不断出现下落的敌机,玩家按下键盘上的↑、↓、←、→方向键移动飞机的位置并且发射子弹打掉敌机,每打掉一只敌机得100分。当玩家飞机与敌机发生碰撞时游戏结束,同时显示游戏得分以及排行榜按钮,游戏结束界面如图5所示。
图5 游戏结束界面
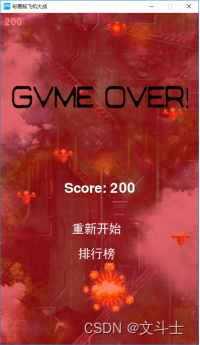
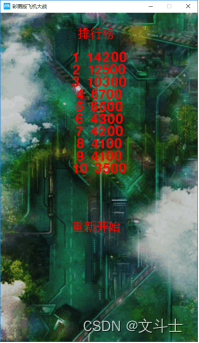
(2)查看排行榜。在游戏结束界面中,单击“排行榜”按钮,将显示排行榜界面,如图6所示。在该界面中,如果想重新玩游戏,可以单击“重新开始”按钮。
图6 游戏排行榜界面
源码示例
# -*- coding: utf-8 -*-
import pygame           # 导入pygame库
from pygame.locals import *  # 导入pygame库中的一些常量
from sys import exit  # 导入sys库中的exit函数
import random
import codecs# 设置游戏屏幕大小
SCREEN_WIDTH = 480
SCREEN_HEIGHT = 800# 子弹类
class Bullet(pygame.sprite.Sprite):def __init__(self, bullet_img, init_pos):# 调用了父类的初始化方法来初始化sprite的属性pygame.sprite.Sprite.__init__(self)# 调用了父类的初始化方法来初始化sprite的属性self.image = bullet_imgself.rect = self.image.get_rect()self.rect.midbottom = init_posself.speed = 10def move(self):self.rect.top -= self.speed# 玩家飞机类
class Player(pygame.sprite.Sprite):def __init__(self, player_rect, init_pos):pygame.sprite.Sprite.__init__(self)self.image = []  # 用来存储玩家飞机图片的列表for i in range(len(player_rect)):self.image.append(player_rect[i].convert_alpha())self.rect = player_rect[0].get_rect()  # 初始化图片所在的矩形self.rect.topleft = init_pos  # 初始化矩形的左上角坐标self.speed = 8  # 初始化玩家飞机速度,这里是一个确定的值self.bullets = pygame.sprite.Group()  # 玩家飞机所发射的子弹的集合self.img_index = 0  # 玩家飞机图片索引self.is_hit = False  # 玩家是否被击中# 发射子弹def shoot(self, bullet_img):bullet = Bullet(bullet_img, self.rect.midtop)self.bullets.add(bullet)# 向上移动,需要判断边界def moveUp(self):if self.rect.top <= 0:self.rect.top = 0else:self.rect.top -= self.speed# 向下移动,需要判断边界def moveDown(self):if self.rect.top >= SCREEN_HEIGHT - self.rect.height:self.rect.top = SCREEN_HEIGHT - self.rect.heightelse:self.rect.top += self.speed# 向左移动,需要判断边界def moveLeft(self):if self.rect.left <= 0:self.rect.left = 0else:self.rect.left -= self.speed# 向右移动,需要判断边界def moveRight(self):if self.rect.left >= SCREEN_WIDTH - self.rect.width:self.rect.left = SCREEN_WIDTH - self.rect.widthelse:self.rect.left += self.speed# 敌机类
class Enemy(pygame.sprite.Sprite):def __init__(self, enemy_img, enemy_down_imgs, init_pos):pygame.sprite.Sprite.__init__(self)self.image = enemy_imgself.rect = self.image.get_rect()self.rect.topleft = init_posself.down_imgs = enemy_down_imgsself.speed = 2self.down_index = 0# 敌机移动,边界判断及删除在游戏主循环里处理def move(self):self.rect.top += self.speed
"""
对文件的操作
写入文本:
传入参数为content,strim,path;content为需要写入的内容,数据类型为字符串。
path为写入的位置,数据类型为字符串。strim写入方式
传入的path需如下定义:path= r’ D:\text.txt’
f = codecs.open(path, strim, 'utf8')中,codecs为包,需要用impor引入。
strim=’a’表示追加写入txt,可以换成’w’,表示覆盖写入。
'utf8'表述写入的编码,可以换成'utf16'等。
"""
def write_txt(content, strim, path):f = codecs.open(path, strim, 'utf8')f.write(str(content))f.close()
"""
读取txt:
表示按行读取txt文件,utf8表 示读取编码为utf8的文件,可以根据需求改成utf16,或者GBK等。
返回的为数组,每一个数组的元素代表一行,
若想返回字符串格式,可以将改写成return ‘\n’.join(lines)
"""
def read_txt(path):with open(path, 'r', encoding='utf8') as f:lines = f.readlines()return lines# 初始化 pygame
pygame.init()
# 设置游戏界面大小
screen = pygame.display.set_mode((SCREEN_WIDTH, SCREEN_HEIGHT))
# 游戏界面标题
pygame.display.set_caption('彩图版飞机大战')
# 图标
ic_launcher = pygame.image.load('resources/image/ic_launcher.png').convert_alpha()
pygame.display.set_icon(ic_launcher)
# 背景图
background = pygame.image.load('resources/image/background.png').convert_alpha()
# 游戏结束背景图
game_over = pygame.image.load('resources/image/gameover.png')
# 子弹图片
plane_bullet = pygame.image.load('resources/image/bullet.png')
# 飞机图片
player_img1= pygame.image.load('resources/image/player1.png')
player_img2= pygame.image.load('resources/image/player2.png')
player_img3= pygame.image.load('resources/image/player_off1.png')
player_img4= pygame.image.load('resources/image/player_off2.png')
player_img5= pygame.image.load('resources/image/player_off3.png')
# 敌机图片
enemy_img1= pygame.image.load('resources/image/enemy1.png')
enemy_img2= pygame.image.load('resources/image/enemy2.png')
enemy_img3= pygame.image.load('resources/image/enemy3.png')
enemy_img4= pygame.image.load('resources/image/enemy4.png')
# 开始游戏方法
def startGame():# 设置玩家飞机不同状态的图片列表,多张图片展示为动画效果player_rect = []# 玩家飞机图片player_rect.append(player_img1)player_rect.append(player_img2)# 玩家爆炸图片player_rect.append(player_img2)player_rect.append(player_img3)player_rect.append(player_img4)player_rect.append(player_img5)player_pos = [200, 600]# 初始化玩家飞机player = Player(player_rect, player_pos)# 子弹图片bullet_img = plane_bullet# 敌机不同状态的图片列表,多张图片展示为动画效果enemy1_img = enemy_img1enemy1_rect=enemy1_img.get_rect()enemy1_down_imgs = []enemy1_down_imgs.append(enemy_img1)enemy1_down_imgs.append(enemy_img2)enemy1_down_imgs.append(enemy_img3)enemy1_down_imgs.append(enemy_img4)# 储存敌机enemies1 = pygame.sprite.Group()# 存储被击毁的飞机,用来渲染击毁动画enemies_down = pygame.sprite.Group()# 初始化射击及敌机移动频率shoot_frequency = 0enemy_frequency = 0# 玩家飞机被击中后的效果处理player_down_index = 16# 初始化分数score = 0# 游戏循环帧率设置clock = pygame.time.Clock()# 判断游戏循环退出的参数running = True# 游戏主循环while running:# 绘制背景screen.fill(0)screen.blit(background, (0, 0))# 控制游戏最大帧率为 60clock.tick(60)# 生成子弹,需要控制发射频率# 首先判断玩家飞机没有被击中if not player.is_hit:if shoot_frequency % 15 == 0:player.shoot(bullet_img)shoot_frequency += 1if shoot_frequency >= 15:shoot_frequency = 0for bullet in player.bullets:# 以固定速度移动子弹bullet.move()# 移动出屏幕后删除子弹if bullet.rect.bottom < 0:player.bullets.remove(bullet)# 显示子弹player.bullets.draw(screen)# 生成敌机,需要控制生成频率if enemy_frequency % 50 == 0:enemy1_pos = [random.randint(0, SCREEN_WIDTH - enemy1_rect.width), 0]enemy1 = Enemy(enemy1_img, enemy1_down_imgs, enemy1_pos)enemies1.add(enemy1)enemy_frequency += 1if enemy_frequency >= 100:enemy_frequency = 0for enemy in enemies1:# 移动敌机enemy.move()# 敌机与玩家飞机碰撞效果处理 两个精灵之间的圆检测if pygame.sprite.collide_circle(enemy, player):enemies_down.add(enemy)enemies1.remove(enemy)player.is_hit = Truebreak# 移动出屏幕后删除飞机if enemy.rect.top < 0:enemies1.remove(enemy)# 敌机被子弹击中效果处理# 将被击中的敌机对象添加到击毁敌机 Group 中,用来渲染击毁动画# 方法groupcollide()是检测两个精灵组中精灵们的矩形冲突enemies1_down = pygame.sprite.groupcollide(enemies1, player.bullets, 1, 1)# 遍历key值 返回的碰撞敌机for enemy_down in enemies1_down:# 点击销毁的敌机到列表enemies_down.add(enemy_down)# 绘制玩家飞机if not player.is_hit:screen.blit(player.image[player.img_index], player.rect)# 更换图片索引使飞机有动画效果player.img_index = shoot_frequency // 8else:# 玩家飞机被击中后的效果处理player.img_index = player_down_index // 8screen.blit(player.image[player.img_index], player.rect)player_down_index += 1if player_down_index > 47:# 击中效果处理完成后游戏结束running = False# 敌机被子弹击中效果显示for enemy_down in enemies_down:if enemy_down.down_index == 0:passif enemy_down.down_index > 7:enemies_down.remove(enemy_down)score += 100continue#显示碰撞图片screen.blit(enemy_down.down_imgs[enemy_down.down_index // 2], enemy_down.rect)enemy_down.down_index += 1# 显示精灵enemies1.draw(screen)# 绘制当前得分score_font = pygame.font.Font(None, 36)score_text = score_font.render(str(score), True, (255, 255, 255))text_rect = score_text.get_rect()text_rect.topleft = [10, 10]screen.blit(score_text, text_rect)# 更新屏幕pygame.display.update()# 处理游戏退出for event in pygame.event.get():if event.type == pygame.QUIT:pygame.quit()exit()# 获取键盘事件(上下左右按键)key_pressed = pygame.key.get_pressed()# 处理键盘事件(移动飞机的位置)if key_pressed[K_w] or key_pressed[K_UP]:player.moveUp()if key_pressed[K_s] or key_pressed[K_DOWN]:player.moveDown()if key_pressed[K_a] or key_pressed[K_LEFT]:player.moveLeft()if key_pressed[K_d] or key_pressed[K_RIGHT]:player.moveRight()# 绘制游戏结束背景screen.blit(game_over, (0, 0))# 游戏 Game Over 后显示最终得分font = pygame.font.Font(None, 48)text = font.render('Score: ' + str(score), True, (255, 255, 255))text_rect = text.get_rect()text_rect.centerx = screen.get_rect().centerxtext_rect.centery = screen.get_rect().centery + 24screen.blit(text, text_rect)# 使用系统字体xtfont = pygame.font.SysFont('SimHei', 30)# 重新开始按钮textstart = xtfont.render('重新开始 ', True, (255, 255, 255))text_rect = textstart.get_rect()text_rect.centerx = screen.get_rect().centerxtext_rect.centery = screen.get_rect().centery + 120screen.blit(textstart, text_rect)# 排行榜按钮textstart = xtfont.render('排行榜 ', True, (255, 255, 255))text_rect = textstart.get_rect()text_rect.centerx = screen.get_rect().centerxtext_rect.centery = screen.get_rect().centery + 180screen.blit(textstart, text_rect)# 判断得分更新排行榜# 临时的变量在到排行榜的时候使用j = 0#获取文件中内容转换成列表使用mr分割开内容arrayscore = read_txt(r'score.txt')[0].split('mr')# 循环分数列表在列表里排序for i in range(0, len(arrayscore)):# 判断当前获得的分数是否大于排行榜上的分数if score > int(arrayscore[i]):# 大于排行榜上的内容 把分数和当前分数进行替换j = arrayscore[i]arrayscore[i] = str(score)score = 0# 替换下来的分数下移动一位if int(j) > int(arrayscore[i]):k = arrayscore[i]arrayscore[i] = str(j)j = k#  循环分数列表 写入文档for i in range(0, len(arrayscore)):# 判断列表中第一个分数if i == 0:# 覆盖写入内容追加mr方便分割内容write_txt(arrayscore[i] + 'mr', 'w', r'score.txt')else:# 判断是否为最后一个分数if (i == 9):# 最近添加内容最后一个分数不添加mrwrite_txt(arrayscore[i], 'a', r'score.txt')else:# 不是最后一个分数,添加的时候添加mrwrite_txt(arrayscore[i] + 'mr', 'a', r'score.txt')# 排行榜
def gameRanking():screen2 = pygame.display.set_mode((SCREEN_WIDTH, SCREEN_HEIGHT))# 绘制背景screen2.fill(0)screen2.blit(background, (0, 0))# 使用系统字体xtfont = pygame.font.SysFont('SimHei', 30)# 重新开始按钮textstart = xtfont.render('排行榜 ', True, (255, 0, 0))text_rect = textstart.get_rect()text_rect.centerx = screen.get_rect().centerxtext_rect.centery = 50screen.blit(textstart, text_rect)# 重新开始按钮textstart = xtfont.render('重新开始 ', True, (255, 0, 0))text_rect = textstart.get_rect()text_rect.centerx = screen.get_rect().centerxtext_rect.centery = screen.get_rect().centery + 120screen2.blit(textstart, text_rect)# 获取排行文档内容arrayscore = read_txt(r'score.txt')[0].split('mr')# 循环排行榜文件显示排行for i in range(0, len(arrayscore)):# 游戏 Game Over 后显示最终得分font = pygame.font.Font(None, 48)# 排名重1到10k=i+1text = font.render(str(k) +"  " +arrayscore[i], True, (255, 0, 0))text_rect = text.get_rect()text_rect.centerx = screen2.get_rect().centerxtext_rect.centery = 80 + 30*k# 绘制分数内容screen2.blit(text, text_rect)# 开始游戏
startGame()# 判断点击位置以及处理游戏推出
while True:for event in pygame.event.get():# 关闭页面游戏退出if event.type == pygame.QUIT:pygame.quit()exit()# 鼠标单击elif event.type == pygame.MOUSEBUTTONDOWN:# 判断鼠标单击的位置是否为开始按钮位置范围内if screen.get_rect().centerx - 70 <= event.pos[0] \and event.pos[0] <= screen.get_rect().centerx + 50 \and screen.get_rect().centery + 100 <= event.pos[1] \and screen.get_rect().centery + 140 >= event.pos[1]:# 重新开始游戏startGame()# 判断鼠标是否单击排行榜按钮if screen.get_rect().centerx - 70 <= event.pos[0] \and event.pos[0] <= screen.get_rect().centerx + 50 \and screen.get_rect().centery + 160 <= event.pos[1] \and screen.get_rect().centery + 200 >= event.pos[1]:# 显示排行榜gameRanking()# 更新界面pygame.display.update()
源码及说明文档下载路径
彩图版飞机大战的程序使用说明.zip