单页面网站做百度推广效果免费网页制作模板
前言
在一个容器的创建或是使用之前,我们应该先明白这个容器的一些特征。
我们可以通过文档来来了解,当然我也会将重要的部分写在下面。
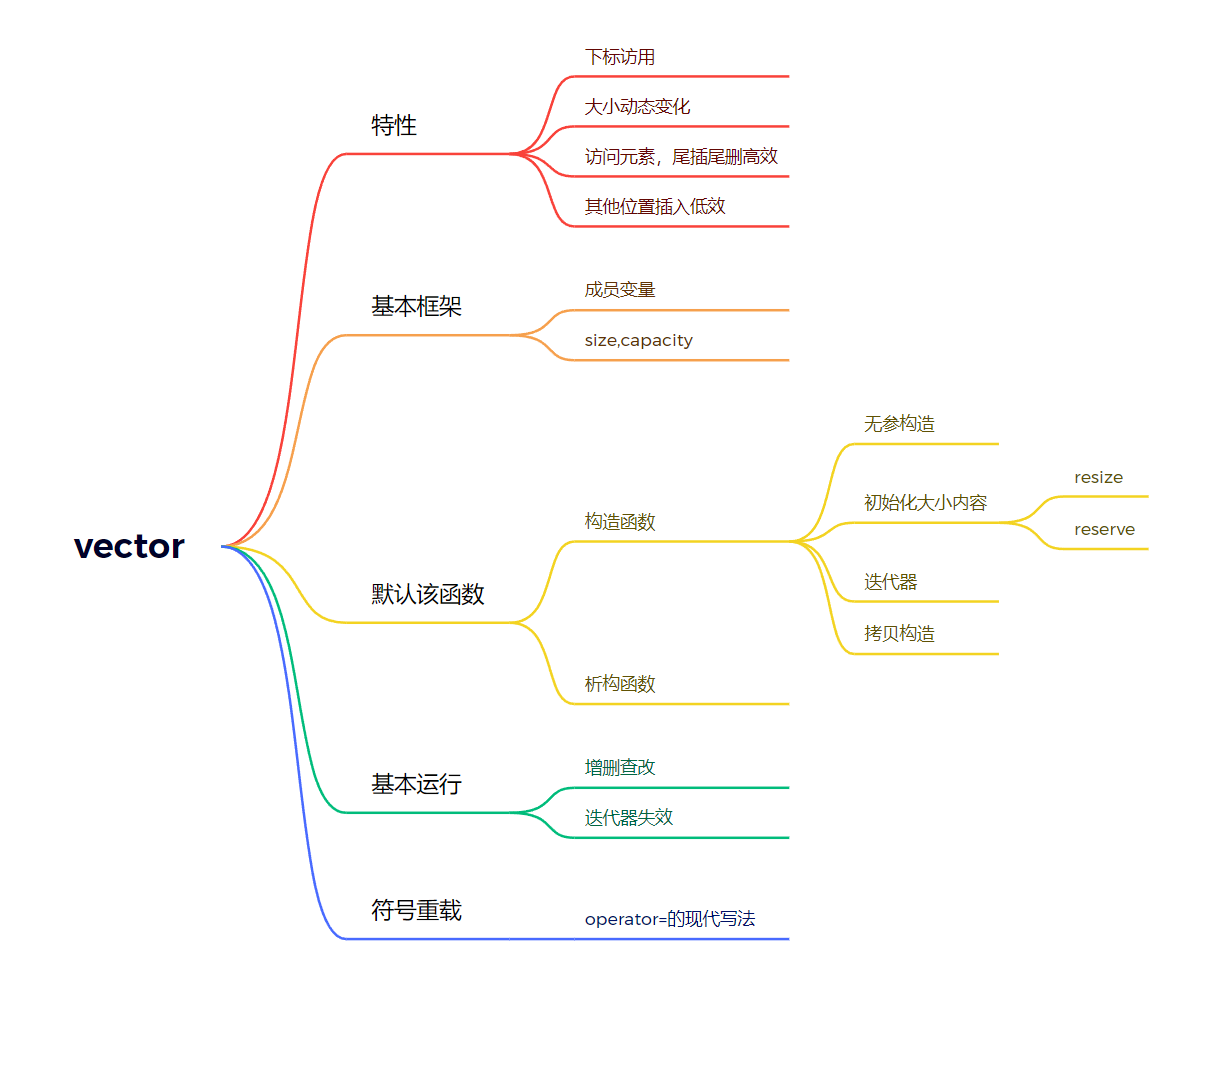
1. vector 是表示可变大小数组的序列容器。2. 就像数组一样, vector 也采用的连续存储空间来存储元素。也就是意味着 可以采用下标 对 vector 的元素进行访问,和数组一样高效。但是又不像数组,它的 大小是可以动态改变 的,而且它的 大小会被容器自动处理 。3. 本质讲, vector 使用动态分配数组来存储它的元素。当新元素插入时候,这个数组需要被重新分配大小为了增加存储空间。其做法是, 分配一个新的数组 ,然后将全部元素移到这个数组。就时间而言,这是一个相对代价高的任务,因为每当一个新的元素加入到容器的时候,vector 并不会每次都重新分配大小 。4. vector 分配空间策略: vector 会分配一些额外的空间以适应可能的增长,因为存储空间比实际需要的存储空间更大。不同的库采用不同的策略权衡空间的使用和重新分配。但是无论如何,重新分配都应该是对数增长的间隔大小,以至于在末尾插入一个元素的时候是在常数时间的复杂度完成的。5. 因此, vector 占用了更多的存储空间,为了获得管理存储空间的能力,并且以一种有效的方式动态增长。6. 与其它动态序列容器相比( deque, list and forward_list ), vector 在 访问元素的时候更加高效,在末尾添加和删除元素相对高效 。对于 其它不在末尾的删除和插入操作,效率更低 。比起list 和 forward_list统一的迭代器和引用更好。
一.vector的基本框架
上次我们讲了string,其经本框架是由一个char的指针和两个分别代表含量和容量的整形构成。但是严格意义上string出现的时间很早并不属于stl,而在stl这个需要大量迭代器操作的地方,使用上面那种框架,似乎并不合适。所以我们使用如下操作。
使用三个指针_start _finish _end_of_storage
来构成vector的框架。而通过这个图我们可以发现size() capacity() empty()等函数可以轻松实现。
而这三个指针的类型取决于vector需要储存的数据。所以我们这里使用类模板,那么这样基本框架就构建完成了。
template<class T>class vector{	public:size_t capacity()const{return _endofstorage - _start;}size_t size()const{return _finish - _start;}
private:T* _start = nullptr;T* _finish = nullptr;T* _endofstorage = nullptr;//容量的最大};
二、vector的默认函数
作为一个类模板,合理的初始化是必不可少的。
其中1是无参数构造,2中 n为初始化vector的大小,val是vector的内容初始化的值,其默认为所传类型的默认值,比如int()=0, 3、是使用迭代器进行构造,4、拷贝构造

1.无参数构造
因为我们在成员变量的的声明是使用了就地初始化(c++11支持),所以在无参数构造时,就不用使用初始化列表。(关于类成员初始化我们可以看看这篇文章).所以这个构造就十分简单了
vector()
{}
2.初始化大小和内容
在实现这个函数前我们注意到,在vector中有一对有关与capacity的函数resize() reserve()
resize
reserve


如果我们实现了这两个函数构造函数就变的十分简单。
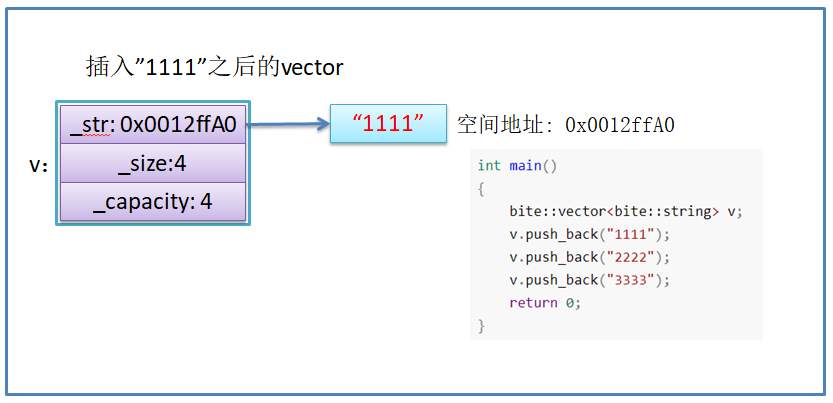
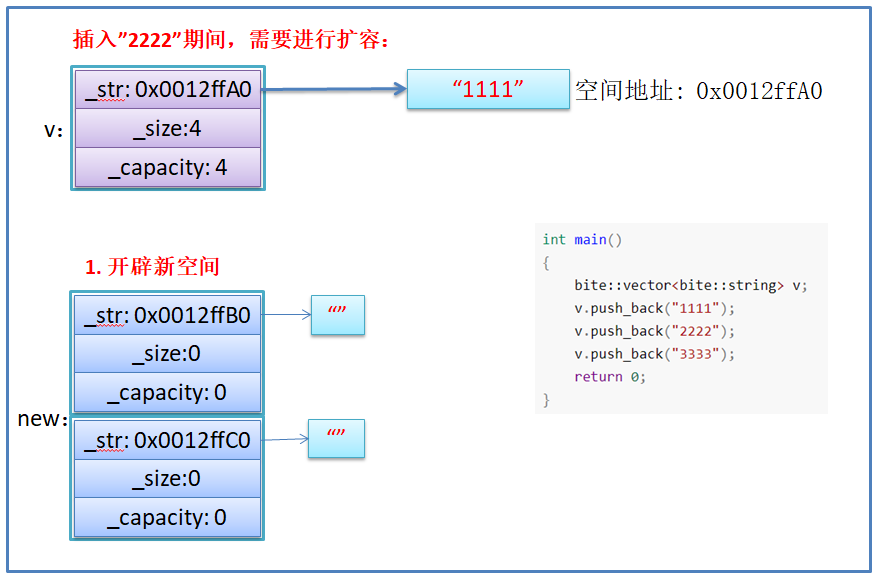
而在这两个函数中reserve主要改变vector的空间大小实现空间的开辟,空间的扩容。
void reserve(size_t n){if (n > capacity()){size_t sz = size();T* tmp = new T[n];if (_start){memcpy(tmp, _start, sizeof(T) * sz);delete[] _start;}_start = tmp;_finish = tmp + sz;_endofstorage = _start + n;}}这里要注意,size()是由_finish - _start;实现的所以要提前取出防止失效。这里我们并不是直接将this memcpy到tmp中,而是将以_start为起始地址,向后sz个空间中的值传到tmp所开辟的空间。否则会出现如下问题。


在实现reserve后resize()和vector(size_t n,T val=T())就变得简单了
vector(size_t n, const T& val = T()){resize(n, val);}vector(int n, const T& value = T()){resize(n, value);} void resize(size_t n,const T& val=T()){if (n < size()){_finish = _start + n;}else{reserve(n);while (_finish != _start + n){*_finish = val;++_finish;}}}3、迭代器构造
作为一个空间连续的容器,vector的迭代器相较与list map等容器就相对简单一些。
typedef T* iterator;typedef const T* const_iterator;iterator begin(){return _start;}iterator end(){return _finish;}const_iterator begin()const{return _start;}const_iterator end()const{return _finish;}private:iterator _start = nullptr;iterator _finish = nullptr;iterator _endofstorage = nullptr;//容量的最大于此同时将成员变量的类型也做一个改变,使得代码的可读性大大提升。
在迭代器实现后我们只需要将参数中的迭代器所指向值赋值到我们新构建的函数中就好。
template<class InputIterator>vector(InputIterator first, InputIterator last){reserve(last - first);while (first != last){if (_finish == _endofstorage){size_t newcapacity = capacity() == 0 ? 4 : capacity() * 2;reserve(newcapacity);}*_finish = *first;++_finish;++first;}}这里在模板函数中再次使用模板函数,是因为传进来的参数不一定与所构建的函数迭代器类型相同。
4、拷贝构造函数
在前三个函数都实现的情况下,拷贝构造可以说是小菜一碟。
vector(const vector<T>& v){_start = new T[v.capacity()];//memcpy(_start, v._start, sizeof(T)*v.size());for (size_t i = 0; i < v.size(); i++){_start[i] = v._start[i];}_finish = _start + v.size();_endofstorage = _start + v.capacity();}5、析构函数
就是单纯的消除空间。
~vector(){if (_start){delete[] _start;_start = _finish = _endofstorage = nullptr;}}三、vector的基本运行(增删查改)
作为一共空间连续的容器vector和string的增删查改逻辑其实差不多。
所以这里就不再重复实现了。
void push_back(const T& x){/*if (_finish == _endofstorage){size_t newcapacity = capacity() == 0 ? 4 : capacity() * 2;reserve(newcapacity);}*_finish = x;++_finish;*/insert(end(), x);}void pop_back(){erase(--end());}iterator insert(iterator pos, const T& x){assert(pos >= _start && pos <= _finish);if (_finish == _endofstorage){size_t len = pos - _start;size_t newcapacity = capacity() == 0 ? 4 : capacity() * 2;reserve(newcapacity);// 解决pos迭代器失效问题pos = _start + len;}iterator end = _finish - 1;while (end >= pos){*(end + 1) = *end;--end;}*pos = x;++_finish;return pos;}iterator erase(iterator pos){assert(pos >= _start && pos < _finish);iterator it = pos + 1;while (it != _finish){*(it - 1) = *it;++it;}--_finish;return pos;}
3.1vector迭代器失效问题
在了解这个问题前我们要清楚这个问题指什么
迭代器的主要作用就是让算法能够不用关心底层数据结构,其底层实际就是一个指针,或者是对指针进行了 封装 ,比如: vector 的迭代器就是原生态指针 T* 。因此 迭代器失效,实际就是迭代器底层对应指针所指向的 空间被销毁了,而使用一块已经被释放的空间 ,造成的后果是程序崩溃 ( 即 如果继续使用已经失效的迭代器, 程序可能会崩溃 ) 。
#include <iostream>
using namespace std;
#include <vector>
int main()
{vector<int> v{1,2,3,4,5,6};auto it = v.begin();// 将有效元素个数增加到100个,多出的位置使用8填充,操作期间底层会扩容// v.resize(100, 8);// reserve的作用就是改变扩容大小但不改变有效元素个数,操作期间可能会引起底层容量改变// v.reserve(100);// 插入元素期间,可能会引起扩容,而导致原空间被释放// v.insert(v.begin(), 0);// v.push_back(8);// 给vector重新赋值,可能会引起底层容量改变v.assign(100, 8);/*出错原因:以上操作,都有可能会导致vector扩容,也就是说vector底层原理旧空间被释放掉,
而在打印时,it还使用的是释放之间的旧空间,在对it迭代器操作时,实际操作的是一块已经被释放的
空间,而引起代码运行时崩溃。解决方式:在以上操作完成之后,如果想要继续通过迭代器操作vector中的元素,只需给it重新
赋值即可。*/while(it != v.end()){cout<< *it << " " ;++it;}cout<<endl;return 0;
}#include <iostream>
using namespace std;
#include <vector>
int main()
{int a[] = { 1, 2, 3, 4 };vector<int> v(a, a + sizeof(a) / sizeof(int));// 使用find查找3所在位置的iteratorvector<int>::iterator pos = find(v.begin(), v.end(), 3);// 删除pos位置的数据,导致pos迭代器失效。v.erase(pos);cout << *pos << endl; // 此处会导致非法访问return 0;
}4、vector的符号重载
这里需要着重讲的有一个operator=,而其他的与上一篇string差不多。
vector<T>& operator=(vector<T> v)
这里我们要注意,v是传值引用,可以说v是传参的一种拷贝构造,v不会影响到原来的参数。
所以我们可以直接将 v与this经行交换,而在离开函数时v会自动调用析构函数。
void swap(vector<T>& v){std::swap(_start, v._start);std::swap(_finish, v._finish);std::swap(_endofstorage, v._endofstorage);}vector<T>& operator=(vector<T> v){swap(v);return *this;}而其他的函数
T& operator[](size_t pos){assert(pos < size());return _start[pos];}const T& operator[](size_t pos)const{assert(pos < size());return _start[pos];}