网站找建站公司电商平台推广方式有哪些
一、作用
最长公共子序列的问题常用于解决字符串的相似度,是一个非常实用的算法,作为码农,此算法是我们的必备基本功。
二、概念
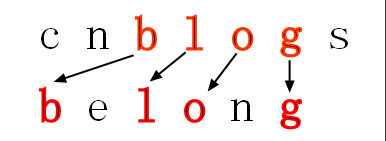
举个例子,cnblogs 这个字符串中子序列有多少个呢?很显然有 27 个,比如其中的 cb,cgs 等等都是其子序列,我们可以看出子序列不见得一定是连续的,连续的那是子串。
我想大家已经了解了子序列的概念,那现在可以延伸到两个字符串了,那么大家能够看出:cnblogs 和 belong 的公共子序列吗?
在你找出的公共子序列中,你能找出最长的公共子序列吗?
三、解决方案
<1> 枚举法
这种方法是最简单,也是最容易想到的,当然时间复杂度也是龟速的,我们可以分析一下,刚才也说过了cnblogs的子序列个数有27个 ,延伸一下:一个长度为N的字符串,其子序列有2N个,每个子序列要在第二个长度为N的字符串中去匹配,匹配一次需要O(N)的时间,总共也就是O(N*2N),可以看出,时间复杂度为指数级,恐怖的令人窒息。
<2> 动态规划
既然是经典的题目肯定是有优化空间的,并且解题方式是有固定流程的,这里我们采用的是矩阵实现,也就是二维数组。
第一步:先计算最长公共子序列的长度。
第二步:根据长度,然后通过回溯求出最长公共子序列。
现有两个序列 X={x1,x2,x3,…xi},Y={y1,y2,y3,…,yi},设一个 C[i,j]: 保存 Xi 与 Yj 的 LCS 的长度。
递推方程为:

不知道大家看懂了没?动态规划的一个重要性质特点就是解决“子问题重叠”的场景,可以有效的避免重复计算,根据上面的公式其实可以发现 C[i,j]一直保存着当前(Xi,Yi)的最大子序列长度。
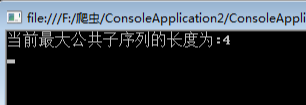
using System;namespace ConsoleApplication2{public class Program{static int[,] martix;static string str1 = "cnblogs";static string str2 = "belong";static void Main(string[] args){martix = new int[str1.Length + 1, str2.Length + 1];LCS(str1, str2);//只要拿出矩阵最后一个位置的数字即可Console.WriteLine("当前最大公共子序列的长度为:{0}", martix[str1.Length, str2.Length]);Console.Read();}static void LCS(string str1, string str2){//初始化边界,过滤掉0的情况for (int i = 0; i <= str1.Length; i++)martix[i, 0] = 0;for (int j = 0; j <= str2.Length; j++)martix[0, j] = 0;//填充矩阵for (int i = 1; i <= str1.Length; i++){for (int j = 1; j <= str2.Length; j++){//相等的情况if (str1[i - 1] == str2[j - 1]){martix[i, j] = martix[i - 1, j - 1] + 1;}else{//比较“左边”和“上边“,根据其max来填充if (martix[i - 1, j] >= martix[i, j - 1])martix[i, j] = martix[i - 1, j];elsemartix[i, j] = martix[i, j - 1];}}}}}}
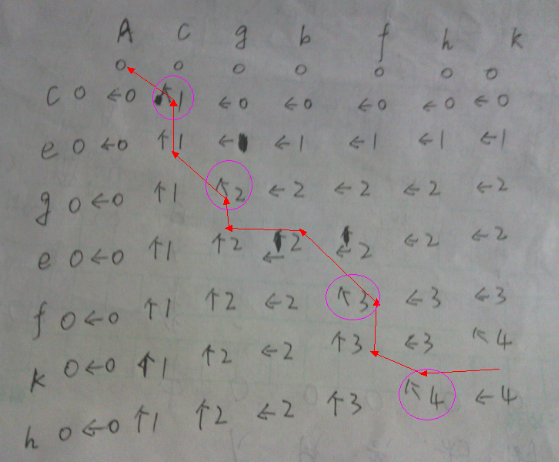
图大家可以自己画一画,代码完全是根据上面的公式照搬过来的,长度的问题我们已经解决了,这次要解决输出最长子序列的问题,我们采用一个标记函数 Flag[i,j],当
①:C[i,j]=C[i-1,j-1]+1 时 标记 Flag[i,j]=“left_up”; (左上方箭头)
②:C[i-1,j]>=C[i,j-1] 时 标记 Flag[i,j]=“left”; (左箭头)
③: C[i-1,j]<C[i,j-1] 时 标记 Flag[i,j]=“up”; (上箭头)
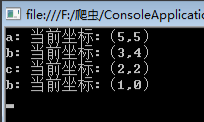
例如:我输入两个序列 X=acgbfhk,Y=cegefkh。
using System;namespace ConsoleApplication2{public class Program{static int[,] martix;static string[,] flag;static string str1 = "acgbfhk";static string str2 = "cegefkh";static void Main(string[] args){martix = new int[str1.Length + 1, str2.Length + 1];flag = new string[str1.Length + 1, str2.Length + 1];LCS(str1, str2);//打印子序列SubSequence(str1.Length, str2.Length);Console.Read();}static void LCS(string str1, string str2){//初始化边界,过滤掉0的情况for (int i = 0; i <= str1.Length; i++)martix[i, 0] = 0;for (int j = 0; j <= str2.Length; j++)martix[0, j] = 0;//填充矩阵for (int i = 1; i <= str1.Length; i++){for (int j = 1; j <= str2.Length; j++){//相等的情况if (str1[i - 1] == str2[j - 1]){martix[i, j] = martix[i - 1, j - 1] + 1;flag[i, j] = "left_up";}else{//比较“左边”和“上边“,根据其max来填充if (martix[i - 1, j] >= martix[i, j - 1]){martix[i, j] = martix[i - 1, j];flag[i, j] = "left";}else{martix[i, j] = martix[i, j - 1];flag[i, j] = "up";}}}}}static void SubSequence(int i, int j){if (i == 0 || j == 0)return;if (flag[i, j] == "left_up"){Console.WriteLine("{0}: 当前坐标:({1},{2})", str2[j - 1], i - 1, j - 1);//左前方SubSequence(i - 1, j - 1);}else{if (flag[i, j] == "up"){SubSequence(i, j - 1);}else{SubSequence(i - 1, j);}}}}}

好,我们再输入两个字符串:
static string str1 = "abcbdab";
static string str2 = "bdcaba";
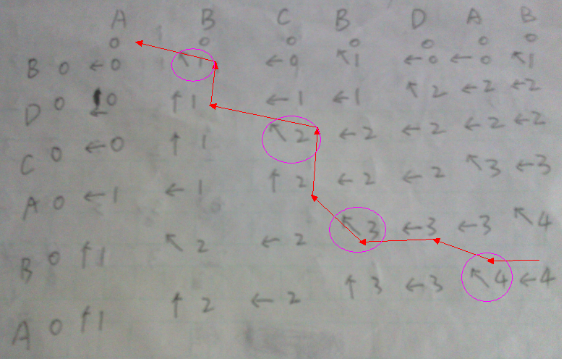
通过上面的两张图,我们来分析下它的时间复杂度和空间复杂度。
**时间复杂度:**构建矩阵我们花费了 O(MN)的时间,回溯时我们花费了 O(M+N)的时间,两者相加最终我们花费了 O(MN)的时间。
**空间复杂度:**构建矩阵我们花费了 O(MN)的空间,标记函数也花费了 O(MN)的空间,两者相加最终我们花费了 O(MN)的空间。