网站建设需怎么做怎么在百度上做广告
目录
- 1.摘要
- 2.人工蜂群算法ABC原理
- 3.强化学习驱动双邻域结构人工蜂群算法RL_DNSABC
- 4.结果展示
- 5.参考文献
- 6.代码获取
- 7.算法辅导·应用定制·读者交流
1.摘要
人工蜂群算法(Artificial Bee Colony,ABC)因其结构简单且在全局优化任务中的有效性而被广泛认可。然而,传统 ABC 算法中固定的邻域结构限制了其在动态且复杂搜索空间中的适应性。为了解决上述问题,本文提出了基于强化学习驱动的双邻域结构人工蜂群算法(RL_DNSABC)。RL_DNSABC方法引入了双邻域结构,能够更细致地在搜索空间中实现探索与开发的权衡。通过强化学习机制,根据算法运行过程中的性能反馈,动态调整邻域结构的大小,从而实现自适应搜索。基于双邻域结构,RL_DNSABC采用一种新颖的个体选择机制和三种带有不同偏好的改进搜索策略。
2.人工蜂群算法ABC原理
【智能算法】人工蜂群算法(ABC)原理及实现
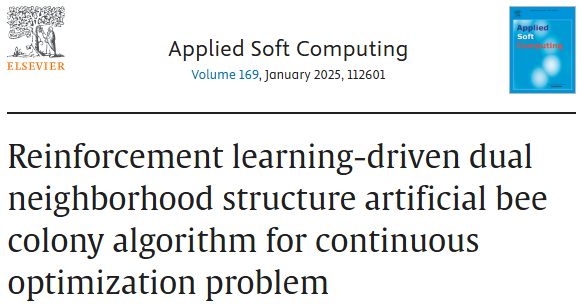
3.强化学习驱动双邻域结构人工蜂群算法RL_DNSABC
RL_DNSABC算法结合了随机邻域结构(RNS)与欧几里得距离邻域结构(EDNS),构建双邻域搜索框架,以增强搜索的多样性与灵活性。RNS的邻域大小由强化学习模块RL_RNS自适应调节,使算法能够动态响应搜索环境的变化。考虑到传统适应度评估机制的局限性,RL_DNSABC 引入了改进的个体选择方法,并基于双邻域结构设计了三种具有不同偏好的搜索策略,以更好地在全局探索与局部开发之间取得平衡。
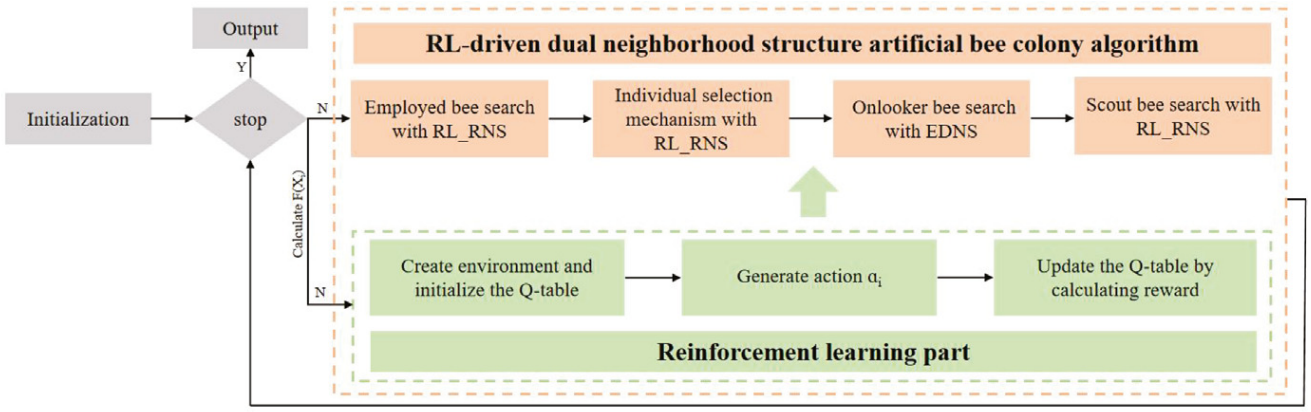
双邻域结构
RNS每个解 X i X_i Xi会从整个种群中随机选取 k k k 个个体作为其邻居,EDNS通过计算每个解 X i X_i Xi 与种群中其他个体之间的平均欧几里得距离,来调整其邻域范围。
m d i = ∑ i = 1 S N d i , j S N − 1 md_i=\frac{\sum_{i=1}^{SN}d_{i,j}}{SN-1} mdi=SN−1∑i=1SNdi,j
对于不同个体 X i , X j X_i,X_j Xi,Xj,如果 d i , j d_{i,j} di,j小于 m d i md_i mdi,则 X j X_j Xj属于 X i X_i Xi的EDNS邻居:
S i 2 = { S i 2 ∪ X j , if d i , j < m d i S i 2 , otherwise S_i^2 = \begin{cases} S_i^2 \cup X_j, & \text{if } d_{i,j} < md_i \\ S_i^2, & \text{otherwise} \end{cases} Si2={Si2∪Xj,Si2,if di,j<mdiotherwise
RNS中基于强化学习自适应邻域搜索
在传统ABC算法中,邻域搜索的规模是固定的。实际上,不同的优化问题往往需要不同的邻域规模以获得更好的性能。为克服这一局限,本文将Q 学习机制引入随机邻域结构(RNS)中,提出了自适应邻域调整模块 RL_RNS,能够根据搜索过程中的表现动态调整邻域大小。
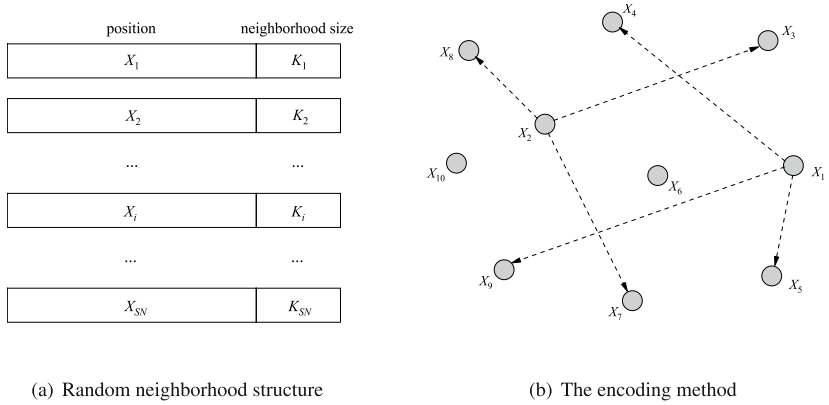
在ABC中,适应度函数用于指导个体选择,但在求解数值最小化问题的后期阶段,目标函数值趋近于零,不同解可能获得几乎相同甚至完全相同的适应度值,导致优秀个体在观察蜂阶段无法被有效区分和优先选择。本文提出一种基于强化学习邻域结构(RL_RNS)的新型个体选择方法,该方法通过构建个体 X i X_i Xi的RL_RNS邻域集合 S i 1 S_i^1 Si1:
X i r b = { ∃ X ∗ ∈ S i ∣ f ( X ∗ ) ≤ f ( X ) , ∀ X ∈ S i } X_{irb}=\left\{\exists X^{*}\in S_{i}\left|f\left(X^{*}\right)\leq f\left(X\right),\forall X\in S_{i}\right.\right\} Xirb={∃X∗∈Si∣f(X∗)≤f(X),∀X∈Si}
基于RL_RNS和EDNS的不同改进搜索策略
在ABC中,雇佣蜂主要负责全局搜索,而观察蜂则依据雇佣蜂传递的信息进一步挖掘优质解,理论上应发挥收敛优化作用。然而,两个阶段采用相同的搜索策略,导致算法偏重探索、收敛能力不足,限制了优化性能。本文提出了一种基于 RL_RNS 的改进搜索策略,在保持搜索多样性的同时,有效提升收敛效率:
v i , j = x i r , j + ϕ i , j ⋅ ( x i r , j − x i k , j ) + ψ i , j ⋅ ( x i r b , j − x i k , j ) v_{i,j}=x_{ir,j}+\phi_{i,j}\cdot(x_{ir,j}-x_{ik,j})+\psi_{i,j}\cdot(x_{irb,j}-x_{ik,j}) vi,j=xir,j+ϕi,j⋅(xir,j−xik,j)+ψi,j⋅(xirb,j−xik,j)
利用EDNS的概念设计另一种改进的搜索:
v i , j = x i e b , j + ϕ i , j ⋅ ( x i e b , j − x k , j ) v_{i,j}=x_{ieb,j}+\phi_{i,j}\cdot(x_{ieb,j}-x_{k,j}) vi,j=xieb,j+ϕi,j⋅(xieb,j−xk,j)
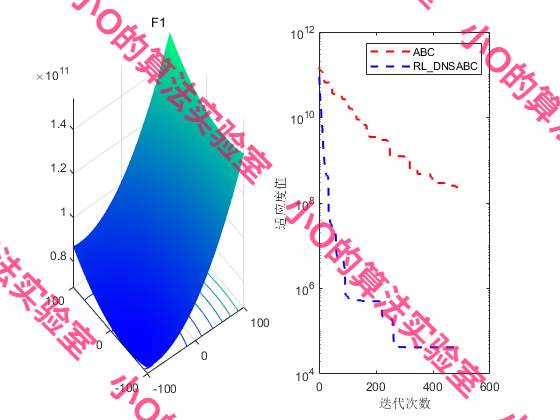
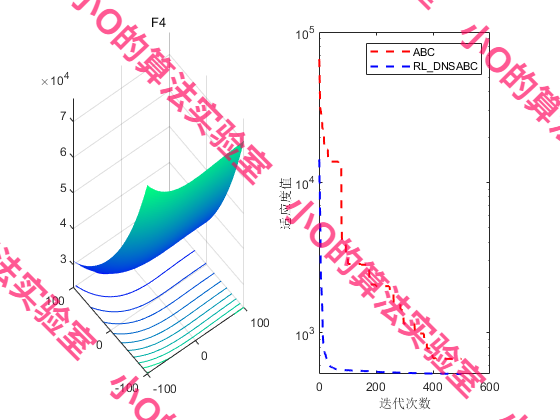
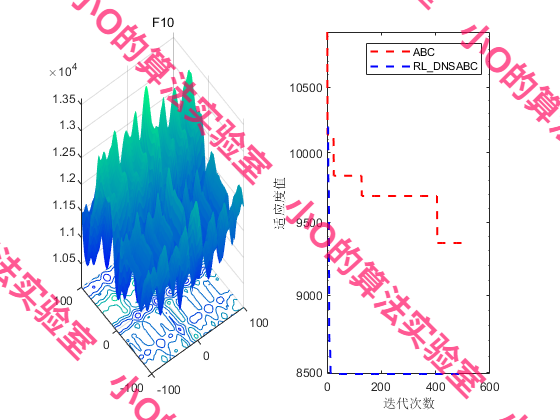
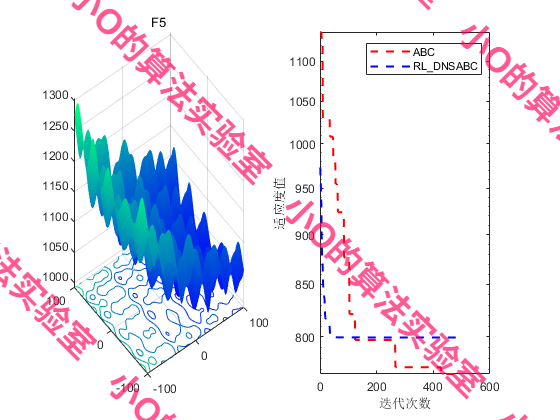
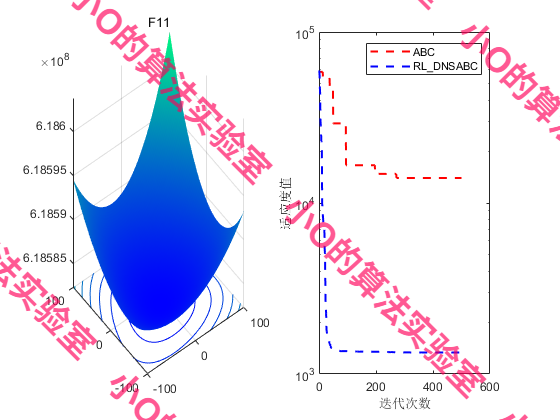
4.结果展示
5.参考文献
[1] Ye T, Zhang P, Wang H, et al. Reinforcement learning-driven dual neighborhood structure artificial bee colony algorithm for continuous optimization problem[J]. Applied Soft Computing, 2025, 169: 112601.
6.代码获取
xx