华为做网站吗推广的公司
持续交付:发布可靠软件的系统方法(十三)
- 第 13 章 组件和依赖管理
- 13.1 引言
- 13.2 保持应用程序可发布
- 13.2.1 将新功能隐蔽起来,直到它完成为止
- 13.2.2 所有修改都是增量式的
- 13.2.3 通过抽象来模拟分支
- 13.3 依赖
- 13.3.1 依赖地狱
- 13.3.2 库管理
- 13.4 组件
- 13.4.1 如何将代码库分成多个组件
- 13.4.2 将组件流水线化
- 13.4.3 集成流水线
- 13.5 管理依赖关系图
- 13.5.1 构建依赖图
- 13.5.2 为依赖图建立流水线
- 13.5.3 什么时候要触发构建
- 13.5.4 谨慎乐观主义
- 13.5.5 循环依赖
- 13.6 管理二进制包
- 13.6.1 制品库是如何运作的
- 13.6.2 部署流水线如何与制品库相结合
- 13.7 用 Maven 管理依赖
- 13.8 小结
第 13 章 组件和依赖管理
13.1 引言
持续交付让我们每天都能发布几个新的可工作版本的软件。也就是说,保持应用程序处于随时可发布的状态。然而,在大型重构或添加复杂新功能时又怎么办呢?从版本控制库上拉一个新的分支看上去好像是解决这个问题的一个方案。但我们强烈感觉到这是错误的做法。本章将描述如何在不断变化的同时保持应用程序随时可发布。要解决这个问题,一项关键的技术就是大型应用程序的组件化。所以,本章会详细讨论组件化,包括使用多组件来创建并管理大型项目。
组件是什么?在软件领域,这个术语的使用呈现一种泛滥状态,所以在使用这个术语前,我们试着对其进行一个清晰的定义。当我们说起组件时,是指应用程序中的一个规模相当大的代码结构,它具有一套定义良好的API,而且可以被另一种实现方式代替。对于一个基于组件的软件系统来说,通常其代码库被分成多个相互分离的部分,每个部分通过个数有限的定义良好的接口提供一些服务行为,与其他组件进行有限的交互。
与基于组件的系统相对应的是那些如“铁板一块”那样的系统,其内部没有清晰的边界,或者说负责不同任务的元素之间也没有做到关注点分离。“铁板”系统典型的问题是没有良好的封装,逻辑上原本应该独立的结构却是紧耦合的,破坏了迪米特法则(Law of Demeter)。其所用的语言和技术不是关键问题(这件事跟究竟是用VB写的图形界面,还是用Java写的没有什么关系)。有些人把组件叫做“模块”(module)。在Windows平台上,一个组件通常是以DLL形式打包的。在UNIX平台上,它可能就被打包成SO文件了。而在Java世界中,它可能就是一个Jar文件。
基于组件的设计通常被认为是一种良好的架构,具有松耦合性,是一种鼓励重用的设计。事实也确实如此。但它还有另外一个重要的好处:对于大型软件开发团队的协作来说,它是最有效的方法之一。本章也会描述如何为这种基于组件的应用程序创建和管理构建系统(build system)
假如你是在做一个小项目,那么在读了下面这段文字后,你可能就想跳过本章(其实无论项目大小,你都应该读完)。尽管很多项目其实只用一个版本控制代码库和一个简单的部署流水线就足够了,但最终还是陷入了无法维护的代码泥潭,因为在很容易做组件分离的阶段,却没人打算创建分离式的组件。然而小项目会逐渐变成大项目。项目一旦大到某种程度,以原来那种开发小项目的方式来修改代码,其成本就相当高了。但很少有项目经理会有胆量要求他的团队长时间停下来,将一个大应用程序重新架构成组件方式。而“如何创建并管理组件”就是本章所要讨论的主题。
构建系统的三个维度:部署流水线、分支和组件。
在开发一个大型软件系统时,常常能看到这三个维度同时出现。在这样的系统中,组件间会形成一种依赖关系,而且也会依赖于外部库(external library)。每个组件可能会有几个发布分支。在这些组件中找到各组件的某个好用的版本进行编译,并组成一个完整的系统是一个极具难度的过程,有点类似于一个叫做“打地鼠”的游戏——我们曾听说有个项目曾花了几个月来做这件事。只要你遇到过类似的情况,就应该开始通过部署流水线来完成这样的事情了。
事实上,这正是持续集成想要解决的最根本问题。我们将要提出的这些解决方案依赖于目前为止你从本书中获得的那些最佳实践。
13.2 保持应用程序可发布
对于“应用程序功能的可用性”这个问题,持续集成可以给你某种程度上的自信。而部署流水线(持续集成的扩展)用于确保软件一直处于可发布状态。但是,这两个实践都依赖于一件事,即主干开发模式
在开发过程中,团队会不断地增加新特性,有时候还要做较大的架构改变。在这些活动期间,应用程序是不能发布的,尽管它能够成功通过持续集成的提交测试阶段。通常,在发布之前,团队会停止开发新功能,并进入一个只做缺陷修复的稳定期。当应用程序发布后,就会在版本控制中拉出一个发布分支,而新功能的开发仍会在主干上进行。可是,这个流程常常会导致两次发布的时间间隔是几个星期或几个月。而持续交付的目标是让应用程序总是保持在可发布状态。那么如何做到这一点呢?
一种方法是在版本控制库中创建分支,当工作完成后再合并,以便主干一直是可发布的(下一章将会详细讨论这种方法)。然而,我们认为这种方法只是一种次优选择,因为如果工作成果是在分支上,那么应用程序就不是持续集成的。相反,我们提倡每个人都应该提交到主干。可是,怎么既能让每个人都在主干上开发,又让应用程序一直保持在可发布状态呢?
为了在变更的同时还能保持应用程序的可发布,有如下四种应对策略。
- 将新功能隐蔽起来,直到它完成为止。
- 将所有的变更都变成一系列的增量式小修改,而且每次小的修改都是可发布的。
- 使用通过抽象来模拟分支(branch by abstraction)的方式对代码库进行大范围的变更。
- 使用组件,根据不同部分修改的频率对应用程序进行解耦。
13.2.1 将新功能隐蔽起来,直到它完成为止
持续开发应用程序的一个常见问题是:开发一个特性或一组特性需要的时间太长。假如没有增量式发布一组特性的诉求,我们常常会忍不住想在版本控制库的一个分支上做新功能的开发,当功能做完了再集成,以便不破坏已完成的系统的其他部分,阻碍它们的发布。
有一种解决方案,就是把新功能直接放进主干,但对用户不可见。例如,某网站提供了旅行服务。运维这个网站的公司想提供一种新的服务:酒店预订。为了做到这一点,先把它作为一个单独的组件来开发,通过一个单独的URI“/hotel”来访问。如果愿意的话,这个组件就可以与系统的其他部分一起部署,但不允许访问其入口就行了(在Web服务器软件中,可以通过一个配置项来控制)
另一种让半成品组件可以发布而不让用户访问的方法是通过配置项开关来管理。比如,在一个富客户端应用中,可能有两个菜单,一个包含新功能,另一个不包含新功能。可以用一个配置项在两个菜单之间进行切换。这既可以通过命令行选项做,也可以通过在部署时或运行时的其他配置完成(参见第2章中关于软件配置的部分)。在运行自动化测试时,这种通过运行时配置项做到功能切换(或替换具体实现方式)的能力也是非常有用的。
把功能半成品与系统其他部分一同发布是一个好实践,因为它表明你一直在集成并测试整个系统。这让计划和交付整个应用程序变得更容易,因为这样做的话,在项目计划中就不需要依赖和集成阶段了。它能确保从一开始,被开发的组件就可以与系统的其他部分一起部署。这也意味着,你一直在对整个应用程序做回归测试,包括这个新组件所需的新服务或被修改的服务。
虽然以这种方式开发软件需要一定量的计划工作、细心地架构和严格的开发纪律,但是考虑到它能够在增加新关键功能集的同时还能允许发布新版本,这种优点值得我们花费一些额外的精力。这种方式也优于为了新功能开发而使用版本分支的策略。
13.2.2 所有修改都是增量式的
让所有修改都是增量式完成的。当需要做较大改动时,拉分支并在分支上做修改的方式非常有诱惑力。其理论是:如果变动较大,则会破坏应用程序,那么,拉分支并完成修改后再把代码合并回去能够提高效率。然而事实上,最后阶段才将所有东西合并在一起往往是最困难的部分。假如其他团队同时也在主干上开发,最后的合并可能会更困难。而且,改动越大,合并的难度就越大。分支的理由越明显,就越不应该分支。
虽然将大的改动变成一系列小步增量修改是一个很困难的工作,但你坚持这么做的话,就意味着你正在解决一个问题:保持应用程序一直可工作,避免后期的痛苦。这也意味着,如果必要的话,可以随时停下当前的工作,从而避免“大修改刚做到一半,就不得不放弃它”而产生的巨大成本浪费。
为了能够将大块变更分解成一系列的小修改,分析工作就要扮演非常重要的角色了。首先需要用各种各样的方式将一个需求分解成较小的任务。然后将这些任务再划分成更小的增量修改。这种额外的分析工作常常会使修改的错误更少、目的性更强。当然如果修改是增量式的,也就可以“边走边评估”(take stock as you go along),并决定是否需要继续做和如何继续。
然而,有时候某些修改太难做增量式开发了。此时,应该考虑“通过抽象来模拟分支”(branching by abstraction)的方法。
13.2.3 通过抽象来模拟分支
对应用程序做大修改时,可以采用另一种替代分支方法的策略,即在要修改的那部分代码上创建一个抽象层。然后在当前实现方法存在的同时,开发一种新的实现方式。当完成时,再把原始的实现和抽象层(它是可选的)删除。
当应用程序的某个部分需要做改进,但却无法使用一系列小步增量开发时,就要按如下步骤这么做。
(1) 在需要修改的那部分系统代码上创建一个抽象层。
(2) 重构系统的其他部分,让它使用这个抽象层。
(3) 创建一种新的实现代码,在它完成之前不要将其作为产品代码的一部分。
(4) 更新抽象层,让它使用这个新的实现代码。
(5) 移除原来的实现代码。
(6) 如果不再需要抽象层了,就移除它。
“通过抽象来模拟分支”是一次性实现复杂修改或分支开发的替代方法。它让团队在持续集成的支撑下持续开发应用程序的同时替换其中的一大块代码,而且这一切都是在主干上完成的。如果代码库的某一部分需要修改,首先要找到这部分代码的入口(一个缝隙),然后放入一个抽象层,让这个抽象层代理对当前实现方式的调用。然后,开发新的实现方式。到底使用哪种实现方式由一个配置选项来决定,可以在部署时或者运行时对这个选项进行修改。
你既可以在较高的层次上使用“通过抽象来模拟分支”(比如替换整个持久层),也可以在很低的层次上使用它,比如使用策略模式把一个类替换成另一个。依赖注入是另一种能够做到“通过抽象来模拟分支”的机制。棘手的事情是找到或创建那个让你插入抽象层的裂缝。
13.3 依赖
在构建或运行软件时,软件的一部分要依赖于另一部分,就产生了依赖关系。在任何应用程序(甚至是最小的应用程序)中也会有一些依赖关系。至少,大多数软件应用都对其运行的操作系统环境有依赖。Java应用程序依赖于JVM,它提供了JavaSE API的一个实现,而.NET应用程序依赖于CLR,Rails应用程序依赖于Ruby on Rails 框架,用C编写的应用程序依赖于C语言标准库,等等。
我们将谈到组件(component)和库(library)之间的差异,以及构建时依赖与运行时依赖之间的差异,而这两种差异对本章的内容非常有用。
我们是这样来区分组件和库的。库是指团队除了选择权以外,没有控制权的那些软件包,它们通常很少更新。相反,组件是指应用程序所依赖的部分软件块,但它通常是由你自己的团队或你公司中的其他团队开发的。组件通常更新频繁。这种区别非常重要,因为当设计构建流程时,处理组件要比处理库所需考虑的事情多一些。比如,你要一次性编译整个应用程序吗?还是当某个组件被修改时,只独立编译它就可以了?如何管理组件之间的依赖,才能避免循环依赖呢?
构建时依赖与运行时依赖之间的区别如下:
- 构建时依赖会出现在应用程序编译和链接时(如果需要编译和链接的话);
- 而运行时依赖会出现在应用程序运行并完成它的某些操作时。
这种区别很重要,原因如下。首先,在部署流水线中,会使用一些与所部署的应用程序无关的一些软件,比如单元测试框架、验收测试框架、构建脚本化框架,等等。其次,应用程序在运行时所用的库版本可能与构建时所用的不同。当然,在C和C++中,构建时依赖只是头文件,而运行时就需要有动态链接库(DLL)或共享库(SO)形式的二进制文件。在其他需要编译的语言中也一样,例如,Java程序在编译时,只需要拿到包含它所需要的接口信息的JAR文件就行了,但在运行时就需要再拿到包括已实现全部功能的JAR文件(比如,使用J2EE应用服务器时)。在构建系统中,也需要考虑这些因素。
管理依赖有可能会很困难。我们先看一下最常见的在运行时对库文件依赖的问题。
13.3.1 依赖地狱
依赖管理最常见的问题可能就是所谓的“依赖地狱”(dependency hell),有时被称为“DLL地狱”(DLL hell)。当一个应用程序依赖于某个库的特定版本,但实际部署的是另一个版本,或者根本没有部署时,依赖地狱就产生了。
在微软的Windows早期版本中,DLL地狱是很常见的问题。所有以DLL方式存在的共享库(shared library)都保存在系统目录中(windows\system32),但是没有版本标识,新版本只是把旧版本覆盖掉了。除此之外,在XP之前的Windows版本中,COM类表(class table)是一个单体,所以那些需要某个特定COM对象的应用程序只能找到该COM对象被最先加载的那个版本。所有这些都意味着,在这种情况下,即使你明知不同的应用程序使用某个DLL的不同版本,甚至知道在运行时需要该DLL的哪个版本,你也无法办到。
Linux通过使用简单的命名规则来避免依赖地狱:在全局库目录(/usr/lib)中,每个.so文件的文件名后都会有一个整数,并用一个软链接来决定在系统范围内所使用的标准版本。对于管理员来说,他们很容易对应用程序所使用的版本进行修改。如果某个应用程序依赖于某个特定的版本,它就会请求对应的那个具体版本的文件。当然,如果某个库文件在整个系统范围内只有一个标准的指定版本,就可以确保安装的每个应用程序都能使用它。这个问题有两种答案:像Gentoo那样,从源文件开始编译每个应用程序,或者对每个应用程序的二进制包进行全面的回归测试——大多数Linux发布包的创建者喜欢这种方法。这就意味着,如果没有非常好的依赖管理工具的支持,你就无法随意安装一个依赖于系统库新版本的应用程序的二进制发布包。幸运的是,Debian包管理系统就是这类包管理工具(可能是现存最好的依赖管理工具)。这也是为什么Debian平台如此平稳,而Ubuntu每年能发布两个稳定版本的原因。
对于整个系统范围内的依赖问题,一个简单的解决方案就是审慎地使用静态编译。也就是说,应用程序中的那些关键依赖在编译时就放到一个程序集中,以便减少运行时依赖。然而,尽管这使部署更简单了,但它也有一些缺点。除了会创建较大的二进制包以外,它还和那些与操作系统特定版本中的特定二进制包耦合在一起,这样就不可能通过升级操作系统的方式来修复相关的缺陷或安全漏洞了。因此,通常不推荐使用静态编译。
对于动态语言来说,对等的方法就是将应用程序所依赖的框架或者库打包并一起发布。Rails使用这种方法,让整个框架和使用该框架的应用程序一起发布。也就是说,同时可能会有多个Rails应用程序运行,而每个应用程序都使用不同版本的框架。
由于类加载器的设计原因,Java的运行时依赖面临的问题尤其严重。最初的设计使得在同一个JVM上每个类只能有一个版本生效。OSGi框架解决了这种严格限制,它提供了多版本的类加载,以及热部署和自动升级。如果不使用OSGi的话,这种约束就会一直存在,也就是说,在构建时就要小心地管理依赖。一个常见却令人不爽的场景是:一个应用程序依赖于两个库文件(比如两个JAR包),而这两个库文件又都依赖于另外一个库(比如一个日志包),但它们所依赖的版本各不相同。此时,虽然这个应用程序可能在编译时没出问题,但运行时肯定会出问题,比如可能会抛出一个ClassNotFound异常(如果所需的方法或类不存在的话),或者出现一点儿小缺陷。这个问题被称作“菱形依赖问题”。
13.3.2 库管理
在软件项目中,有两种适当的方法来管理库文件。一种是将它们提交到版本控制库中,另一种是显式地声明它们,并使用像Maven或Ivy这样的工具从因特网上或者(最好)从你所在组织的公共库中下载。你所要强化的关键约束就是让构建具有可重复性,即每个人从版本库中签出项目代码,然后运行自动化构建,得到的二进制包一定是完全相同的;而且三个月后,当某个用户发现了旧版本中的一个缺陷时,为了修复它,我能够从版本库中签出那个版本,并重新创建一个与之完全相同的二进制包。
将库文件提交到版本控制库是最简单的解决办法,对于小项目来说足够用了。习惯上,在项目的根目录上会创建一个lib目录,所有的库文件都会放在这个目录中。我们建议添加三个子目录:build、test和run,分别对应构建时、测试时和运行时的依赖。我们也建议在库文件名后加上版本号,作为库文件的命名规则。因此,不要只把nunit.dll签入到库目录,而应该签入nunit-2.5.5.dll。这样,你就能确切地知道你在使用哪个版本,并且很容易知道每个库文件是否为最新最好的版本。这种方法的好处在于:构建应用程序所需的内容都在版本控制库中。只要你从项目代码库中签出代码到本地,你的构建结果就与其他人的一样。
将整个工具链全部签入是个好主意,因为它是项目的构建时依赖。然而,应该将它放到一个单独的代码库中,而不是放在项目源代码库中,因为工具链代码库很容易变得很大。应该避免让项目源代码库变得太大,因为那会导致常用的版本操作(例如,查看本地变更历史、做了较小的修改后就提交到中央代码库)变得太慢。另一种方法是将工具链放在一个网络共享存储中。
13.4 组件
几乎所有的现代软件系统都是由组件组成的。这些组件可能是DLL、JAR文件、OSGi bundle、Perl模块或其他形式。在软件行业中,组件已经有相当长的历史了。然而,将它们组装成可部署的产物,并实现一个考虑了组件间互动的部署流水线却并不简单。这种复杂性的结果经常表现为一次构建需要花数小时才能组装成一个可部署可测试的应用程序。
大多数应用程序开始时就是一个组件。也有一些应用程序在开始时是两三个组件(比如,一个客户端/服务器应用程序)。那么,为什么要把代码库分成多个组件呢?如何管理它们之间的关系?除非有效地管理好这些关系,否则可能就无法把它们放到持续集成系统中。
13.4.1 如何将代码库分成多个组件
软件中“组件”这个概念,大多数人一看到它就能理解,但是它也有很多不同且纷乱的定义。为了清楚讲述本章的内容,在13.1节中已经定义了这里所说的组件是什么,但它还有另外一些特性也是很多人都认同的。一个相当有争议的陈述是这样的:“组件是可重用的代码,它可以被实现了同样API的其他代码所代替,同时可独立部署,并封装了一些相关的行为和系统的部分职能。”
显然,一个类大体上也具备这些特征,但通常它不能算做组件。因为对组件的一个要求就是它应该可独立部署,所以类通常不能算做组件。虽然我们可以把一个类进行单独打包,并对其进行部署,但是大多数情况下,做如此细粒度的打包并不值得。另外,通常只有一小簇类聚在一起工作,才能交付有用的价值。而且,相对来说,它们会与其关系密切的协作者紧密地耦合。
从这一点上来看,我们可以看出,组件的构成会有一个底限。只有当其具有一定的复杂度之后才应该考虑将这部分代码作为应用程序的独立部分。那么,它的上界是什么?我们将一个系统分成多个组件的目标是提高整个团队的效率。那么,为什么说组件开发方式让软件开发流程更高效呢?原因如下。
- 它将问题分成更小且更达意的代码块。
- 组件常常表示出系统不同部分代码的变化率不同,并且有不同的生命周期。
- 它鼓励我们使用清晰的职责描述来设计并维护软件,反过来也限制了因修改产生的影响,并使理解和修改代码库变得更容易。
- 它给我们提供了额外的自由度来优化构建和部署过程。
大多数组件的一个显著特征是,它们会以某种方式公开其API。这些API的技术形式可能不同:动态链接、静态链接、Web服务、文件交换(file exchange)和消息交换(message exchange),等等。这些API可能有不同的特征,但重要的是,它与外部合作者交换信息,所以这些组件与外部合作者的耦合度是至关重要的。即使当组件的接口是一种文件格式或一个消息模式时,它仍旧代表了某种信息上的耦合,这种耦合也需要作为组件之间的依赖来考虑。
当在构建与部署流程中将这些组件分离并作为独立单位对待时,正是组件之间的接口和行为的耦合度增加了复杂性。
将组件从代码库中分离出来的理由如下。
(1) 代码库的一部分需要独立部署(比如一个服务器或富客户端)。
(2) 你打算将一个“铁板”系统分成一个内核和一系列的组件,以便用另一种实现代替当前系统中的某个部分,或者支持用户自扩展。
(3) 组件为其他系统提供一个接口(比如提供某个API的框架或服务)。
(4) 代码的编译和链接时间太长。
(5) 在开发环境中打开项目的时间太长。
(6) 对于一个团队来说,代码库太大了。
尽管上面列出的最后三条看上去非常主观,但的确是组件分离的正当理由。最后一点尤其关键。当团队人数在十个人左右,并且都能够从内到外了解代码库的某个特定部分(无论是功能组件还是其他某种边界)时,团队是处于最佳状态的。如果你希望一个超过十人的团队以你期望的速度开发的话,一个最有效的方法是将系统分成多个松耦合的组件,而且也把团队分开。
13.4.2 将组件流水线化
即使应用程序是由多个组件构成的,也并不是说一定要为每个组件实现各自的构建。最简单而且是很令人吃惊的方法就是整个应用程序只有一个构建流水线。每次提交修改时,就应该构建并测试整个应用。在大多数情况下,我们建议将整个软件系统作为一个整体来构建,除非是反馈过程太长。如前所述,假如你遵守了我们在本书中的建议,你会发现自己完全有能力用这种方法构建一个超大且复杂的系统。这种方法的优点是,很容易追踪到底是哪一行代码破坏了构建。
然而,在很多现实场景下,系统会受益于将其分成多个不同的构建流水线。下面是几个使用多构建流水线的情况。
- 应用程序的某些组成部分有不同的生命周期(比如作为应用程序的一部分,你构建自己的操作系统内核版本,但是几个星期才需要做一次)。
- 应用程序的几个功能领域由不同的(很可能是分布式的)团队负责,那么这些团队可能都会有自己的组件。
- 某些组件使用不同的技术或构建流程。
- 某些共享组件被不同的几个项目所用。
- 组件相对稳定,不需要频繁修改。
- 全面构建整个应用程序所花时间太长,但为每个组件创建一个构建会更快(需要注意的是,有必要这么做的时间点要比大多数人想的晚得多)
从构建和部署流程的角度来说,一件重要的事情是,管理基于组件的构建总要有一些额外的开销。为了将单一构建分成几个构建,你要为每个组件创建一个构建系统。也就是说,每个部署流水线都可能需要新的目录结构和构建文件,而且它们要遵循整个系统的同一模式。这意味着,每个构建的目录结构都应该包含单元测试、验收测试及它们所依赖的库文件、构建脚本、配置信息和其他需要放到版本库中的东西。每个组件或者组件集合的构建都应该有自己的构建流水线来证明它满足发布条件。这个流水线会执行下列步骤。
- 编译代码(如果需要的话)。
- 组装一个或多个二进制文件,它们能够部署到任意环境中。
- 运行单元测试。
- 运行验收测试。
- 如果合适的话,还要进行手工测试。
对于一个完整的系统,这个流程确保你尽早得到关于“每次变更的可行性”的反馈。
一旦二进制包成功通过它自身的迷你发布流程,就可以晋升到集成构建了(详细内容请参见下一节)。你需要将这个二进制包(以及能标识该二进制包来源的版本信息元数据)放在到一个制品库中。尽管你可以自己做这事儿,只需将产生该二进制包的流水线标识作为目录名就能办到了,但是,现在的CI服务器可以替你完成这种事。另一种方式是使用Artifactory、Nexus或其他的制品库管理工具。
请注意,我们并没有强调要为每个DLL或JAR创建一个流水线。这也是为什么我们在前面反复说“组件或组件集合”的原因。一个组件可能由几个二进制包组成。一般的指导原则是:应该尽量将需要管理的构建数量最少化。一个优于两个,两个优于三个,以此类推。持续优化构建,让它更高效,尽可能保持单一流水线,只有当效率太低而无法忍受时,才使用并行流水线方式。
13.4.3 集成流水线
集成流水线的起点是:从所有组件流水线中得到组成该应用系统的二进制包。集成流水线的第一个阶段应该是将这些二进制文件组装在一起,创建一个(也许是多个)部署安装包。第二个阶段应该将其部署到一个类生产环境中,并在其上运行冒烟测试,快速验证是否有最基本的集成问题。如果这个阶段成功了,那么流水线就应该进入到常规的验收测试阶段,以通常的方式来运行整个应用的验收测试,图13-1是一个常见的流水线阶段图。
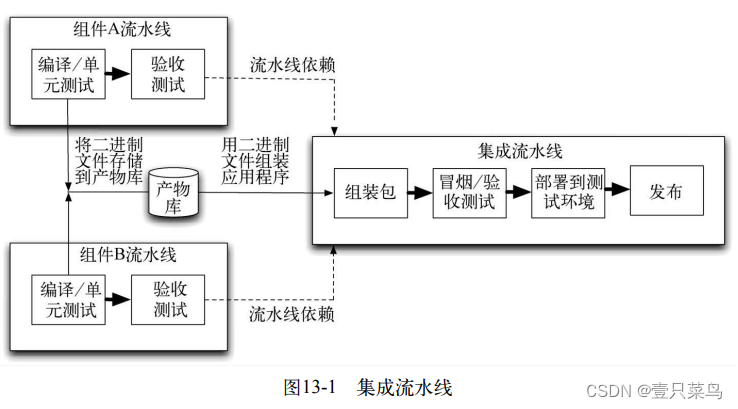
当创建集成流水线时,需要牢记部署流水线的两个通用原则:快速反馈和为所有相关角色提供构建状态可视化。如果流水线或流水线链太长的话,会让反馈时间变长。如果你恰好遇到了这种情况,并且你有足够多的硬件环境的话,一种解决方案是,在生成了二进制文件并通过单元测试之后就立即触发下游的流水线。
对于可视化而言,如果集成流水线的任何一个阶段失败了,都应该能够明确地看到它为什么失败。也就是说,能够从集成构建反向追踪到组成该构建的每个组件的具体版本,这是非常关键的。对于“能否发现到底是哪些源代码变更令某次构建失败”而言,维护这种关系就显得非常重要了。现代CI工具应该为你提供这种功能。如果它不能的话,你就应该再找一个可以做到这一点的CI工具。它应该在几分钟内就能追溯到集成流水线失败的原因。
有几种不同的技术来解决这个问题,接下来我们就来讨论一下。最简单的方法是每当任何一个组件构建成功后就触发集成流水线的构建。如果组件变化的频率不高,或者在构建集群中你有足够多的计算能力,你就可以这么做。这也是最佳方法,因为它不需要人工干预或聪明的算法,而且相对于人力资源的话,计算资源更便宜。所以,如果条件允许,你就这么做好了。
第二个最佳方法是对尽可能多的应用程序版本进行构建。你可以使用相对简单的算法,比如拿到每个组件的最近一个版本,尽可能频繁地将它们组装在一起。如果这种做法足够快的话,在每次组装后都能运行并完成一个较短的冒烟测试套件。假如冒烟测试套件的时间稍长,有可能就会跳过一个版本,在第三个版本上运行测试了。之后,可以通过某种手工方式来选择这些组件的特定版本,然后通知CI服务器:
“将这些版本的组件放在一起,运行一下集成流水线。”有些CI工具支持这种做法。
13.5 管理依赖关系图
对依赖进行版本管理是至关重要的,包括库和组件的依赖。如果没做版本依赖管理,你就无法重现构建。也就是说,当应用程序因为某个依赖的变更而导致问题时,你无法追溯并发现是哪个变更令其失败,或者无法找到库文件的最后一个“好”版本。
在前一节中,我们讨论了一个组件集(每个组件有其自己的部署流水线)汇集到一个集成流水线,这个集成流水线对应用程序进行组装,并在其上运行自动化和手工测试。然而,事情并不总是这么简单:组件本身对其他组件也可能有依赖,比如第三方库文件。如果在组件之间画一个依赖关系图的话,它应该是一个DAG(Directed Acyclic Graph,有向无环图)。如果不是的话(尤其是图中有循环的),你就遇上了病态依赖关系了,后面会简单讨论一下。
13.5.1 构建依赖图
首先,考虑如何构建依赖图是很重要的。比如,图13-2中的一套组件。

投资组合管理系统依赖于报价引擎、处理引擎和报告引擎。而这些都依赖于框架。报价引擎依赖于CDS(Credit Default Swap)库,它是第三方提供的。图13-2中,我们将在左侧的组件称为“上游”依赖,而在右侧的组件称为“下游”依赖。所以,报价引擎有两个上游依赖,即CDS报价库和框架,以及一个下游依赖,即投资组合管理系统。
每个组件都应该有自己的构建流水线,当其源代码被修改时或者上游依赖有变化时都应该触发它的构建流水线。当该组件成功通过它自己的所有自动化测试时,就应该触发下游依赖。在为这种状况下的组件构建依赖图时,需要考虑以下几种可能的场景。
- 对投资组合管理系统做修改。此时,只有投资组合管理系统需要重新构建。
- 对报告引擎做修改。此时,报告引擎必须重新构建,并通过它自己的所有自动化测试。然后,需要使用报告引擎的最新版本与报价及处理引擎的当前版本重新构建投资组合管理系统。
- 对报价库做修改。CDS报价库是第三方的二进制依赖。所以,如果使用的CDS更新后,报价引擎需要使用这个新版本和框架的当前版本重新构建。然后再触发投资组合管理系统的重新构建。
- 对框架做修改。如果对框架进行了成功修改,即框架流水线通过了所有测试,那么它的下游依赖应该立即进行重新构建:报告引擎、报价引擎和处理引擎。如果这三个依赖的构建都成功了,那么就要用这三个上游依赖的新版本对投资组合管理系统进行重新构建。如果这三个组件中的任何一个构建失败,投资组合管理系统就不应该重新构建,而且应该把这次框架的构建结果视为失败,并对框架进行修复,以便这三个下游组件能够通过它们各自的测试,最终让投资组合管理系统的流水线成功通过。
在这个例子中,有一个非常重要的点,那就是场景(4)。看上去,在投资组合管理系统的三个上游组件之间好像需要一种“与”的关系。然而,事实并不是这样的。如果报告引擎的源代码被修改了,就应该触发对投资组合管理系统的重新构建,无论报价引擎或处理引擎是否重新构建了。另外,考虑下面的场景。
- 对框架和报价引擎做修改。此时,整个关系图都需要重新构建。但是可能会有多个产出,每个产出物都有其动因。顺利的构建路径是使用这个新版本的框架和CDS报价库的三个中间组件都顺利通过了各自的构建流水线。但是,如果处理引擎失败了怎么办?很明显,投资组合管理系统就不应该使用框架的这个新的但有问题版本来构建。然而,你也许很想使用报价引擎的新版本来构建投资组合管理系统,而报价引擎的新版本应该是使用新版本的CDS报价库和旧版本(好的)框架构建的。现在你遇到问题了,因为这个新版本的报价库根本没有生成。
在这些情况下,最重要的约束就是投资组合管理系统只应该依赖框架的一个版本进行构建。我们最不想看到的是:报价引擎用框架的某个版本构建,而处理引擎却用框架的另一个版本构建。这是一个典型的“菱形依赖”问题。这与本章前面提到的运行时“依赖地狱”问题相似,是构建时的“依赖地狱”。
13.5.2 为依赖图建立流水线
那么,基于上述的项目结构,如何组建部署流水线呢?这个部署流水线的关键元素是:若有任何问题,团队必须尽快得到反馈,同时,我们还要遵从上面描述的构建依赖规则。我们的方法如图13-3所示。
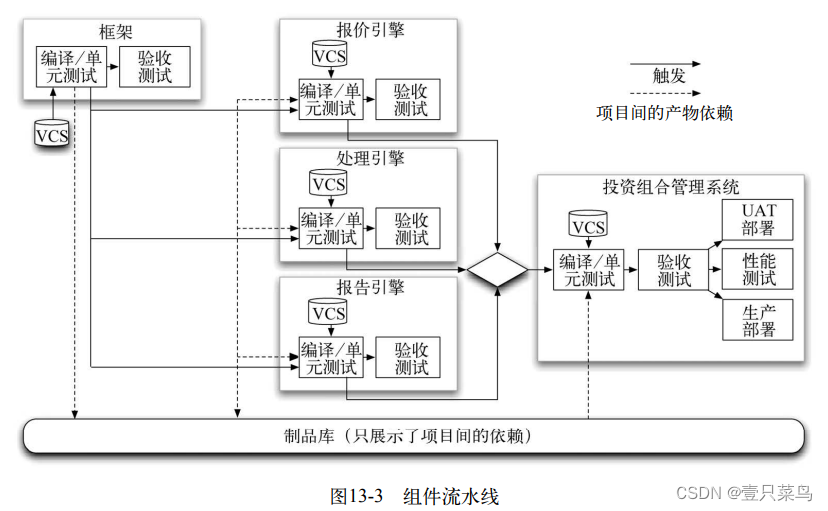
有几个非常重要的特性。首先,为了增加反馈的速度,一旦任何一个项目部署流水线的提交阶段完成了,就要触发下游的项目,并不需要等待验收测试全部通过,只要下游项目所需的二进制文件已经产生就行了。这些二进制文件产生之后就被放到了制品库中。当然,后续的验收测试和各种部署阶段会重用这些二进制文件(为了避免太过零乱,图13-3中并没有画出来)。
除了向手工测试环境和生产环境部署以外,其他的触发都是自动的,因为这两个环境通常需要手工授权操作。这些自动化触发使任何变更(比如对框架)都会触发报价引擎、处理引擎和报告引擎的构建。如果这三个组件都使用新版本的框架构建成功了,投资组合管理系统就会用上游所有组件的新版本进行重新构建。
团队要能够追踪在应用程序的某个具体版本中每个组件的源是什么,这一点是非常关键的。一个好的持续集成工具不仅可以做到这一点,还应该能够展示它是由哪些组件的哪个版本集成在一起的。比如在图13-4中,可以看到投资组合管理系统的V2.0.63是由报价引擎的V1.0.217和处理引擎的V2.0.11,以及报告引擎的V1.5.5和框架的V1.3.2396组成的。
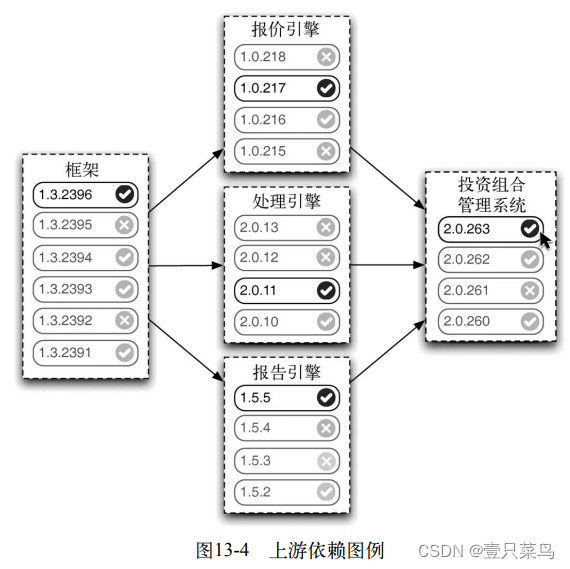
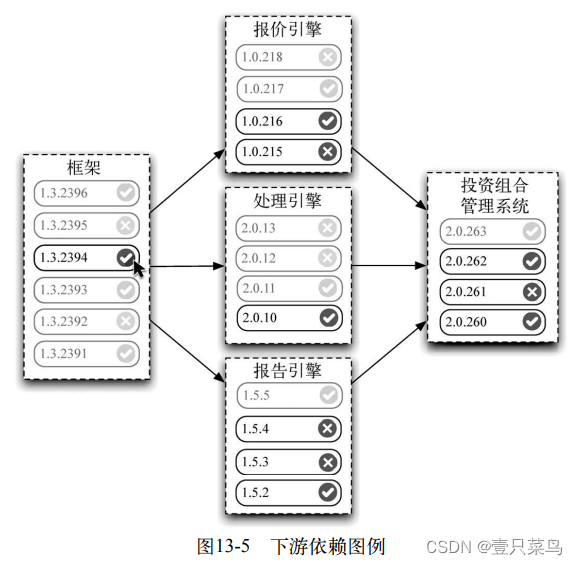
图13-5中展示了到底哪些下游组件使用框架的V1.3.2394进行了构建。
持续集成工具还要确保在每个流水线实例中,从前到后每个组件所有的版本都是一致的。它应该防止“依赖地狱”这样的事,并确保当版本控制库中的某次变更影响到多个组件时,它只能通过流水线传播(propatage)一次。
在本章开始时给出的关于增量式开发的建议对组件也同样适用。要以增量方式进行修改,且不要破坏依赖。当增加新功能时,在被修改的组件中为它提供一个新的API入口。如果不想支持旧的功能,就把静态分析放在部署流水线中,用来检查哪个组件还在使用旧的API。流水线应该很快就会告诉你,某次修改是否不小心破坏了某个依赖。
如果你要对某个组件做一个深远的变更,那么可以为它创建一个新的发布版本。在图13-6中,我们假设开发报告引擎的团队需要创建一个新版本,会破坏一些API。为了做到这一点,他们为其创建了一个分支V1.0,并在主干上开发V1.1。
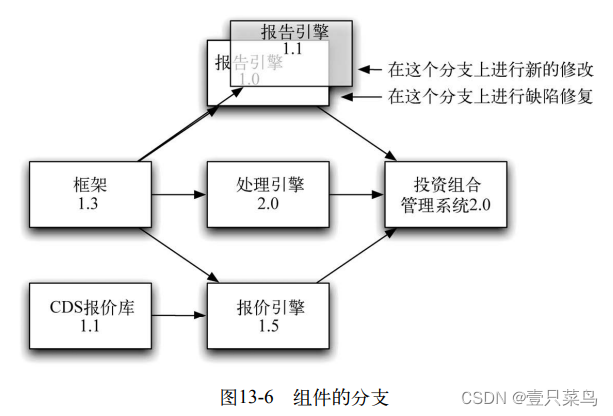
报价引擎团队会在主干上不断增加新功能。与此同时,报价引擎的下游用户仍旧可以用1.0分支上创建的二进制文件。如果需要修复缺陷,可以提交到1.0分支上,再合并回主干。一旦下游用户准备好使用新版本了,就可以切换过来。需要澄清的是,“按发布创建分支”模式仍旧需要承担推迟集成的后果。因此,就持续集成而言,它是次优选择。然而,如果组件(至少应该)是松耦合的,那么延迟集成的痛苦会更加可控一些。所以,当管理组件出现更复杂的变化时,这是一个非常有用的策略。
13.5.3 什么时候要触发构建
上面的所有讨论都有一个假设,即只要上游依赖发生变更就触发一次新的构建。这是正确的做法,但在很多团队中这并不是标准做法。相反,他们更倾向于在代码库稳定后(比如集成阶段或开发到达某个里程碑时),才更新它们的依赖。这种行为强调稳定,但潜在风险成本是在集成时花更多的时间。
由此可以看出,在开发过程中涉及依赖的地方都会存在一种张力。一方面,最好是保持与上游依赖最新的版本一致,以确保得到最新的功能和已修复的缺陷。而另一方面,集成每个依赖的最新版本会有一定的成本,因为要花时间来修复这些新版本带来的破坏。大多数团队会妥协,当更新的风险比较低时,在每次发布之后才更新所有依赖。
当决定更新依赖的频率时,一个关键的考虑是:对这些依赖的新版本的信任度有多高。如果你所依赖的组件也是你的团队自己开发的,通常你能快速且简单地修复由于API变更引起的问题,这样,频繁集成是最好的。如果组件足够小,最好就让整个应用只有一个构建——这样才反馈最快。
假如上游依赖组件是由你所在公司的其他团队开发的,那么最好这些组件有它们各自的流水线。然后,你可以再判断并决定是使用上游依赖组件每次变更后的最新版本,还是仍旧使用某个具体版本。这个决定既依赖于它们变化的频率,又依赖于上游团队解决问题的速度。
你对组件变更的掌控性、可视性和影响力越少,你对它的信任就越少,你接受新版本时就越保守。如果没有明显需求,就不要更新第三方库。如果那些变更并没解决你遇到的问题,就不要更新,除非供应商不再为你所用版本提供技术支持了。
在大多数情况下,团队最好持续集成依赖组件的新版本。当然,持续更新所有依赖组件,成本会更高一些,比如花费到集成(包括硬件和构建)上的资源以及修复bug或集成“未完成”版本引入的一些问题所带来的消耗。你要在“应用程序集成时是否得到了快速反馈”和“很多你不关心的失败构建不断地打扰你”之间寻找一个平衡点。一个可能的解决方案是Alex Chaffee的一篇文章提到的 “谨慎乐观主义”。
13.5.4 谨慎乐观主义
Chaffee的建议是,在依赖图中引入一些新的触发类型,即某个上游依赖的触发类型包括 “静止”(static)、“慎用”(guarded)和“活跃”(fluid)。
- “静止类型”的上游依赖发生变化后,不会触发新的构建。
- “活跃类型”的上游依赖发生变化后就一定会触发新的构建。如果某个“活跃类型”的上游依赖发生变更后触发了构建,并且这次构建失败了,那么就把上游依赖标记为“慎用类型”,并且将这个上游依赖的上一次成功的组件版本被标记为“好版本”。
- “慎用类型”的上游依赖可以按“静态类型”那样来使用,即它不会再拿上游依赖的最新修改,而这个状态的目的是提醒开发团队,这个上游依赖需要解决某个问题。
这样,我们既有效表明了不想对哪个依赖做持续更新,也确保了应用程序一直是“成功的”(green),即构建系统会自动去除因上游依赖有问题的新版本导致的失败。
让我们来看看图13-7中的依赖关系吧。我们将CDS报价库和报价引擎之间的依赖设置为“活跃类型”触发,而将框架和报价引擎之间的依赖设置为“静止类型”触发。
想象一下下面这种场景,CDS报价库和框架都更新了。新版本的框架被忽略,因为报价引擎和框架之间的触发器类型是“静止类型”。然而,新版本的CDS报价库会触发报价引擎的构建,因为它的触发器类型是“活跃类型”。假如报价引擎的新版本失败了,触发类型就变为“慎用类型”,后续CDS报价库的变更也不会触发它的新构建。假如报价引擎的这次构建是成功了,这个触发就仍旧是“活跃类型”
然而,“谨慎乐观主义”可能导致复杂的行为。比如,将框架和报价引擎之间的触发类型设置为“活跃类型”,与CDS报价库一样。当CDS报价库和框架都更新以后,报价引擎就会有一次构建。如果报价引擎失败了,你就不知道到底是哪个依赖使这次构建失败了。是新版本的CDS报价库呢?还是框架的新版本呢?你就需要不断试验,找出到底是哪个。与此同时,这两个触发类型都变成了“慎用类型”。Chaffee提到,可以使用一种称作“告知悲观主义”(informed pessimism)的策略作为实现依赖追溯算法的起点。在这种策略中,每个触发都被设为“静止”的,但当上游依赖的某个新版本有效时,下游组件的开发团队会得到相应的通知。

13.5.5 循环依赖
最糟糕的依赖问题可能就是循环依赖了,即依赖图中包含循环。最简单的例子就是你有一个组件A,它依赖于另一个组件B。不幸的是,组件B反过来也依赖于组件A。这可能会导致致命的引导问题。为了构建组件A,就需要构建组件B,同时为了构建组件B,也需要组件A,等等。
令人惊奇的是,我们的确看到过这么做而且成功了的项目,在它的构建系统中的确存在循环依赖。你可能会对我们这里所说的“成功”提出质疑,但这些代码的确可以在生产环境中正常工作,对我们来说,这就足够了。关键在于,不要在项目一开始时就有循环依赖,这会导致蔓延。要是用组件A的某个版本来构建组件B,再用这个组件B再反过来构建组件A的一个新版本,这是完全可以做到的。但是,如果能够避免的话,我们还是建议不要这么做。因为这会导致一种“构建阶梯”,如图13-8所示。
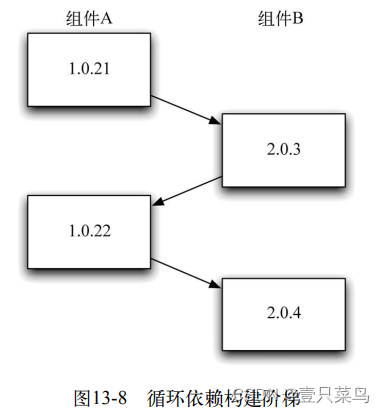
只要A和B两个组件同时存在的话,运行时就不会出问题。
如前所述,我们不建议使用循环依赖。但是,如果你已经陷入其中,并且无法避免的话,那么上面所说的策略还是可行的。目前还没有哪种构建系统直接支持这种配置方式,所以你要自己打造一个工具来支持这种情况。另外,你还要非常小心地处理构建过程中各部分的交互关系:如果每个组件都自动触发依赖于它的组件的构建,由于是个死循环,所以这两个组件就会一直不断地做构建,不会停下来。一定要尽量避免循环依赖,但假如你发现你正在使用的代码库中有循环依赖,也别气馁,在完全解决这个问题之前,可以把“构建阶梯”作为一个临时解决方案。
13.6 管理二进制包
我们花了相当多的笔墨讨论如何为组件化应用程序组织构建系统,还描述了如何为每个组件创建部署流水线,以及当一个组件变更时,触发下游组件流水线的策略有哪些,如何做组件分支。但是,我们还没有讨论基于组件的构建如何管理二进制包。这是非常重要的,因为在大多数情况下,每个组件都应该生成二进制包,而不是在源代码级的组件依赖。接下来,我们就讨论这个问题。
首先,我们会讨论制品库背后所反映的通用原则。然后描述如何使用文件系统来管理二进制包。接下来描述如何使用Maven管理依赖。
你不必自己管理制品库。目前市场上有几种相关的产品,包括开源项目Artifactory和Nexus。另外还有几种工具,比如AntHill Pro和Go就有它们自己的制品库。
13.6.1 制品库是如何运作的
制品库的最重要特性就是,它不应该包含那些无法重现的产物。你应该能删除制品库,却不必担心无法找回有价值的内容。为了达到这一点,版本控制系统就要包含重建这些二进制包所需的所有内容,包括自动化构建脚本。
为什么要删除二进制产物呢?因为这些产物很大(即使现在不大,将来也会变得很大)。考虑到存储空间,你最终也需要删除它们。因此,我们不建议将产物提交到版本控制库中。如果能重新生成它们,就不需要它们。当然,将已通过所有测试的这些产物和待发布的候选版本保存下来是非常值得的。已经发布过的东西也值得保存,因为可能会回滚到前面的版本,或都需要对使旧版本的用户提供一些技术支持。
无论这些产物能保存多长时间,都应该一直保存每个产物的散列值,以便可以验证生成二进制包的源代码是否正确。对于审计来说,这是非常重要的。比如,当你不确定某个具体环境中到底部署了哪个版本的应用程序时,可以使用该版本的MD5码找出版本库中对应的版本。你既可以使用构建系统来保存数据(一些持续集成服务器提供了这个功能),也可以使用版本控制系统。但无论怎样,管理散列码是配置管理策略的一部分。
最简单的制品库是磁盘上的一个目录结构。一般来说,这个目录结构会放在RAID或SAN上,因为什么时候丢弃产物,应该由你来决定, 而不是由于某人对硬件误操作的结果。
在这个目录结构中,最重要的约束就是它应该能将一个二进制文件关联到版本控制库中生成该文件的某个源代码版本上。一般来说,构建系统会为每个构建生成一个标识,通常是个序号。这个标识应该比较短,这样在与他人沟通时就很容易记住。它可能还要包含版本控制库中该版本的唯一标识(假设你没用像Git或Mercurile这样的工具,这些工具使用散列值作为标识)。这个标识就可以放在该二进制产物(例如JAR文件或.NET程序集)的描述文件manifest中。
为每个流水线创建一个目录。在该目录中,为每个构建号创建一个与之对应的子目录。从该构建中产生的所有产物都放在该子目录中。
为了更全面,可以再多做一点儿工作,即增加一个索引文件,将状态与该构建相关联。这样当每次代码变更在该流水线上进行构建时,你就可以记录它所处的阶段和状态了。如果不想用共享目录这种方式来管理制品库,那么也可以使用一个Web服务来存取这些产物。然而,如果这么做,建议考虑使用某种开源或商业化产品,市面上这种产品很多。
13.6.2 部署流水线如何与制品库相结合
实现部署流水线需要做两件事:一是将构建过程中的产物放到制品库里;二是以后需要时能把它取出来。
设想一下,某个流水线包括以下阶段:编译、单元测试、自动化验收测试、手工验收测试和生产环境部署。
- 编译阶段会创建需要放到制品库的二进制文件。
- 单元测试和验收测试阶段会取出这些二进制文件,并在其上运行单元测试和验收测试,将生成的测试报告放到制品库中,以便开发人员查看结果。
- 用户验收测试阶段是将二进制文件部署到 UAT 环境中,用于手工测试。
- 发布阶段是取出二进制文件,将其发布给用户或部署到生产环境中。
随着候选发布版本在流水线中的进展,每个阶段的成功或失败都记录到索引文件中。流水线的后续阶段依赖于该文件中的状态记录,即只有已经通过验收测试的二进制文件才能用于手工测试和后续阶段。
从制品库中存取产物有几种选择。可以把它们放在一个共享文件系统中,使每个环境(构建或部署)都可以访问它。这样,部署脚本中就可引用该文件系统中的路径。另外,也可以使用如Nexus或Artifactory这样的管理工具。
13.7 用 Maven 管理依赖
Maven是Java项目使用的一种可扩展的构建管理工具。尤其是,它为依赖管理提供了一个全面机制。即使不喜欢Maven的其他功能,也可以单独使用它强大的依赖管理功能。另外,还可以使用Ivy,它只做依赖管理,没有像Maven那样的构建管理功能。如果不使用Java,那么可以跳过这一节,除非你想知道Maven是如何解决依赖管理问题的。
如前所述,项目中有两种依赖:外部库依赖(参见13.3.2节),以及应用程序的组件间依赖。Maven提供一种抽象,可以用同一种方式处理这两种依赖。所有的Maven领域对象,比如项目、依赖和插件,都能由一组元素来标识,它们是groupId、artifactId和version(有时这个三元组简称为GAV)。这三个元素唯一标识一个对象,还有packaging。一般以下面的格式书写,在Buildr中也是这么声明的:
groupId:artifactId:packaging:version
比如,当项目依赖于Commons Collections 3.2时,可以按如下格式描述依赖:
commons-collections:commons-collections:jar:3.2
Maven社区维护了一个镜像库,包含了大量常见的开源库及其相关的元数据(包括传递依赖)。这些库几乎涵盖了任何项目中可能用到的开源库。可以访问http://repo1. maven.org/maven2来浏览这些库。如果声明依赖于Maven库中的一个库文件,那么当构建项目时,Maven就会自动下载它。
使用一个名为pom.xml的文件在Maven中声明一个项目,如下所示:
<project> <modelVersion>4.0.0</modelVersion> <groupId>com.continuousdelivery</groupId> <artifactId>parent</artifactId> <packaging>jar</packaging> <version>1.0.0</version> <name>demo</name> <url>http://maven.apache.org</url> <dependencies> <dependency> <groupId>junit</groupId> <artifactId>junit</artifactId> <version>3.8.1</version> <scope>test</scope> </dependency> <dependency> <groupId>commons-collections</groupId> <artifactId>commons-collections</artifactId> <version>3.2</version> </dependency> </dependencies>
</project>
当构建此项目时,JUnit的V3.8.1和Commons Collections的V3.2就会被下载到本地的Maven库中,位置在~/.m2/repository/<groupId>/<artifactId>/<version>/。本地Maven库服务有两个用途:它是项目依赖的一个缓存,也是Maven存储项目构建产物的地点(稍后会有详细的讲述)。注意,也可以指定依赖的范围:test是指依赖只在测试编译和组装时有效。其他可以使用的范围选项还包括:runtime是指编译时不需要的依赖,provided是指编译时需要用到且在运行时才提供的库,compile(默认值)是编译时和运行时都需要的依赖。
也可以指定版本范围,比如[1.0,2.0),它表示1.x的任意版本。圆括号表示不包含边界值,方括号表示包含边界值。左右都可以使用,如[2.0,)表示任意一个高于V2.0的版本。然而,当选择版本时,即使想给Maven一点自由,也最好指定上边界,避免项目因取到最新的版本,而破坏了应用程序。
Maven 依赖重构
比如,很多项目使用了同一组依赖。如果你只想一次定义好产物的版本,你可以定义一个父项目(parent project),它包含所有需要使用的产物版本。利用上面提到的POM定义,把<dependency Management>包在<dependencies>里面就可以了。之后,可以定义一个子项目,如下所示:
<project> <modelVersion>4.0.0</modelVersion> <parent> <groupId>com.continuousdelivery</groupId> <artifactId>parent</artifactId> <version>1.0.0</version> </parent> <artifactId>simple</artifactId> <packaging>jar</packaging> <version>1.0-SNAPSHOT</version> <name>demo</name> <url>http://maven.apache.org</url> <dependencies> <dependency> <groupId>junit</groupId> <artifactId>junit</artifactId> <scope>test</scope> </dependency> <dependency> <groupId>commons-collections</groupId> <artifactId>commons-collections</artifactId> </dependency> </dependencies>
</project>
这样就可以使用父项目中所定义的那些依赖了。注意,这里的 junit和commons-collections都没有指定具体的版本。
也可以重构Maven的构建,移除重复的公共依赖。不必创建一个JAR作为它的最终产品,可以让Maven项目创建一个pom,供其他项目引用。在第一个代码列表(有artifactId父结点)中,你可以将<packaging>的值修改为pom,而不是jar。你可以在任意一个想使用这个依赖的项目中声明关于这个pom的依赖,如下所示:
<project> ... <dependencies> ... <dependency> <groupId>com.thoughtworks.golive</groupId> <artifactId>parent</artifactId> <version>1.0</version> <type>pom</type> </dependency> </dependencies>
</project>
Maven有一个非常有用的特性,就是它能分析项目中的依赖,并告诉你哪些是未清晰定义的依赖,哪些是没有用的依赖。只要运行命令mvn dependency:analyze即可得到这个报告。
13.8 小结
本章讨论了既能让应用程序一直处于可发布状态,又能尽可能让团队高效开发的技术。原则就是确保团队尽快得到代码修改后所产生的影响。达到这一目标的一种策略就是确保将每次修改都分解成小且增量式的步骤,并小步提交。还有一种策略是将应用程序分解成多个组件。
将应用程序分解成一组松耦合且具有良好封闭性的协作组件不只是一种好的设计。而且,对于一个大系统的开发来说,还可以提高工作效率,得到更快的反馈。直到应用程序变得足够大时,才需要对组件进行分别构建。最简单的做法是在部署流水线的第一个阶段就构建整个系统。如果你的精力集中在高效的提交构建和快速的单元测试,以及为验收测试提供了一个构建网格之上的话,你的项目就可能变得比你想象的还要大。对于一个由20个人组成且大家一起工作了几年的团队来说,虽然在开发的应用程序应该分成几个组件,但应该不需要创建多个构建流水线。
一旦你超过这一限制,组件化、基于依赖的构建流水线和有效的产物管理就是高效交付和快速反馈的关键了。本章所述方法的优越性就在于它是建立在组件化设计这个最佳实践基础之上的。这种方法避免了复杂分支策略的使用,因为复杂分支策略通常会导致在应用程序集成时出现严重问题。当然,这依赖于应用程序要有良好设计,只有这样才能使用组件化构建方式。不幸的是,我们看到很多大型应用程序无法按这种方式很容易地进行组件化。也很难将它改造成一种既容易修改又容易集成的状态。因此,你一定要使用一系列有效的技术手段写出好的代码,以便使它在变得很大时能够被构建成一组相对独立的组件。