优化20条措施网站seo分析报告案例
最近感觉大家好多在忙C语言课设~
我来贡献一下,如果对你有帮助的话谢谢大家的点赞收藏喔!
1. 项目分析
小白的神级项目,99%的程序员,都做过这个项目!
掌握这个项目,就基本掌握 C 语言了!
跳过这个项目,永远是小白!
2. 项目准备
VS 的任意版本(推荐 VS2010/VS2019)
任意版本的 C 语言开发环境、
3. 创建项目
1. 创建空项目。
2. 编写测试代码
#include <stdio.h>
#include <stdlib.h>
int main(void) {
printf("hello world\n");
system("pause");
return 0;
}
4. 编写功能菜单
初级版
int main(void) {
printf("
学生信息管理系统\n");
printf("1. 输入学生信息\n");
printf("3. 删除学生信息\n");
printf("3. 删除学生信息\n");
printf("4. 修改学生信息\n");
printf("5. 插入学生信息\n");
printf("6. 学生成绩排名\n");
printf("7. 统计学生总数\n");
printf("8. 显示所有信息\n");
printf("0. 退出系统\n");
system("pause");
return 0;
}
表格版
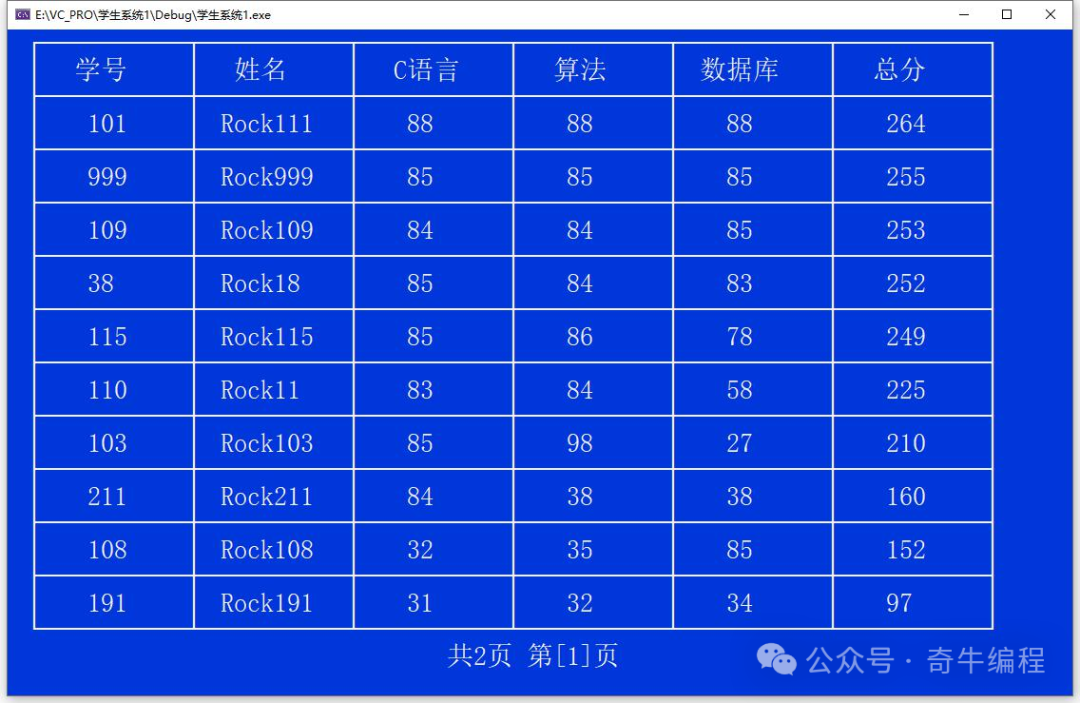
使用表格形式打印。
![]()
导入第 3 行工具(Rock 开发,可以进一步完善)
公众号:奇牛编程
回复关键字:管理系统
初始化窗口大小
void init() {
char cmd[128];
sprintf(cmd, "mode con lines=%d cols=%d", WIN_HEIGHT, WIN_WIDTH);
system(cmd);
}
int main(void) {
init();
......
return 0;
}
创建菜单函数 menu
void menu() {
system("cls");
printTableHead(MENU_WIDTH);
printTableMidInfo(MENU_WIDTH, "学生信息管理系统");
printTableMidInfo(MENU_WIDTH, "");
const char* subMenus[] = {
"1. 输入学生信息",
"2. 查找学生信息",
"3. 删除学生信息",
"4. 修改学生信息",
"5. 插入学生信息",
"6. 学生成绩排名",
"7. 统计学生总数",
"8. 显示所有信息",
"0. 退出系统 "
};
int count = sizeof(subMenus) / sizeof(subMenus[0]);
for (int i = 0; i < count; i++) {
printTableMidInfo(MENU_WIDTH, subMenus[i]);
}
printTableMidInfo(MENU_WIDTH, "");
printTableTail(MENU_WIDTH);
printMidInfo("请选择(0-8): ");
}
调用 menu 函数
int main(void) {
init();
menu();
return 0;
}
上色
color -?
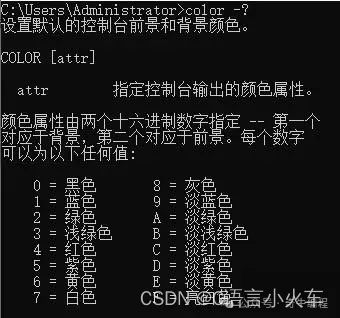
void init() {
char cmd[128];
sprintf(cmd, "mode con lines=%d cols=%d", WIN_HEIGHT, WIN_WIDTH);
system(cmd);
system("color 1f"); //system("color f0\n");
}
5. 菜单选择
int main(void) {
init();
menu();
int n;
scanf("%d", &n);
while (1) {
switch (n) {
case 1: input();break;
case 2: search();break;
case 3: del(); break;
case 4: modify(); break;
case 5: insert(); break;
case 6: order(); break;
case 7: total(); break;
case 8: show(); break;
default:break;
}
waitConfirm();
menu();
rewind(stdin); // fflush(stdin),在 VS2015 以上无效
scanf("%d", &n);
}
return 0;
}
添加的各功能接口:
void input() {
system("cls");
printf("输入...\n");
}
void search() {
system("cls");
printf("查询...\n");
}
void del() {
system("cls");
printf("删除...\n");
}
void modify() {
system("cls");
printf("修改...\n");
}
void insert() {
system("cls");
printf("插入...\n");
}
void order() {
system("cls");
printf("排序...\n");
}
void total() {
system("cls");
printf("统计...\n");
}
void show() {
system("cls");
printf("显示...\n");
}
void waitConfirm() {
rewind(stdin); //flush(stdin)在 VS2015 以上无效,使用 rewind,清空缓存
getch();
}
学生信息的表示
struct student {
int num; //学号
char name[16];
int cLang; //C 语言
int algo; //算法
int database; //数据库
int sum;
};
学生信息的存储
在内存中的存储
#define MAX_COUNT 100
struct student stu[MAX_COUNT];
int currentCount = 0;
在文件中的存储
data.txt
初始化学员信息
void init() {
char cmd[128];
sprintf(cmd, "mode con lines=%d cols=%d", WIN_HEIGHT, WIN_WIDTH);
system(cmd);
system("color 1f"); //system("color f0\n");
memset(stu, 0, sizeof(stu));
FILE* fp = fopen("data.txt", "rb");
if (fp == NULL) {
//printf("文件不存在!\n");
currentCount = 0;
return;
}
int i = 0;
while (!feof(fp)) {
int ret = fread(&stu[i], sizeof(struct student), 1, fp);
if (ret == 1) {
i++;
}
}
currentCount = i;
}
输入学生信息
实现输入功能
void input() {
char str[16];
struct student s;
while (1) {
system("cls");
printf("输入学生信息(y/n):");
rewind(stdin); //清空输入缓存区
scanf("%s", str);
if (strcmp(str, "Y") != 0 && strcmp(str, "y") != 0) {
break;
}
s = inputInfo();
if (searchStu(s.num) >= 0) {
printf("学号[%d] 已经存在!\n", s.num);
waitConfirm();
continue;
}
stu[currentCount++] = s;
if (!save()) {
printf("保存失败!\n");
}
else {
printf("保存成功!\n");
}
waitConfirm();
}
printf("\n 结束输入!\n");
}
inputInfo 函数
struct student inputInfo() { //可优化成使用指针参数
struct student s;
rewind(stdin); //清空输入缓存区
printf("学号:");
scanf("%d", &s.num);
printf("姓名:");
scanf("%s", s.name);
printf("C 语言:");
scanf("%d", &s.cLang);
printf("算法:");
scanf("%d", &s.algo);
printf("数据库:");
scanf("%d", &s.database);
s.sum = s.cLang + s.algo + s.database;
return s;
}
searchStu 函数
int searchStu(int snum) {
for (int i = 0; i < currentCount; i++) {
if (stu[i].num == snum) {
return i;
}
}
return -1;
}
save 函数
bool save() {
FILE *fp = fopen("data.txt", "wb");
if (fp == NULL) {
fclose(fp);
return false;
}
for (int i = 0; i < currentCount; i++) {
if (fwrite(&stu[i], sizeof(struct student), 1, fp) != 1) {
fclose(fp);
return false;
}
}
fclose(fp);
return true;
}
显示学生信息
#define RECORDER_PER_PAGE 10
void show() {
system("cls");
if (currentCount == 0) {
printf("还没有学生信息!\n");
return;
}
int pageCount = (currentCount + RECORDER_PER_PAGE - 1) / RECORDER_PER_PAGE;
char buff[64];
for (int i = 0; i < pageCount; i++) {
showPage(i * RECORDER_PER_PAGE, (i + 1) * RECORDER_PER_PAGE - 1);
sprintf(buff, "共%d 页 第[%d]页", pageCount, i + 1);
printMidInfo(buff);
if (i < pageCount - 1) {
waitConfirm();
}
}
}
showPage 函数
// 表头信息
char head[][COL_LEN_MAX] = { "学号", "姓名", "C 语言", "算法", "数据库", "总分" };
void showPage(int startIndex, int endIndex) {
if (endIndex >= currentCount) {
endIndex = currentCount - 1;
}
if (endIndex - startIndex + 1 > RECORDER_PER_PAGE) {
endIndex = startIndex + RECORDER_PER_PAGE - 1;
}
char row[6][COL_LEN_MAX];
system("cls");
printTableHead(TABLE_WIDTH, 6);
printTableRow(TABLE_WIDTH, head, sizeof(head) / sizeof(head[0]));
printTableMidLine(TABLE_WIDTH, 6);
for (int i = startIndex; i <= endIndex; i++) {
sprintf(row[0], "%d", stu[i].num);
sprintf(row[1], "%s", stu[i].name);
sprintf(row[2], "%d", stu[i].cLang);
sprintf(row[3], "%d", stu[i].algo);
sprintf(row[4], "%d", stu[i].database);
sprintf(row[5], "%d", stu[i].sum);
printTableRow(TABLE_WIDTH, row, 6);
if (i < endIndex) {
printTableMidLine(TABLE_WIDTH, 6);
}
else {
printTableTail(TABLE_WIDTH, 6);
}
}
}
查询学生信息
void search() {
int snum = 0;
system("cls");
printf("请输入学号:");
scanf("%d", &snum);
int i = searchStu(snum);
if (i < 0) {
printf("没有找到这名学生!\n");
return;
}
char row[6][COL_LEN_MAX];
char head[][COL_LEN_MAX] = { "学号", "姓名", "C 语言", "算法", "数据库", "总分" };
printTableHead(TABLE_WIDTH, 6);
printTableRow(TABLE_WIDTH, head, sizeof(head) / sizeof(head[0]));
printTableMidLine(TABLE_WIDTH, 6);
sprintf(row[0], "%d", stu[i].num);
sprintf(row[1], "%s", stu[i].name);
sprintf(row[2], "%d", stu[i].cLang);
sprintf(row[3], "%d", stu[i].algo);
sprintf(row[4], "%d", stu[i].database);
sprintf(row[5], "%d", stu[i].sum);
printTableRow(TABLE_WIDTH, row, 6);
printTableTail(TABLE_WIDTH, 6);
}
删除学生信息
void del() {
FILE* fp;
int snum = 0;
char str[16] = "";
system("cls");
printf("请输入学号:");
scanf("%d", &snum);
int i = searchStu(snum);
if (i<0) {
printf("没有找到这名学生!\n");
return;
}
printf("找到这条记录,是否删除?(y/n)");
scanf("%s", str);
if (strcmp(str, "Y") == 0 || strcmp(str, "y") == 0) {
for (int j = i; j < currentCount; j++) {
stu[j] = stu[j + 1];
}
currentCount--;
if (save()) {
printf("删除成功!\n");
}
else {
printf("保存文件失败!\n");
}
}
else {
printf("取消删除!\n");
}
}
修改学生信息
void modify() {
int snum;
system("cls");
printf("请输入要修改的学生的学号: ");
scanf("%d", &snum);
int i = searchStu(snum);
if (i < 0) {
printf("没有找到这名学生!\n");
return;
}
printf("找到了这名学生, 可以修改他的信息!\n");
printf("姓名:");
scanf("%s", stu[i].name);
printf("C 语言:");
scanf("%d", &stu[i].cLang);
printf("算法:");
scanf("%d", &stu[i].algo);
printf("数据库:");
scanf("%d", &stu[i].database);
stu[i].sum = stu[i].cLang + stu[i].algo + stu[i].database;
if (save()) {
printf("修改成功!\n");
}
else {
printf("保存文件失败!\n");
}
}
插入学员信息
在指定学生的后面插入
int snum;
system("cls");
printf("请输入要插入的位置(学号):");
scanf("%d", &snum);
int destIndex = searchStu(snum);
if (destIndex < 0) {
printf("没有这名学生,插入位置错误!\n");
return;
}
struct student t = inputInfo();
int i = searchStu(t.num);
if (i >= 0) {
printf("学号[%d]已经存在! \n", t.num);
return;
}
for (int j = currentCount-1; j > destIndex; j--) {
stu[j + 1] = stu[j];
}
stu[destIndex + 1] = t;
currentCount++;
if (save()) {
printf("插入成功!\n");
} else {
printf("保存文件失败!\n");
}
学生成绩排名
掌握最基础的排序算法-交换排序
void order() {
if (currentCount == 0) {
printf("还没有学生记录!\n");
return;
}
for (int i = 0; i < currentCount - 1; i++) {
for (int j = i + 1; j < currentCount; j++) {
if (stu[i].sum < stu[j].sum) {
struct student t = stu[i];
stu[i] = stu[j];
stu[j] = t;
}
}
}
if (!save()) {
printf("排序后,保存文件失败!\n");
}
else {
show();
}
}
统计学生总数
作业,自己实现哦~
更多项目提升
长按图片扫码进入小程序