武汉网站建设团队企业网站怎么注册
第二部分:元数据集成体系结构
在明确了元数据管理策略后需要确定实现该管理策略所需的技术体系结构,即元数据集成体系结构。元数据集成体系结构涉及到多个概念,如元模型、元-元模型、公共仓库元模型(CWM)等,本部分将继续介绍大数据治理统一流程参考模型第二步“元数据集成体系结构”的相关内容。
在本系列的第一篇文章中,我们主要介绍了大数据治理的基本概念和统一流程参考模型,并阐述了该模型的第一步“明确元数据管理策略”和第二步“元数据集成体系结构”的六种示例等内容。大数据治理统一流程参考模型的第二步是“元数据集成体系结构”,具体包括元模型、元-元模型、公共仓库元模型(CWM)、CWM发展史、OMG的模型驱动体系结构(Model Driven Architecture,MDA)本文将对元数据集成体系结构包含的各种模型展开叙述。
大数据治理统一流程参考模型,第二步:元数据集成体系结构
元模型(Meta model)
模型(Model)是用来描述特定的系统、过程、事物或概念的准确而抽象的表示。例如软件架构师可以用概要设计的形式建立一个应用系统的模型。本质上来说,元数据是数据的形式化模型,是数据的抽象描述,该描述准确地描述了数据。元模型(Meta model)也就是模型的模型(或者元-元数据),是用来描述元数据的模型。
下面基于关系型表实体-关系(ER)模型举例说明什么是元模型。如图1所示,一个简单的关系型表元模型描述了如何定义一个关系型表,规定了每个表必须有一个名字(字符串),一个表可以有1到多个列,每个列必须有一个名字(字符串)和数据类型(字符串):

图1简单关系型表元模型
如果要创建一个关系型表模型,基于该表元模型创建一个实例即可,比如创建一个常见的雇员表Employees表模型,具体如图2所示,Employees表包含6个列,分别是编号、姓、名字、部门编号、经理编号和职位编号。
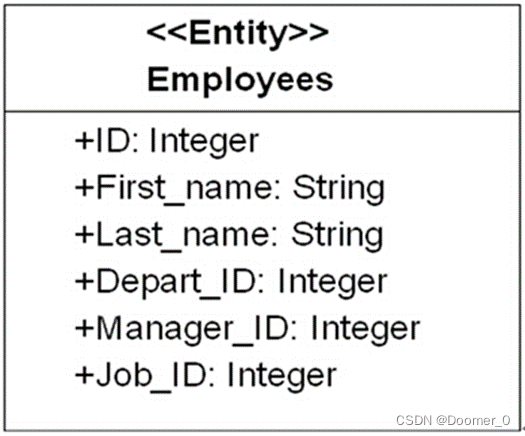
图2Employees表实例
比如在DB2中创建employees表,可以很容易的从employees表模型中得到相应的DDL语句,执行DDL语句时DB2会生成描述employees表的内部元数据并存储在目录(DB2内部的元数据存储库)中。
清单1 在DB2中创建employees表示例
Create table employees (
Id integer not null,
First_name String not null,
Last_name String not null,
Depart_ID Integer not null,
Manager_ID Integer not null,
Job_ID Integer not null
)
同样基于图1简单关系型表元模型创建另一个实例department表模型。department表包含2个列,分别是编号和部门名称,具体如图3所示。由于department表模型和employees表模型都是基于相同的公共元模型,其它工具和应用程序软件(了解关系型表的公共元模型)可以很容易理解department表和employees表,因为它们都是同一个元模型的实例。其它工具或应用程序通过调用导入映射(import mapping)将该department表模型或employees表模型翻译成自己内部的元数据实例。同样,也可以将该软件内部元数据翻译成一个与平台无关的形式化模型,也就是导出映射(export mapping),以便其他软件使用其专有的元数据。这种基于公共元模型的集成方法就是模型驱动的元数据集成体系结构[1]。

图3 department表实例
元-元模型(Meta-meta model)
元-元模型就是元模型的模型,有时也被称为本体(ontology),是模型驱动的元数据集成体系结构的基础,其定义了描述元模型的语言,规定元模型必须依照一定的形式化规则来建立,以便所有的软件工具都能够对其进行理解。
元-元模型比元模型具有更高的抽象级别,一个元模型是一个元-元模型的实例,元模型比元-元模型更加精细,而元-元模型比元模型更加抽象。元数据(模型)则是一个元模型的实例,遵守元模型的规定和约束。用户对象(或用户数据)则是元数据(或者称为模型)的实例。元数据层次结构具体如表1所示,共分为4层,最高层L3是元-元模型,之下是L2元模型和L1模型/元数据,最底层是L0用户对象/用户数据:
表1 元数据层次结构
| 元层次 | 名称 | 示例 |
| L3 | 元-元模型 | 元类、元属性、元操作 |
| L2 | 元模型 | 类、属性、操作、构件 |
| L1 | 模型/元数据 | 实体-关系(ER)图 |
| L0 | 用户对象/用户数据 | 交易数据、ODS数据、数据仓库数据、数据集市数据、数据中心数据等 |
公共仓库元模型(CWM)概述
公共仓库元模型(Common Warehouse MetaModel,CWM)是被对象管理组织OMG(Object Management Group)采纳的数据仓库和业务分析领域元数据交换开放式行业标准,在数据仓库和业务分析领域为元数据定义公共的元模型和基于XML的元数据交换(XMI)。CWM作为一个标准的接口,可以帮助分布式、异构环境中的数据仓库工具,数据仓库平台和数据仓库元数据存储库之间轻松实现数据仓库和业务分析元数据交换。CWM提供一个框架为数据源、数据目标、转换、分析、流程和操作等创建和管理元数据,并提供元数据使用的世系信息[2]。
CWM是一个基于模型驱动方法的完整地描述数据仓库和业务分析领域的元模型,提供构建元数据所需的语法和语义,由若干个不相同又紧密相关的子元模型组成。CWM模型的目的是最大限度的重用对象模型(Object Model,UML的一个子集),并在可能的地方共享通用模型结构。如图4所示,CWM元模型使用包(package)和层次来简化管理的复杂度并便于理解,共包含21个单独的包,这些包被分为5个层次。对象模型层包含定义基本元模型的概念、关系和约束的包,其它CWM包都需要用到这些定义,对象模型层的包构成了其它CWM包所需要的基本元模型服务的全部集合。对象模型层主要包括核心包(Core package)、行为包(Behavioral package)、关系包(Relationships package)和实例包(Instance package)。
- 数据源层(Data Resources):主要描述CWM元数据交换中既可作为源又可以作为目标的数据源的结构,本层含有的元模型主要描述面向对象的数据库和应用、关系型数据库、面向记录的数据源(如文件、记录数据库管理系统等)、多维数据库和XML数据源等。对于面向对象数据源,CWM一般情况下重用基本的对象模型(位于对象模型层),如果该数据源具有对象模型层无法处理的一些特征和功能时,可以通过定义一个扩展包来解决。
- 数据分析层(Data Analysis):本层含有的元模型主要描述数据转换、在线分析处理OLAP、数据挖掘、信息可视化和业务术语等。
- 仓库管理层(Warehouse Management):本层含有的元模型主要描述数据仓库处理和数据仓库操作。
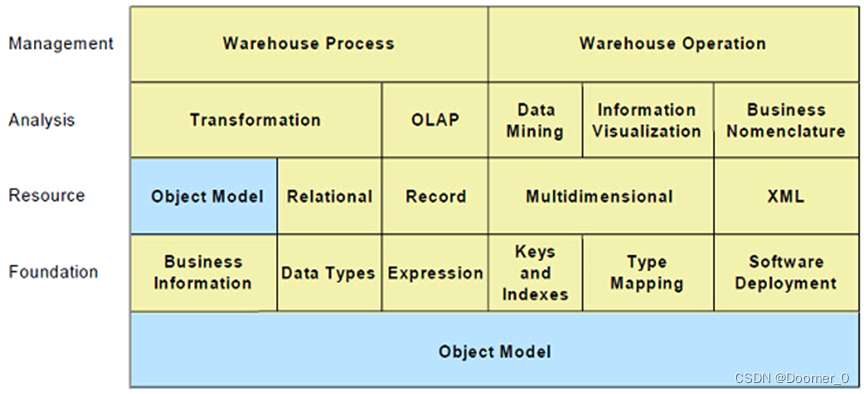
图4 CWM1.1元模型
CWM1.1是在2003年3月发布的,与之相关的OMG组织规范还有MOF、UML和XMI。CWM使用统一建模语言(UML)定义公共元数据的模型(CWM元模型),使用可扩展标记语言(XML)生成CWM元数据交换规范(也就是XML元数据交换,XMI),使用CORBA接口定义语言(IDL)为访问CWM元数据生成编程语言API的规范(依赖MOF到IDL的映射)。
UML是一种规范化、可视化、描述明确、结构化和文档化的定义分布式对象系统的图形化语言。1996年,业内三种最杰出的面向对象建模语言:Grady Booch的Booch方法、Ivar Jacobson的面向对象软件工程(OOSE)和Jim Rumbaugh的对象建模技术(OMT)被统一起来发布,也就是UML0.9。2011年,UML2.4.1发布。CWM依赖于UML规范的前三个部分,即UML语义、UML符号向导和对象约束语言规范。UML语义定义UML元模型的语义,UML元模型是层次结构并以包为单位进行组织,每个包按照抽象语言(使用类图)、结构良好规则(采用OCL)和语义(采用英语)来定义。UML符号指定表达UML元模型语义的图形语法(例如类图)。对象约束语言规范定义对象约束语言(OCL)的句法、语义和语法,OCL是一种表述约束的形式化语言[3]。
- 构造块和结构良好规则:UML提供了组成构造块和结构良好规则的面向对象建模语言,基本的构造块包括模型元素(如类、对象、接口、组件、用例等)、关系(如关联、泛化、依赖等)和图(如类图、对象图、用例图等)等。
- UML可以为一个系统进行不同方面的建模,比如结构建模(又包括使用类图和对象图的静态结构建模、使用组件图和部署图实现建模)、用例建模和行为建模等。元数据建模只需要静态结构建模,静态结构的核心元素是类、对象、属性和操作。
- UML用包来将模型元素组织成语义上相关联的分组,每个包拥有其自己的模型元素,每个模型元素不能同时被多个包拥有。
UML在CWM中主要作为三种角色出现[4]:
1、UML作为和MOF等价的元-元模型。UML,或者部分对应MOF模型、UML符号和OCL的UML分别被用作建模语言、图形符号和约束语言,用来定义和表示CWM。
2、UML作为基础元模型。对象模型层(ObjectModel)与UML关系密切,是UML的一个子集。
3、UML用来作为面向对象元模型。
元对象框架(Meta Object Framework,MOF,本文以2.4.1版本为例)是一个以独立于平台的方式定义、操作、集成元数据和数据的、可扩展、模型驱动的分布式对象集成框架。此框架支持各种类型的元数据,还可以根据需求添加新类型的元数据。MOF包括MOF模型(定义建立元模型的建模元素和使用规则)、MOF反射接口(允许程序在不使用元模型指定接口时对元数据进行各种操作)和MOF到IDL的映射(定义MOF模型定义的元模型到CORBAIDL之间的标准映射)。MOF模型是以UML的概念和结构为基础,尤其是以UML的静态结构模型和模型管理为基础。MOF模型没有定义自己的图形符号和约束语言,而是采用UML的图形符号和OCL来实现。MOF模型也是层次结构,并以包为单位进行组织。
MOF支持各种类型的元数据,采用四层元数据体系结构(也就是OMG元数据体系结构)[5],具体如表2所示,该体系架构将元数据(M1)视同为数据(M0),并对之进行形式化建模(即元模型,M2)。元模型(M2)使用元-元模型(M3)所提供的元建模结构来表示。表2表明MOF模型(元-元模型)、UML元模型、用户模型和用户对象/数据之间的关系。
表2 MOF四层元数据体系结构
| 描述 | 示例 | |
| M3 | MOF,i.e. the set of constructs used to define metamodels | MOF Class,MOF Attribute,MOF Association,etc . |
| M2 | Metamodels,consisting of | UML Class,UMLAssociation,UML Attribute,UML State,UML Activity,etc.CWM Table,CWM Column,etc. |
| M1 | Models,consisting of instances | Class“Customer”,Class“Account” |
| M0 | Objects and data,i.e.instances of M1 modelconstructs | Customer Jane Smith,Customer Joe Jones,Account 2989,Account2344,Employee A3949,Vendor 78988,etc. |
XML元数据交换(XMI)是在工具软件、应用程序之间进行元数据交换的XML语言,整合了UML、MOF和XML三种技术,允许MOF元数据(即遵从MOF或基于MOF的元模型的元数据)以流或文件的形式按照XML的标准格式进行交换。XMI是OMG在元数据交换方面的标准之一,同时也是W3C认可的标准。本质上,XMI是W3C的XML和MOF之间,以及XML文档和MOF元数据之间的一对平行映射。2011年8月,XML发布了2.4.1。
CWM发展史
其实早在上世纪80年代末90年代初,很多企业就尝试使用一种元模型实现元数据集成以整合分布于各个业务竖井中的元数据,但最终失败了,因为很多的利益相关者各自拥有不同的观点,且需要不同的模型结构。1997年,OMG将UML采纳为标准,为CWM标准制定打下了第一个基础。同样在1997年,MOF被OMG采纳为标准,为CWM的产生打下了第二个基础。1999年初,OMG采纳XMI作为标准,为CWM的出现打下了第三个基础。1998年5月,IBM、ORACLE和Unisys向OMG提交了公共仓库元数据交换(Common Warehouse Metadata Interchange,CWMI)征求意见稿(RFP),同年9月OMG发布了该征求意见稿,经过8个公司(IBM、Unisys、Oracle、Hyperion、UBS、NCR、Genesis和Dimension EDI)2年半的努力和协作,OMG于2001年4月正式采纳CWM为标准。
在CWM发展的同时,其他一些元数据标准的制定也在进行中。最早在1993年,电子信息组织就发布了计算机辅助工程数据交换格式(CASE Data Interchange Format,CDIF)并得到了一定的认可。1995年10月,元数据联盟(Meta Data Coalition,MDC)成立,并与1996年4月发布了元数据交换规范1.0(Meta Data Interchange Specification,MDIS),与CWM相比,MDIS涉及的范畴少很多,且其规范和交换语言都是自身独有的。此时微软也在和其他一些合作者一起开发开放信息模型(Open Information Model,OIM),该模型于1996年10月成形,采用UML作为其规范语言。1998年11月,微软加入MDC并提交OIM标准,1999年7月MDC发布了OIMv1.0版本,由此业内面临着两种元数据集成规范的竞争局面,之后考虑到业内对CWM的认可,MDC于2000年9月决定终止其OIM后续工作,将其元数据标准归入到OMG中,从此CWM影响力和范围持续扩大并得到了业内的统一认可。
OMG的模型驱动体系结构(Model Driven Architecture,MDA)
OMG组织成立不久制定了对象管理体系结构(Object Management Architecture,OMA)参考模型,描述了OMG规范所遵循的概念化的基础结构。OMA是由对象请求代理(Object Request Broker,ORB)、对象服务、公共设施、域接口和应用接口等几个部分组成,其核心是对象请求代理(ORB)。对象请求代理(ORB)是公共对象请求代理体系结构(Common Object Request Broker Architecture,CORBA)的核心组件,提供了识别和定位对象、处理连接管理、传送数据和请求通信所需的框架结构。OMA和CORBA被定位为软件框架,用来指导基于OMG规范的技术开发。
从1995年开始,OMG开始非正式的采用针对特定行业(“领域”,Domain)的技术规范,为了保持扩张重点,OMG在2001年正式采用第二个框架,模型驱动体系架构(Model Driven Architecture,MDA)。与OMA和CORBA不一样,MDA不是部署分布式系统的框架,而是在软件开发中基于模型驱动的方法。为了实现MDA,OMG随后制定了一系列标准如UML、MOF、XMI和CWM等,解决了MDA的模型建立、扩展、交换等几个方面的问题。模型驱动体系结构源自众所周知的和长期建立的思想:“将系统操作规范从系统利用底层平台能力的细节中分离出来”。MDA提供了一种方法(基于相关工具)来规范化一个平台独立的系统,为系统选择一个特定的实现平台,并把系统规范转换到特定的实现平台。MDA的首要三个目标是:可移植性、互操作性和可重用性。MDA三个视角(viewpoint)[6]分别是:
- 计算无关视角(Computation Independent Viewpoint):侧重系统环境和系统需求;系统结构和流程细节被隐藏或尚未确定。其对应的是计算无关模型(Computation Independent Model,CIM)。
- 平台无关视角(Platform Independent Viewpoint):侧重系统的操作,同时隐藏用于特定平台的必要细节。其对应的是平台无关模型(Platform Independent Model,PIM),PIM是抽出技术和具体工程细节之后的模型。
- 平台相关视角(Platform Specific Viewpoint):结合平台无关系视角和系统所使用的特定平台细节。其对应的是平台相关模型(Platform Specific Viewpoint Model,PSM),PSM是包含技术和具体工程细节的模型。
OMG模型驱动体系结构如图5所示:
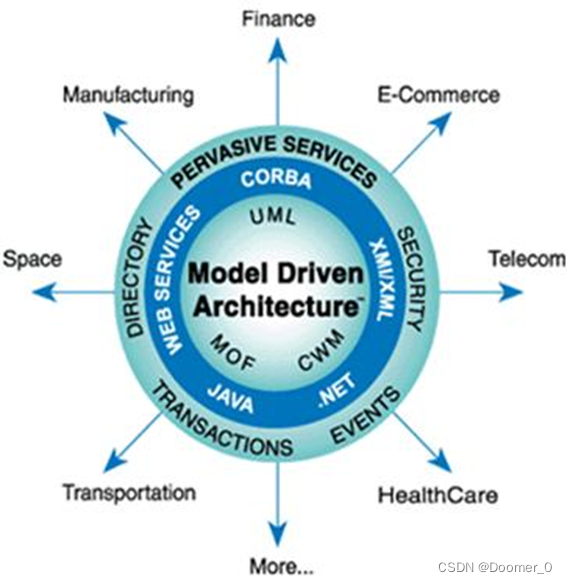
图5 OMG模型驱动体系架构
CWM元模型、规范以及生成的产品同MDA非常契合,从技术平台角度来说,所有的平台相关模型(CWMXML、CWMIDL和CWM Java等)都是自动地从平台无关模型(CWM元模型和规范)中产生的;从产品平台角度来说,平台相关模型(比如DB2、ORACLE、SQLSERVER等)都是人工从平台无关模型(CWM元模型和规范)中构造出来的。
结束语
本文详细介绍了大数据治理统一流程参考模型第二步“元数据集成体系结构”的后续内容,主要包括元模型、元-元模型、公共仓库元模型(CWM)、CWM发展史、对象管理组织OMG的模型驱动体系结构(Model Driven Architecture,MDA)。在本系列文章的下一部分将重点介绍大数据治理统一流程参考模型的第三步:“实施元数据管理”,讲述在大数据时代如何实施元数据管理,如何使用元数据管理成熟度模型,以及IBM在元数据管理方面的产品:业务元数据管理工具IBM Info Sphere Business Glossary、业务词汇表小工具Info Sphere Business Glossary Anywhere和技术元数据管理工具Info Sphere Metadata Workbench。
参考文献
- 更多信息请参考:OMG Model Driven Architecture :Model Driven Architecture (MDA) | Object Management Group ;
- OMG,Common Warehouse Metamodel(CWM)Specification v1.1,P44 ;
- John Poole,Dan Chang,Douglas Tolbert and David Mellor,2002,Common Warehouse Metamodel,p48-53,p58-63 ;
- OMG,Common Warehouse Metamodel(CWM)Specification v1.1,P45 ;
- David Frankel Consulting,”Using Model Driven Architecture™ to Manage Metadata”,P46 ;
- OMG,2003,MDA Guide Version 1.0.1,p11-12,P15-16 ;