iis为网站子目录绑定二级域名怎么制作个人网页
目录
- 1. 网络设计
- 2. 代码实现
- 2.1 网络代码
- 2.2 train
- 3. 完整代码
1. 网络设计
输入是手写数字图片28x28,输出是10个分类0~9,有两个隐藏层,如下图所示:
2. 代码实现
2.1 网络代码
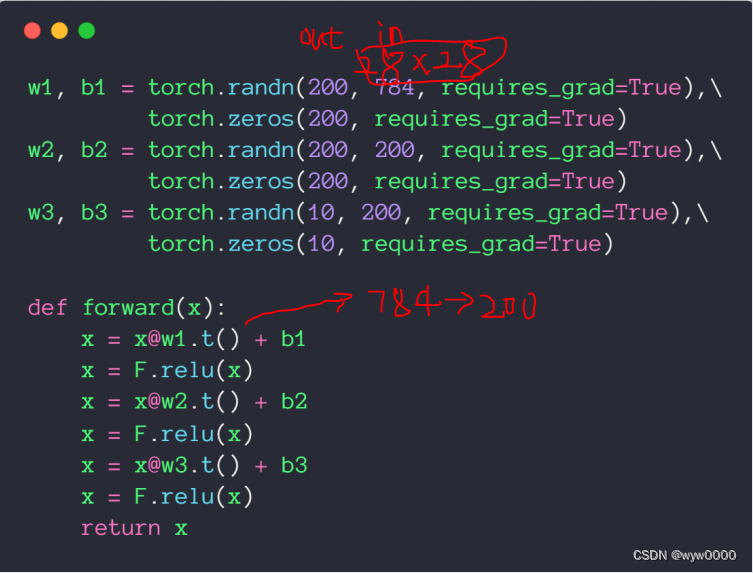
第一层将784降维到200,第二次使用200不降维,输出层200降维到10,每一层之后加一个激活函数relu,每一层都需要梯度信息所以requires_grad=True;
forward函数最后不要加softmax,因为后面CrossEntropyLoss中包含了softmax操作。
2.2 train
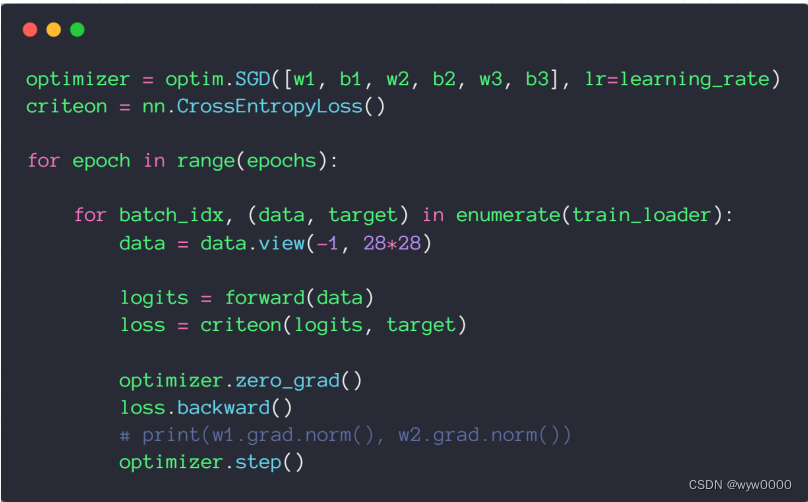
优化目标是w1、b1、w2、b2、w3、b3,使用SGD优化器,使用CrossEntropyLoss计算loss
3. 完整代码
import torch
import torch.nn as nn
import torch.nn.functional as F
import torch.optim as optim
from torchvision import datasets, transformsbatch_size=200
learning_rate=0.01
epochs=10train_loader = torch.utils.data.DataLoader(datasets.MNIST('../data', train=True, download=True,transform=transforms.Compose([transforms.ToTensor(),transforms.Normalize((0.1307,), (0.3081,))])),batch_size=batch_size, shuffle=True)
test_loader = torch.utils.data.DataLoader(datasets.MNIST('../data', train=False, transform=transforms.Compose([transforms.ToTensor(),transforms.Normalize((0.1307,), (0.3081,))])),batch_size=batch_size, shuffle=True)w1, b1 = torch.randn(200, 784, requires_grad=True),\torch.zeros(200, requires_grad=True)
w2, b2 = torch.randn(200, 200, requires_grad=True),\torch.zeros(200, requires_grad=True)
w3, b3 = torch.randn(10, 200, requires_grad=True),\torch.zeros(10, requires_grad=True)# torch.nn.init.kaiming_normal_(w1)
# torch.nn.init.kaiming_normal_(w2)
# torch.nn.init.kaiming_normal_(w3)def forward(x):x = x@w1.t() + b1x = F.relu(x)x = x@w2.t() + b2x = F.relu(x)x = x@w3.t() + b3x = F.relu(x)return xoptimizer = optim.SGD([w1, b1, w2, b2, w3, b3], lr=learning_rate)
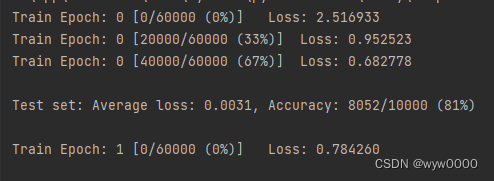
criteon = nn.CrossEntropyLoss()for epoch in range(epochs):for batch_idx, (data, target) in enumerate(train_loader):data = data.view(-1, 28*28)logits = forward(data)loss = criteon(logits, target)optimizer.zero_grad()loss.backward()# print(w1.grad.norm(), w2.grad.norm())optimizer.step()if batch_idx % 100 == 0:print('Train Epoch: {} [{}/{} ({:.0f}%)]\tLoss: {:.6f}'.format(epoch, batch_idx * len(data), len(train_loader.dataset),100. * batch_idx / len(train_loader), loss.item()))test_loss = 0correct = 0for data, target in test_loader:data = data.view(-1, 28 * 28)logits = forward(data)test_loss += criteon(logits, target).item()pred = logits.data.max(1)[1]correct += pred.eq(target.data).sum()test_loss /= len(test_loader.dataset)print('\nTest set: Average loss: {:.4f}, Accuracy: {}/{} ({:.0f}%)\n'.format(test_loss, correct, len(test_loader.dataset),100. * correct / len(test_loader.dataset)))如下图:
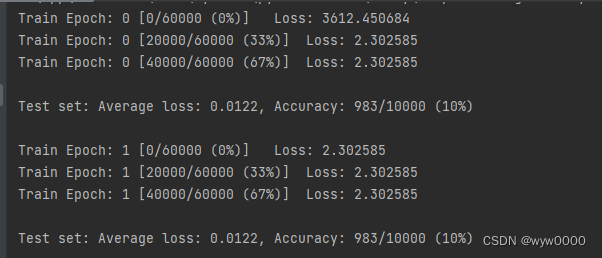
未使用torch.nn.init.kaiming_normal_(w1)初始化参数的情况,可以看出Loss在2.302585后就不下降了。
如下图:使用了torch.nn.init.kaiming_normal_(w1)初始化参数的情况下,Loss下降还是比较快的。
因此使用好的初始化参数对网络的训练起到至关重要的作用