做网站公司郑州引流推广接单
Jumpserver docker 安装启动教程
拉取镜像
docker pull JumpServer
启动进行前确保有Redis 和Mysql
创建jumperServer数据库
在MYSQL上执行
创建数据库
登陆MYSQL
mysql -u root -p
创建Jumperserveri库
create database jumpserver default charset 'utf8mb4';
可以为jumperServer创建专门的用户
grant all on jumpserver.* to 'jumpserver'@'%' identified by 'Aa123456';
刷新配置
flush privileges;
退出
exit;
生成key 和 token 后面启动jumpeSerive 用
生成KEY,在Linux上执行,获取返回值
if [ "$SECRET_KEY" = "" ]; then SECRET_KEY=`cat /dev/urandom | tr -dc A-Za-z0-9 | head -c 50`; echo "SECRET_KEY=$SECRET_KEY" >> ~/.bashrc; echo $SECRET_KEY; else echo $SECRET_KEY; fi
生成token 在Linux上执行,获取返回值
if [ "$BOOTSTRAP_TOKEN" = "" ]; then BOOTSTRAP_TOKEN=`cat /dev/urandom | tr -dc A-Za-z0-9 | head -c 16`; echo "BOOTSTRAP_TOKEN=$BOOTSTRAP_TOKEN" >> ~/.bashrc; echo $BOOTSTRAP_TOKEN; else echo $BOOTSTRAP_TOKEN; fi
创建jumpserver 和物理机映射目录
mkdir -p /data/jumpserver
启动JumperServer命令
docker run -d --name=jumpserver -h jumpserver --restart=always
-v /data/jumpserver/:/data/jumpserver/data/media
-p 8080:80
-p 2222:2222
-e SECRET_KEY=xxxxxxxxxxxxxx \ #填写刚刚生成的key
-e BOOTSTRAP_TOKEN=xxxxxxxxxxxxxxxxxxxxxxxxxxxxxxx \ #填写刚刚生成的token
-e DB_HOST=192.168.2.107 \ # 数据库服务器地址
-e DB_PORT=3306 \ # 数据库端口
-e DB_USER=jumpserver \ # 数据库用户
-e DB_PASSWORD=“Aa123456” \ # 数据库密码
-e DB_NAME=jumpserver \ # 数据库名称
-e REDIS_HOST=192.168.2.107 \ # redis服务器地址
-e REDIS_PORT=6379
-e REDIS_PASSWORD=“xxxxxx”
jumpserver/jms_all:last
docker run -d --name=jumpserver -h jumpserver --restart=always  \
-v /data/jumpserver/:/data/jumpserver/data/media \
-p 8080:80 \
-p 2222:2222 \
-e SECRET_KEY=xxxxxxxxxxxxxx \
-e BOOTSTRAP_TOKEN=xxxxxxxxxxxxxxxxxxxxxxxxxxxxxxx \
-e DB_HOST=192.168.2.107 \
-e DB_PORT=3306 \
-e DB_USER=jumpserver \
-e DB_PASSWORD="Aa123456" \
-e DB_NAME=jumpserver \
-e REDIS_HOST=192.168.2.107 \
-e REDIS_PORT=6379 \
-e REDIS_PASSWORD="xxxxxx" \
jumpserver/jms_all:last
Ldap认证
安装好后浏览器输入 ip加端口8080访问
http://IP:8080/
首次登录默认密码账号admin admin
登陆后右上角点设置—认证设置----LADP 输入对应的Ldap信息
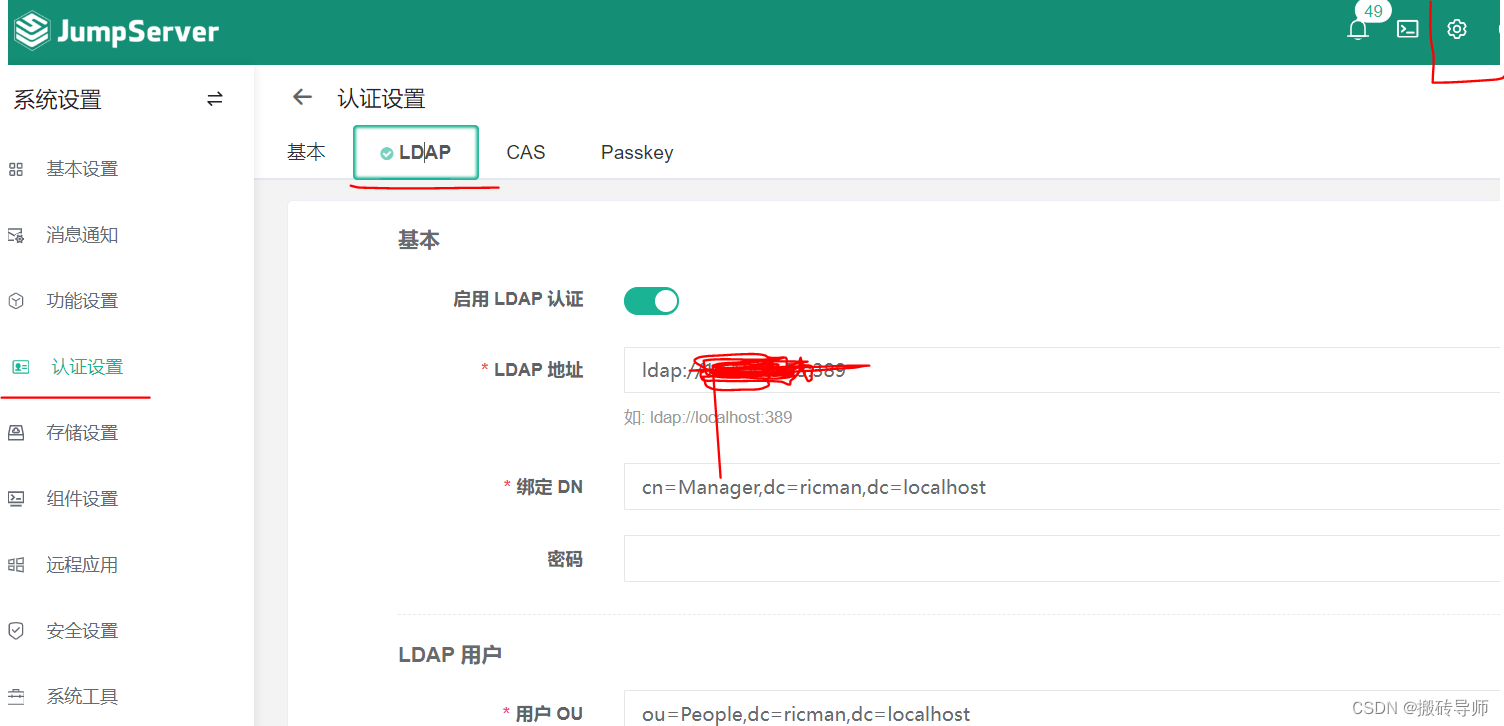
测试链接没问题,提交,提交之后就用户导入,可以导入用户,导入之后就能测试登陆。
