北京响应式网站开发广东seo价格是多少钱
知识点:什么是掌控板?
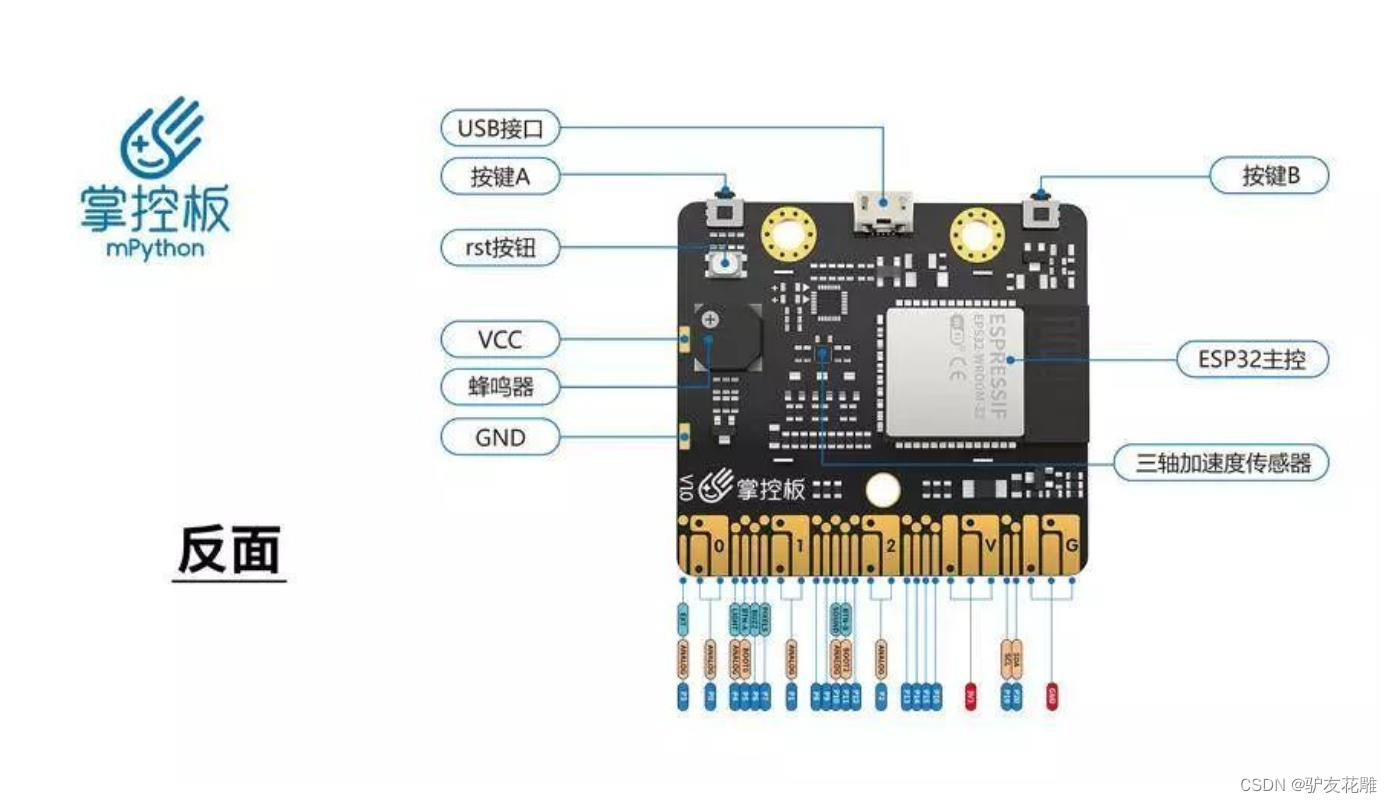
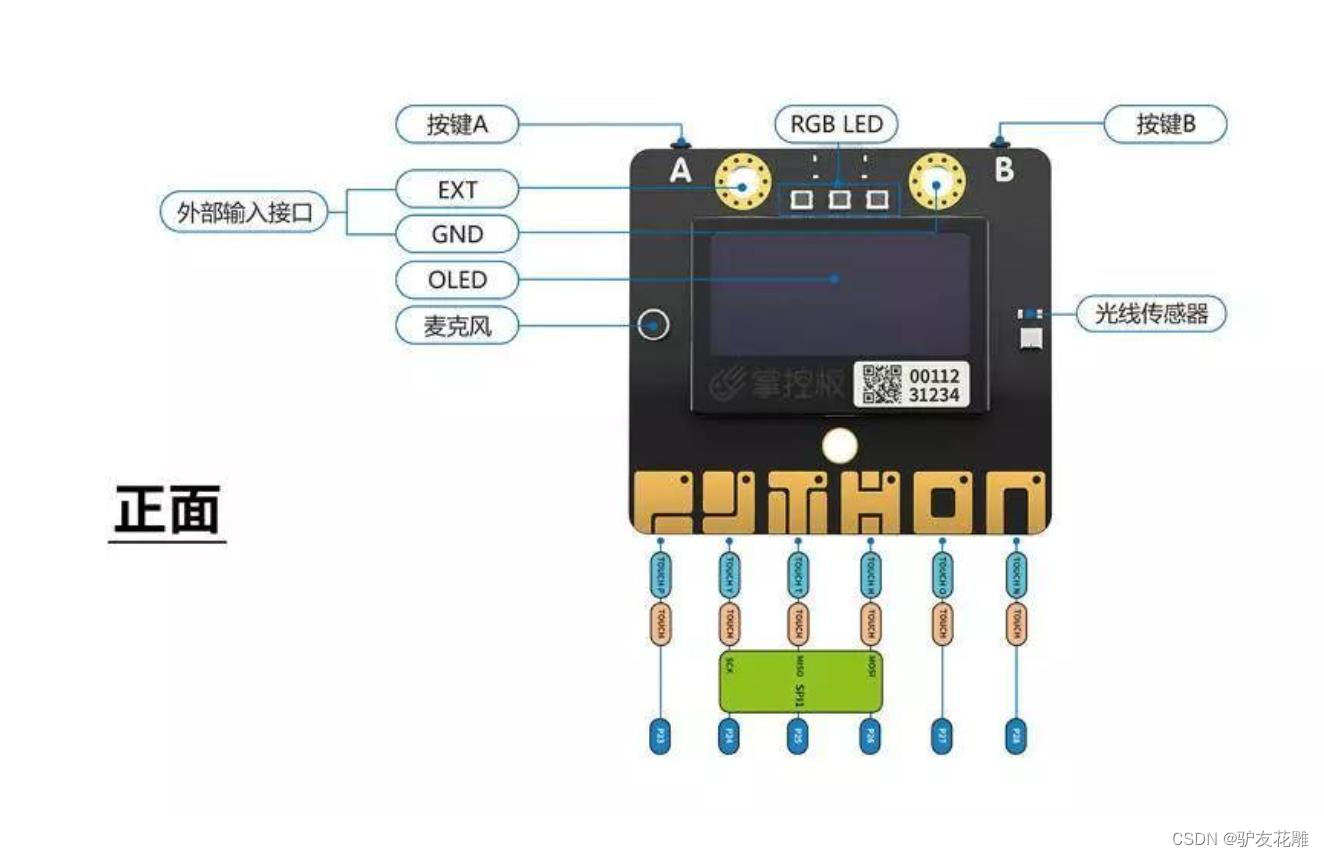
掌控板是一块普及STEAM创客教育、人工智能教育、机器人编程教育的开源智能硬件。它集成ESP-32高性能双核芯片,支持WiFi和蓝牙双模通信,可作为物联网节点,实现物联网应用。同时掌控板上集成了OLED显示屏、RGB灯、加速度计、麦克风、光线传感器、蜂鸣器、按键开关、触摸开关、金手指外部拓展接口,支持图形化及MicroPython代码编程,可实现智能机器人、创客智造作品等智能控制类应用。

1、物联网(Internet of Things,缩写:IoT)
是基于互联网、传统电信网等信息承载体,让所有能行使独立功能的普通物体实现互联互通的网络。其应用领域主要包括运输和物流、工业制造、健康医疗、智能环境(家庭、办公、工厂)等,具有十分广阔的市场前景。
物联网的概念最早是在1999年由Kevin Ashton在一次演讲中提出来的,当时他是一个RFID研究机构的执行主任,这家研究机构是在宝洁公司和吉列公司的赞助下成立的。而他本人也因此被称为物联网之父。随后麻省理工学院的Neil Gershenfeld教授出版了一本名为《When things Start to Think》的书。以这些为标志,正式揭开了物联网的序幕。
物联网的英文是Internet of Things,缩写为IoT。这里的“物”指的是我身边一切能与网络联通的物品。例如你带的手表、你骑的共享单车、马路上的汽车、家里的冰箱、路边的路灯、甚至是一棵树。只要一件物品能够与网络相连,它就都是物联网中的“物”。而所谓物联网,就是“物”与人,以及“物”与“物”之间,通过网络来传递和处理信息。

Blynk
专为物联网而设计。它可以远程控制硬件,可以显示传感器数据,可以存储数据,对其进行虚拟化,还可以执行许多其他出色的工作。该平台包含三个主要组件:
1、Blynk应用程序——允许您使用我们提供的各种小部件为您的项目创建惊人的界面。
2、Blynk服务器——负责智能手机和硬件之间的所有通信。您可以使用我们的Blynk Cloud或在本地运行您的私有Blynk服务器。它是开源的,可以轻松处理数千个设备,甚至可以在Raspberry Pi上启动。
3、Blynk库——适用于所有流行的硬件平台-支持与服务器的通信并处理所有传入和传出的命令。
现在想像一下:每次在Blynk应用程序中按下Button时,消息就会传播到Blynk Cloud空间,神奇地在其中找到通向硬件的方式。它在相反方向上的作用相同,并且所有操作都在眨眼间发生。

3、远程开关控制板载RGB灯
连接服务器IP:116.62.49.166 端口: 8080
设置APP组件

#MicroPython动手做(30)——物联网之Blynk
#远程开关控制板载RGB灯
#MicroPython动手做(30)——物联网之Blynk
#远程开关控制板载RGB灯from mpython import *
import network
import blynklib
import time
import musicmy_wifi = wifi()my_wifi.connectWiFi("zh", "zy1567")blynk = blynklib.Blynk("N14sXx7xQ-rXQF4_gKIFjEQqCC_LzybL", server="116.62.49.166", port=8080)@blynk.handle_event("connect")
def connect_handler():print('Blynk connected')@blynk.handle_event("disconnect")
def connect_handler():print('Blynk disconnected')@blynk.handle_event('write V1')
def write_virtual_pin_handler(pin, _value):global ifor i in range(0, len(_value)):try: _value = eval(_value)except: passif len(_value) == 1: _value = _value[0]rgb.fill((int(153), int(0), int(0)))rgb.write()time.sleep_ms(1)music.play('G5:1')@blynk.handle_event('write V0')
def write_virtual_pin_handler(pin, _value):global ifor i in range(0, len(_value)):try: _value = eval(_value)except: passif len(_value) == 1: _value = _value[0]rgb.fill( (0, 0, 0) )rgb.write()time.sleep_ms(1)music.play('E5:1')oled.fill(0)
oled.DispChar("        网络已经连接", 0, 16, 1)
oled.show()
rgb[1] = (int(0), int(102), int(0))
rgb.write()
time.sleep_ms(1)
music.play('C5:1')
while True:blynk.run()
mPython X 实验图形编程

#MicroPython动手做(30)——物联网之Blynk
#远程开关控制板载RGB灯(实验视频)
https://v.youku.com/v_show/id_XNDcwNDMwMjQwNA==.html?spm=a2h0c.8166622.PhoneSokuUgc_1.dtitle

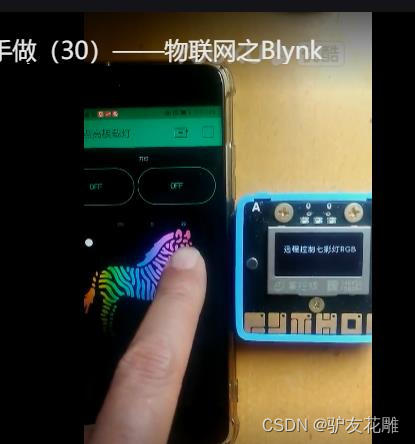
4、Blynk远程控制七彩灯
调整APP控制面板元素为

#MicroPython动手做(30)——物联网之Blynk
#Blynk远程控制七彩灯RGB
#MicroPython动手做(30)——物联网之Blynk
#Blynk远程控制七彩灯RGBfrom mpython import *
import network
import music
import blynklib
import timemy_wifi = wifi()my_wifi.connectWiFi("zh", "zy1567")blynk = blynklib.Blynk("CO1NhMoRAYxP3p3hBjvsqrrHmIoYzM0e", server="116.62.49.166", port=8080)@blynk.handle_event("connect")
def connect_handler():print('Blynk connected')@blynk.handle_event("disconnect")
def connect_handler():print('Blynk disconnected')@blynk.handle_event('write V0')
def write_virtual_pin_handler(pin, _value):global my_listfor i in range(0, len(_value)):try: _value = eval(_value)except: passif len(_value) == 1: _value = _value[0]my_list = _valuergb.fill( (int(my_list[0]), int(my_list[1]), int(my_list[2])) )rgb.write()time.sleep_ms(1)music.play('G5:1')
oled.fill(0)
oled.DispChar("    远程控制七彩灯RGB", 0, 16, 1)
oled.show()
rgb[1] = (int(0), int(102), int(0))
rgb.write()
time.sleep_ms(1)
while True:blynk.run()
mPython X 实验图形编程

#MicroPython动手做(30)——物联网之Blynk
#Blynk远程控制七彩灯RGB
https://v.youku.com/v_show/id_XNDcwNTIxNjAzNg==.html