做时时彩测评网站绍兴seo网站管理
1、调度器监听器
调度器本身收到的一些事件通知,接口ISchedulerListener,如作业的添加、删除、停止、挂起等事件通知,调度器的启动、关闭、出错等事件通知,触发器的暂停、挂起等事件通知,接口部分定义如下:
//添加作业时通知事件
Task JobAdded(IJobDetail jobDetail, CancellationToken cancellationToken = default);
//移除作业时通知事件
Task JobDeleted(JobKey jobKey, CancellationToken cancellationToken = default);
//调度器出错时通知事件
Task SchedulerError(string msg, SchedulerException cause, CancellationToken cancellationToken = default);
//调度器正在关闭时通知事件
Task SchedulerShuttingdown(CancellationToken cancellationToken = default);
//调度器已启动时通知事件
Task SchedulerStarted(CancellationToken cancellationToken = default);
//调度器启动中通知事件
Task SchedulerStarting(CancellationToken cancellationToken = default);
注册方法:scheduler.ListenerManager.AddSchedulerListener(new MySchedulerListener());
MySchedulerListener为具体的调度器实现
2、触发器监听器
对触发器的通知事件监听,接口ITriggerListener,抽象类TriggerListenerSupport,接口定义如下:
public interface ITriggerListener
{string Name { get; }Task TriggerFired(ITrigger trigger, IJobExecutionContext context);Task<bool> VetoJobExecution(ITrigger trigger, IJobExecutionContext context);Task TriggerMisfired(ITrigger trigger);Task TriggerComplete(ITrigger trigger, IJobExecutionContext context, int triggerInstructionCode);
}
3、作业监听器
对Job的通知事件监听,接口IJobListener,抽象类JobListenerSupport,可以通过继承此类实现自定义监听器逻辑,
自定义监听器如下所示,主要是在三个执行方法中分别打印日志信息,观察日志打印顺序,
using Quartz;
using Quartz.Listener;
using System;
using System.Threading;
using System.Threading.Tasks;namespace QuartzConsole
{/// <summary>/// Job执行情况监听器/// </summary>public class MyJobListener : JobListenerSupport{public override string Name => "MyJobListener";public override Task JobWasExecuted(IJobExecutionContext context, JobExecutionException jobException, CancellationToken cancellationToken = default){Console.WriteLine($"JobWasExecuted已执行{DateTime.Now.ToLongTimeString()}");return base.JobWasExecuted(context, jobException, cancellationToken);}public override Task JobExecutionVetoed(IJobExecutionContext context, CancellationToken cancellationToken = default){Console.WriteLine($"JobExecutionVetoed已执行{DateTime.Now.ToLongTimeString()}");return base.JobExecutionVetoed(context, cancellationToken);}public override Task JobToBeExecuted(IJobExecutionContext context, CancellationToken cancellationToken = default){Console.WriteLine($"JobToBeExecuted已执行{DateTime.Now.ToLongTimeString()}");return base.JobToBeExecuted(context, cancellationToken);}}
}
4、定义Job
using Quartz;
using System;
using System.Threading;
using System.Threading.Tasks;namespace QuartzConsole
{public class MyJob : IJob{public Task Execute(IJobExecutionContext context){var mapdata = context.JobDetail.JobDataMap;foreach (var item in mapdata){Console.WriteLine(item.Key + "," + item.Value);}Thread.Sleep(7000);//线程延迟7秒后执行return Console.Out.WriteLineAsync($"任务开始执行了:{DateTime.Now.ToString("yyyy-MM-dd HH:mm:ss")}");}}
}
5、创建调度器
创建调度器,并创建Job实例,触发器实例,调度器绑定Job实例和触发器实例,程序主代码如下所示,
using Quartz;
using Quartz.Impl;
using Quartz.Impl.Matchers;
using Quartz.Logging;
using System;
using System.Collections.Generic;
using System.Linq;
using System.Text;
using System.Threading.Tasks;namespace QuartzConsole
{class Program{async static Task Main(string[] args){StdSchedulerFactory factory = new StdSchedulerFactory();var scheduler = await factory.GetScheduler();//创建调度器scheduler.ListenerManager.AddJobListener(new MyJobListener(), GroupMatcher<JobKey>.AnyGroup());//注册自定义监听器,对任何组织的job实施监听await scheduler.Start();//启动调度器var jobdata = new JobDataMap { };jobdata.Add("小张", "女孩子");jobdata.Add("小潘", 33);jobdata.Add("小唐", new DateTime(2019, 8, 6));IJobDetail job = JobBuilder.Create<MyJob>().WithIdentity("job1", "group1").DisallowConcurrentExecution(true)//禁止并发执行.SetJobData(jobdata).Build();#region 简单触发器,每隔5秒重复执行ITrigger trigger = TriggerBuilder.Create().WithIdentity("trigger", "group1").WithSimpleSchedule(x=>x.WithInterval(TimeSpan.FromSeconds(5)).RepeatForever()).Build();#endregionawait scheduler.ScheduleJob(job, trigger);Console.WriteLine("Press any key to close the application");Console.ReadKey();}}
}
6、运行程序
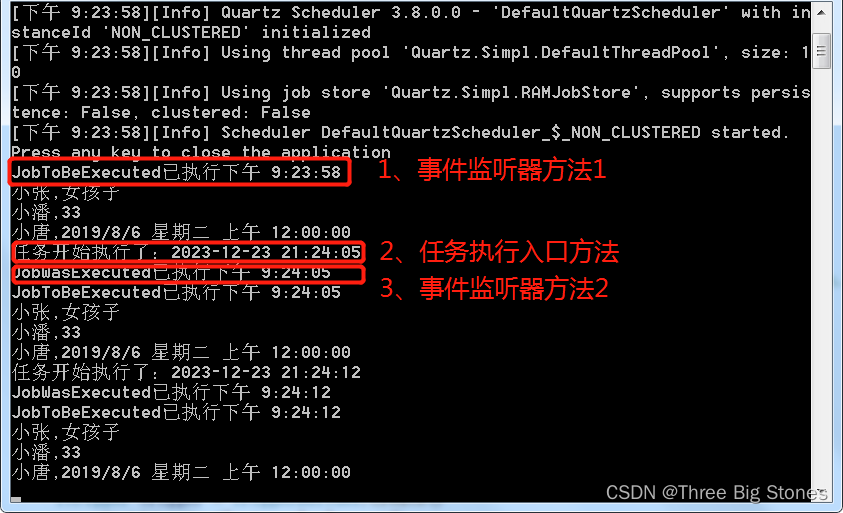
总结:自定义作业监听器注册后,执行顺序为MyJobListener.JobToBeExecuted->Job.Execute->MyJobListener.JobWasExecuted;
Job.DisallowConcurrentExecution(true),true时禁止该job的多个实例并发执行,即使触发器时间已来到下一个执行点,并不会立即触发创建job实例的执行,需要等待前一个job实例执行完成。为false时运行多个实例并发执行。
自建job需要处理好异常,否则事件监听器不会捕捉到事件通知。