wordpress免费摄影主题seo网络运营
1 缓存优化
1.0 问题说明
1.1 环境搭建
将项目推送到远程仓库里,教程在git
提交远程仓库前建议取消代码检查
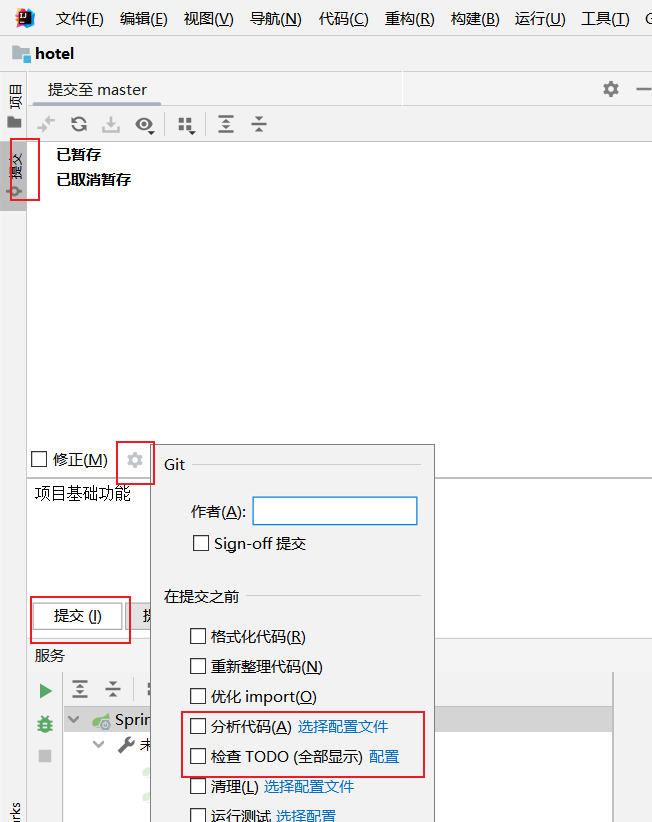
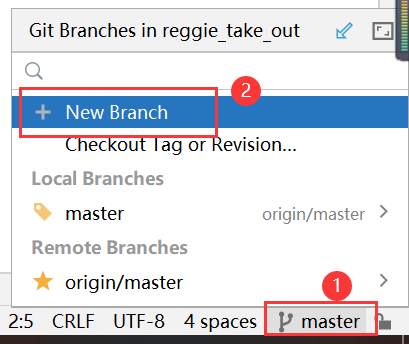
创建新的分支v1.0(用于实现缓存优化)并推送到远程仓库
1.1.1 maven坐标
导入spring-data-redis的maven坐标:
<dependency><groupId>org.springframework.boot</groupId><artifactId>spring-boot-starter-data-redis</artifactId>
</dependency>
1.1.2 配置文件
在application.yml中加入redis相关配置:
spring:redis:host: localhostport: 6379#password: root@123456database: 0
1.1.3 配置类
在项目中加入RedisConfig
/*** Redis配置类*/
@Configuration
public class RedisConfig extends CachingConfigurerSupport{@Beanpublic RedisTemplate<Object, Object> redisTemplate(RedisConnectionFactory connectionFactory) {RedisTemplate<Object, Object> redisTemplate = new RedisTemplate<>();//默认的Key序列化器为:JdkSerializationRedisSerializerredisTemplate.setKeySerializer(new StringRedisSerializer());redisTemplate.setHashKeySerializer(new StringRedisSerializer());redisTemplate.setConnectionFactory(connectionFactory);return redisTemplate;}}
1.2 缓存短信验证码
1.2.1 实现思路
前面已经实现了移动端手机验证码登录,之前随机生成的验证码是保存在HttpSession中的。现在需要改造为将验证码缓存在Redis中,具体的实现思路如下:
- 在服务端UserController中注入RedisTemplate对象,用于操作Redis
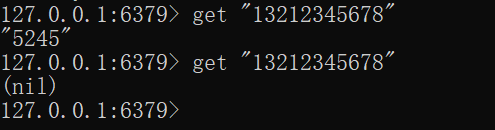
- 在服务端UserController的sendMsg方法中,将随机生成的验证码缓存到Redis中,并设置有效期为5分钟
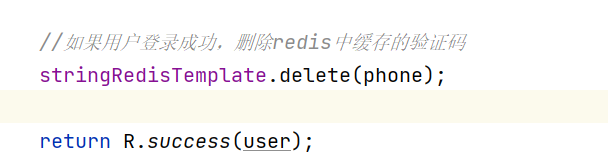
- 在服务端UserController的login方法中,从Redis中 获取缓存的验证码,如果登录成功则删除Redis中的验证码
1.2.2 代码改造


测试验证:
1.3 缓存菜品数据
1.3.1 实现思路
前面已经实现了移动端菜品查看功能,对应的服务端方法为DishController的list方法,此方法会根据前端提交的查询条件进行数据库查询操作。在高并发的情况下,频繁查询数据库会导致系统性能下降,服务端响应时间增长。 现在需要对此方法进行缓存优化,提高系统的性能。
具体的实现思路如下:
- 改造DishController的list方法 ,先从Redis中获取菜品数据,
如果有则直接返回,无需查询数据库;
如果没有则查询数据库,并将查询到的菜品数据放入Redis,有效期1小时。 - 改造DishController的save和update方法,加入清理缓存的逻辑
注意事项:
在使用缓存过程中,要注意保证数据库中的数据和缓存中的数据一致,如果数据库中的数据发生变化,需要及时清理缓存数据。
1.3.2 代码改造
@GetMapping("/list")
public R<List<DishDto>> list(Dish dish){List<DishDto> dishDtoList = null;//动态构造keyString key = "dish_"+dish.getCategoryId()+"_"+dish.getStatus(); //dish_xxxx_1//从redis中获取缓存数据dishDtoList = (List<DishDto>) redisTemplate.opsForValue().get(key);if (dishDtoList != null) {//如果存在,直接返回,无需查询数据库return R.success(dishDtoList);}//构造查询条件LambdaQueryWrapper<Dish> queryWrapper = new LambdaQueryWrapper<>();queryWrapper.eq(dish.getCategoryId() != null ,Dish::getCategoryId,dish.getCategoryId());//添加条件,查询状态为1(起售状态)的菜品queryWrapper.eq(Dish::getStatus,1);//添加排序条件queryWrapper.orderByAsc(Dish::getSort).orderByDesc(Dish::getUpdateTime);List<Dish> list = dishService.list(queryWrapper);dishDtoList = list.stream().map((item) -> {DishDto dishDto = new DishDto();BeanUtils.copyProperties(item,dishDto);Long categoryId = item.getCategoryId();//分类id//根据id查询分类对象Category category = categoryService.getById(categoryId);if(category != null){String categoryName = category.getName();dishDto.setCategoryName(categoryName);}//当前菜品的idLong dishId = item.getId();LambdaQueryWrapper<DishFlavor> lambdaQueryWrapper = new LambdaQueryWrapper<>();lambdaQueryWrapper.eq(DishFlavor::getDishId,dishId);//SQL:select * from dish_flavor where dish_id = ?List<DishFlavor> dishFlavorList = dishFlavorService.list(lambdaQueryWrapper);dishDto.setFlavors(dishFlavorList);return dishDto;}).collect(Collectors.toList());//如果不存在,需要查询数据库,将查询到的菜品数据缓存到redis中redisTemplate.opsForValue().set(key,dishDtoList,60, TimeUnit.MINUTES);return R.success(dishDtoList);
}@PostMapping
public R<String> save(@RequestBody DishDto dishDto){log.info(dishDto.toString());dishService.saveWithFlavor(dishDto);//清理所有菜品的缓存数据//Set keys = redisTemplate.keys("dish_*");//redisTemplate.delete(keys);//清理某个分类下的菜品缓存数据String key = "dish_"+dishDto.getCategoryId()+"_1";redisTemplate.delete(key);return R.success("新增菜品成功");
}@PutMapping
public R<String> update(@RequestBody DishDto dishDto){log.info(dishDto.toString());dishService.updateWithFlavor(dishDto);//清理所有菜品的缓存数据//Set keys = redisTemplate.keys("dish_*");//redisTemplate.delete(keys);//清理某个分类下的菜品缓存数据String key = "dish_"+dishDto.getCategoryId()+"_1";redisTemplate.delete(key);return R.success("修改菜品成功");
}
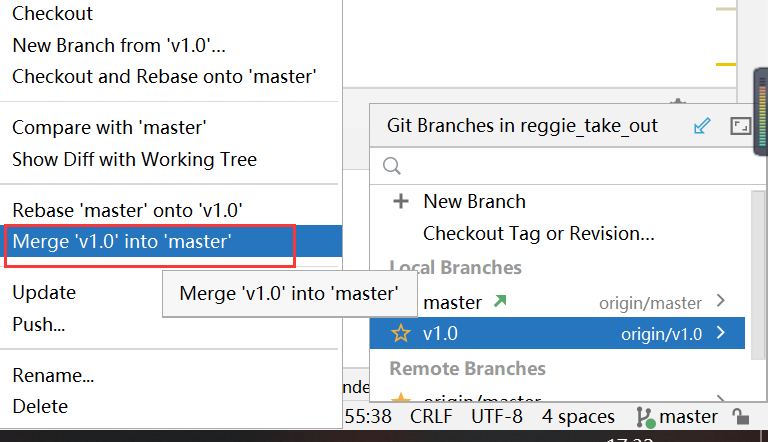
1.4 合并分支
开发完代码并且测试成功后要及时的将代码提交并且推送到远程仓库
然后合并分支:先切换到master分支,然后选择分支合并
1.5 Spring Cache
1.5.1 介绍
-
Spring Cache是一个框架, 实现了基于注解的缓存功能,只需要简单地加一个注解, 就能实现缓存功能。
-
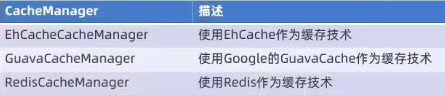
Spring Cache提供了一层抽象,底层可以切换不同的cache实现。具体就是通过CacheManager接口来统一不同的缓存技术。
-
CacheManager是Spring提供的各种缓存技术抽象接口。
-
针对不同的缓存技术需要实现不同的CacheManager:
1.5.2 常用注解
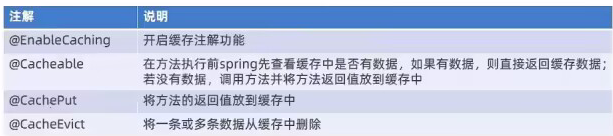
在spring boot项目中,使用缓存技术只需在项目中导入相关缓存技术的依赖包,并在启动类上使用@EnableCaching开启缓存支持即可。
例如,使用Redis作为缓存技术,只需要导入Spring data Redis的maven坐标即可。
1.5.3 简单案例
- 导入坐标
<?xml version="1.0" encoding="UTF-8"?>
<project xmlns="http://maven.apache.org/POM/4.0.0"xmlns:xsi="http://www.w3.org/2001/XMLSchema-instance"xsi:schemaLocation="http://maven.apache.org/POM/4.0.0 http://maven.apache.org/xsd/maven-4.0.0.xsd"><modelVersion>4.0.0</modelVersion><parent><groupId>org.springframework.boot</groupId><artifactId>spring-boot-starter-parent</artifactId><version>2.4.5</version><relativePath/> <!-- lookup parent from repository --></parent><groupId>com.itheima</groupId><artifactId>cache_demo</artifactId><version>1.0-SNAPSHOT</version><properties><java.version>1.8</java.version></properties><dependencies><dependency><groupId>org.springframework.boot</groupId><artifactId>spring-boot-starter-web</artifactId><scope>compile</scope></dependency><dependency><groupId>org.projectlombok</groupId><artifactId>lombok</artifactId><version>1.18.20</version></dependency><dependency><groupId>com.alibaba</groupId><artifactId>fastjson</artifactId><version>1.2.76</version></dependency><dependency><groupId>commons-lang</groupId><artifactId>commons-lang</artifactId><version>2.6</version></dependency><!--<dependency><groupId>org.springframework.boot</groupId><artifactId>spring-boot-starter-cache</artifactId></dependency><dependency><groupId>org.springframework.boot</groupId><artifactId>spring-boot-starter-data-redis</artifactId></dependency>--><dependency><groupId>mysql</groupId><artifactId>mysql-connector-java</artifactId><scope>runtime</scope></dependency><dependency><groupId>com.baomidou</groupId><artifactId>mybatis-plus-boot-starter</artifactId><version>3.4.2</version></dependency><dependency><groupId>com.alibaba</groupId><artifactId>druid-spring-boot-starter</artifactId><version>1.1.23</version></dependency></dependencies><build><plugins><plugin><groupId>org.springframework.boot</groupId><artifactId>spring-boot-maven-plugin</artifactId><version>2.4.5</version></plugin></plugins></build>
</project>
- 如果只是使用基本的功能这些坐标已经够了,spring cache相关的api在spring-context包里面(spring-boot-start-web坐标下)
- 如果后面需要使用到redis作为缓存还需要再导入spring-boot-start-cache包
- 配置yml文件
server:port: 8080
spring:application:#应用的名称,可选name: cache_demodatasource:druid:driver-class-name: com.mysql.cj.jdbc.Driverurl: jdbc:mysql://localhost:3306/cache_demo?serverTimezone=Asia/Shanghai&useUnicode=true&characterEncoding=utf-8&zeroDateTimeBehavior=convertToNull&useSSL=false&allowPublicKeyRetrieval=trueusername: rootpassword: root
mybatis-plus:configuration:#在映射实体或者属性时,将数据库中表名和字段名中的下划线去掉,按照驼峰命名法映射map-underscore-to-camel-case: truelog-impl: org.apache.ibatis.logging.stdout.StdOutImplglobal-config:db-config:id-type: ASSIGN_ID
- 开启缓存:启动类上@EnableCaching
@Slf4j
@SpringBootApplication
@EnableCaching
public class CacheDemoApplication {public static void main(String[] args) {SpringApplication.run(CacheDemoApplication.class,args);log.info("项目启动成功...");}
}
- 在Controller的方法上加入@CachePut、@Cacheable、@CacheEvict等注解,进行缓存操作
注解@CachePut
/*** CachePut:将方法返回值放入缓存(将保存的User对象存到Map里)* value:缓存的名称,每个缓存名称下可以有多个key* key:缓存的key*/
@CachePut(value = "userCache",key = "#user.id")
@PostMapping
public User save(User user){userService.save(user);return user;
}
注解@CacheEvict
/*** CacheEvict:清理指定缓存* value:缓存的名称,每个缓存名称下可以有多个key* key:缓存的key*/
@CacheEvict(value = "userCache",key = "#id")//"#p0" or "#root.args[0]"
@DeleteMapping("/{id}")
public void delete(@PathVariable Long id){userService.removeById(id);
}
注解@Cacheable
/*** Cacheable:* value:缓存的名称,每个缓存名称下可以有多个key* key:缓存的key* condition:满足条件时才缓存数据(不能使用返回值result)* unless:满足条件则不缓存*/
@Cacheable(value = "userCache",key = "#id",unless = "#result == null")
@GetMapping("/{id}")
public User getById(@PathVariable Long id){User user = userService.getById(id);return user;
}
1.5.4 使用方式(redis)
在Spring Boot项目中使用Spring Cache的操作步骤(使用redis缓存技术)
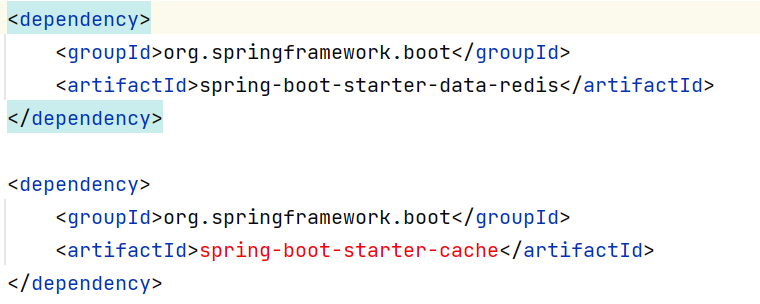
- 导入maven坐标
<dependency><groupId>org.springframework.boot</groupId><artifactId>spring-boot-starter-cache</artifactId>
</dependency>
<dependency><groupId>org.springframework.boot</groupId><artifactId>spring-boot-starter-data-redis</artifactId>
</dependency>
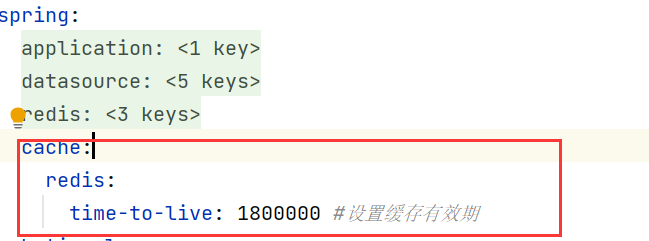
- 配置application.yml
spring:redis:host: localhostport: 6379#password: root@123456database: 0cache:redis:time-to-live: 1800000 #设置缓存过期时间
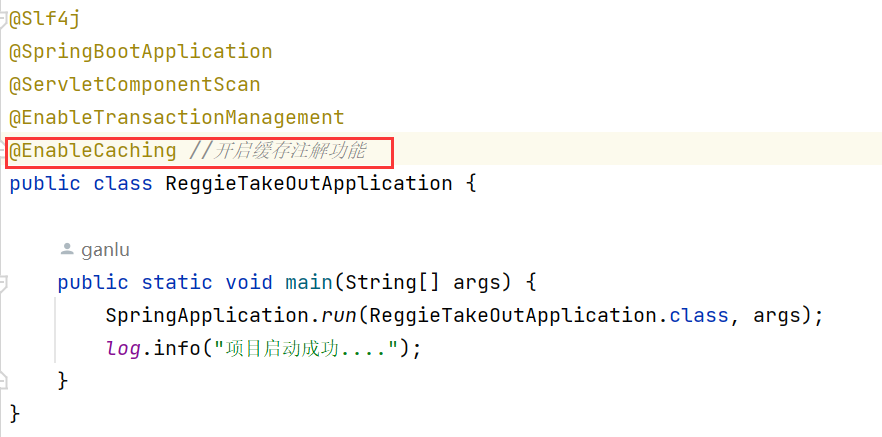
- 在启动类上加入@EnableCaching注解,开启缓存注解功能
- 在Controller的方法上加入@Cacheable、@CacheEvict等注解,进行缓存操作
1.6 缓存套餐数据
1.6.1 实现思路
前面我们已经实现了移动端套餐查看功能,对应的服务端方法为SetmealController的list方法,此方法会根据前端提交的查询条件进行数据库查询操作。在高并发的情况下,频繁查询数据库会导致系统性能下降,服务端响应时间增长。
现在需要对此方法进行缓存优化,提高系统的性能。
具体的实现思路如下:
1、 导入Spring Cache和Redis相关maven坐标
2、 在application.yml中 配置缓存数据的过期时间
3、在启动类.上加入@EnableCaching注解,开启缓存注解功能
4、在SetmealController的list方法.上加入@Cacheable注解
5、在SetmealController的save和delete方法上加入@CacheEvict注解
1.6.2 代码改造
- 在pom.xml文件中导入坐标
- 在application.yml中配置缓存数据过期时间
- 在启动类上加入@EnableCaching注解,开启缓存
- 在SetmealController的list方法上加入@Cacheable注解

问题:返回的R没有序列化

解决:
- 在SetmealController的save方法和delete方法上加入@CacheEvict注解


- 完成后经测试代码没问题后,将代码提交到Git仓库并合并到主分支
2 读写分离
2.0 问题分析

解决方案:读写分离
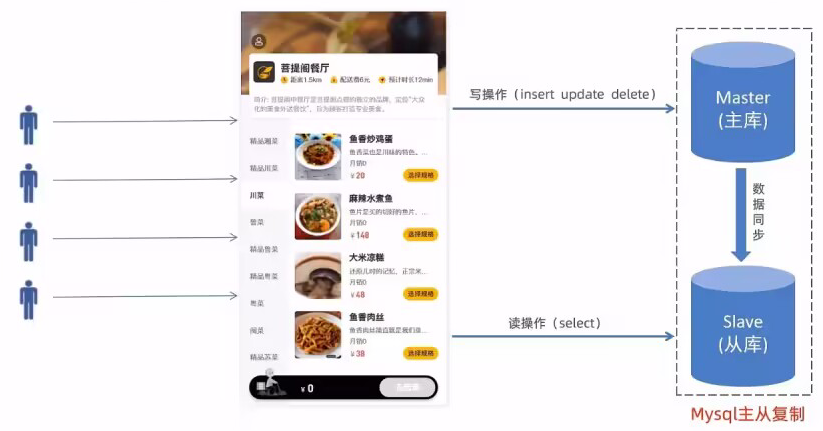
2.1 MySQL主从复制
2.1.1 介绍
MySQL主从复制是一个异步的复制过程,底层是基于Mysql数据库自带的二进制日志功能。就是一台或多台MySQL数据库(slave, 即从库)从另一台MySQL数据库(master, 即主库)进行日志的复制然后再解析日志并应用到自身,最终实现从库的数据和主库的数据保持一致。 MySQL主从复制是MySQL数据库自带功能,无需借助第三方工具。
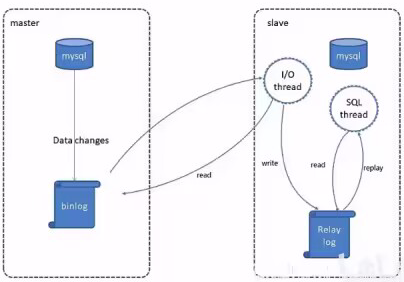
MySQL复制过程分成三步:
● master将 改变记录到二进制日志(binary log )
● slave将master的binary 1og拷贝到它的中继日志(relay log )
● slave重做中继日志中的事件,将改变应用到自己的数据库中
2.2 读写分离案例
2.2.1 配置-前置条件
提前准备好两台服务器,分别安装Mysql并启动服务成功
建议主从库都用虚拟机,跟自己Windows环境的数据库区分开。VMware 虚拟机克隆
2.2.2 主库master
- 修改MySQL数据库的配置文件,
vim /etc/my.cnf
[mysqld]
log-bin=mysql-bin #[必须]启用二进制日志
server-id=100 #[必须] 服务器唯一id
-
重启mysql服务
systemctl restart mysqld -
登录MySQL数据库
mysql -uroot -proot,执行以下SQL
GRANT REPLICATION SLAVE ON *.* to 'xiaoming'@'%' identified by 'Root@123456';
- 登录mysql数据库,执行sql:
show master status;记录结果中的FIle和Position的值
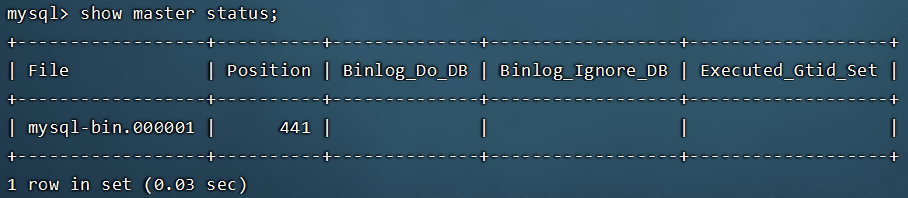
注意:上面SQL的作用是查看Master的状态,执行完上面SQL语句不要再执行任何操作
2.2.3 从库slave
- 修改MySQL数据库的配置文件,
vim /etc/my.cnf
[mysqld]
server-id=101 #[必须] 服务器唯一id
- 重启mysql服务
systemctl restart mysqld - 登录mysql数据库,执行下面SQL
change master to
master_host= '192.168.1.189',master_user='xiaoming',master_password='Root@123456', master_log_file= 'mysql-bin.000002',master_log_pos=154;
start slave;
- 查询从数据库的状态
show slave status\G;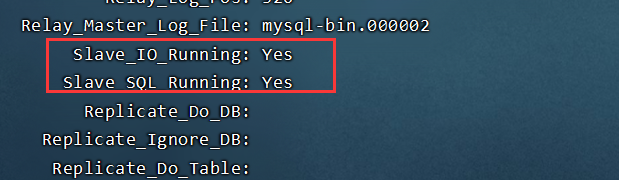
2.3 项目实现读写分离
- 导入maven依赖
<dependency><groupId>org.apache.shardingsphere</groupId><artifactId> sharding-jdbc-spring-boot-starter</artifactId><version>4.0.0-RC1</version>
</dependency>
- 在配置文件中配置读写分离规则并允许bean定义覆盖配置项
server:port: 8080
spring:application:#应用的名称,可选name: reggie_take_outshardingsphere:datasource:names:master,slave# 主数据源master:type: com.alibaba.druid.pool.DruidDataSourcedriver-class-name: com.mysql.cj.jdbc.Driverurl: jdbc:mysql://192.168.1.189:3306/reggie?characterEncoding=utf-8&useSSL=falseusername: rootpassword: 123456# 从数据源slave:type: com.alibaba.druid.pool.DruidDataSourcedriver-class-name: com.mysql.cj.jdbc.Driverurl: jdbc:mysql://192.168.1.190:3306/reggie?characterEncoding=utf-8&useSSL=falseusername: rootpassword: 123456masterslave:# 读写分离配置load-balance-algorithm-type: round_robin #轮询# 最终的数据源名称name: dataSource# 主库数据源名称master-data-source-name: master# 从库数据源名称列表,多个逗号分隔slave-data-source-names: slaveprops:sql:show: true #开启SQL显示,默认falsemain:allow-bean-definition-overriding: trueredis:host: localhostport: 6379#password: root@123456database: 0cache:redis:time-to-live: 1800000 #设置缓存数据的过期时间
mybatis-plus:configuration:#在映射实体或者属性时,将数据库中表名和字段名中的下划线去掉,按照驼峰命名法映射map-underscore-to-camel-case: truelog-impl: org.apache.ibatis.logging.stdout.StdOutImplglobal-config:db-config:id-type: ASSIGN_ID
reggie:path: D:\img\
3 前后端分离
3.1 问题说明
- 开发人员同时负责前端和后端代码开发,分工不明确
- 开发效率低
- 前后端代码混合在一个工程中,不便于管理
- 对开发人员要求高,人员招聘困难
3.2 前后端分离开发
3.2.1 介绍
前后端分离开发,就是在项目开发过程中,对于前端代码的开发由专门的前端开发人员负责,后端代码则由后端开发人员负责,这样可以做到分工明确、各司其职,提高开发效率,前后端代码并行开发,可以加快项目开发进度。
目前,前后端分离开发方式已经被越来越多的公司所采用,成为当前项目开发的主流开发方式。
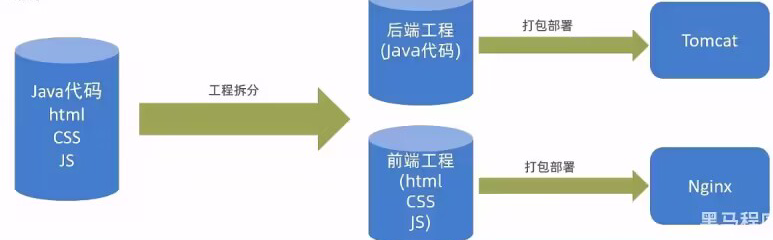
前后端分离开发后,从工程结构上也会发生变化,即前后端代码不再混合在同一个maven工程中,而是分为前端工程(部署到Nginx)和后端工程(部署到Tomcat)。
3.2.2 开发流程
前后端分离开发后,面临一个问题,就是前端开发人员和后端开发人员如何进行配合来共同开发一个项目?
可以按照如下流程进行:
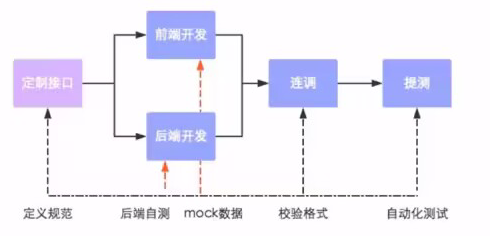
接口(API接口):一个http的请求,主要就是去定义:请求路径、请求方式、请求参数、响应数据
接口举例:

3.2.3 前端技术栈
- 开发工具
- Visual Studio Code
- hbuilder .
- 技术框架
- nodejs
- VUE
- ElementUI
- mock(测试数据)
- webpack (前端打包工具)
3.3 Yapi
3.3.1 介绍
- YApi是高效、易用、功能强大的api管理平台,旨在为开发、产品、测试人员提供更优雅的接口管理服务。可以帮助开发者轻松创建、发布、维护API,YApi 还为用户提供了优秀的交互体验,开发人员只需利用平台提供的接口数据写入工具以及简单的点击操作就可以实现接口的管理。
- YApi让接口开发更简单高效,让接口的管理更具可读性、可维护性,让团队协作更合理。
- 要使用YApi,需要自己进行部署。部署参考文章:YAPI 部署从零到一
- 源码地址:http://github.com/YMFE/yapi
3.3.2 使用
使用YApi可以执行操作:添加项目,添加分类,添加接口,编辑接口,查看接口
3.4 Swagger
3.4.1 介绍
使用Swagger你只需要按照它的规范去定义接口及接口相关的信息,再通过Swagger衍生出来的一系列项目和工具,就可以做到生成各种格式的接口文档,以及在线接口调试页面等等。
官网:https://swagger.io/
knife4j是为Java MVC框架集成Swagger生成Api文档的增强解决方案。
<dependency><groupId>com.github.xiaoymin</groupId><artifactId>knife4j-spring-boot-starter</artifactId><version>3.0.2</version>
</dependency>
3.4.2 使用方式
操作步骤:
- 导入knife4j的maven坐标
<dependency><groupId>com.github.xiaoymin</groupId><artifactId>knife4j-spring-boot-starter</artifactId><version>3.0.2</version>
</dependency>
- 导入knife4j相关配置类-WebMvcConfig
@Slf4j
@Configuration
@EnableSwagger2
@EnableKnife4j
public class WebMvcConfig extends WebMvcConfigurationSupport {/*** 设置静态资源映射* @param registry*/@Overrideprotected void addResourceHandlers(ResourceHandlerRegistry registry) {log.info("开始进行静态资源映射...");registry.addResourceHandler("doc.html").addResourceLocations("classpath:/META-INF/resources/");registry.addResourceHandler("/webjars/**").addResourceLocations("classpath:/META-INF/resources/webjars/");registry.addResourceHandler("/backend/**").addResourceLocations("classpath:/backend/");registry.addResourceHandler("/front/**").addResourceLocations("classpath:/front/");}/*** 扩展mvc框架的消息转换器* @param converters*/@Overrideprotected void extendMessageConverters(List<HttpMessageConverter<?>> converters) {log.info("扩展消息转换器...");//创建消息转换器对象MappingJackson2HttpMessageConverter messageConverter = new MappingJackson2HttpMessageConverter();//设置对象转换器,底层使用Jackson将Java对象转为jsonmessageConverter.setObjectMapper(new JacksonObjectMapper());//将上面的消息转换器对象追加到mvc框架的转换器集合中converters.add(0,messageConverter);}@Beanpublic Docket createRestApi() {// 文档类型return new Docket(DocumentationType.SWAGGER_2).apiInfo(apiInfo()).select().apis(RequestHandlerSelectors.basePackage("com.zs.reggie.controller")).paths(PathSelectors.any()).build();}private ApiInfo apiInfo() {return new ApiInfoBuilder().title("瑞吉外卖").version("1.0").description("瑞吉外卖接口文档").build();}
}- 设置静态资源,否则接口文档页面无法访问-WebMvcConfig
/*** 设置静态资源映射* @param registry*/
@Override
protected void addResourceHandlers(ResourceHandlerRegistry registry) {log.info("开始进行静态资源映射...");registry.addResourceHandler("doc.html").addResourceLocations("classpath:/META-INF/resources/");registry.addResourceHandler("/webjars/**").addResourceLocations("classpath:/META-INF/resources/webjars/");registry.addResourceHandler("/backend/**").addResourceLocations("classpath:/backend/");registry.addResourceHandler("/front/**").addResourceLocations("classpath:/front/");
}
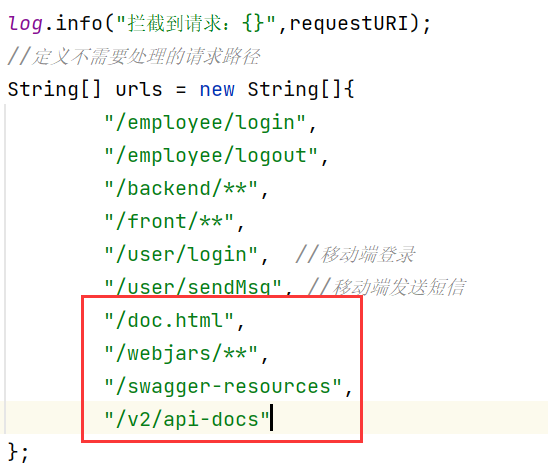
- 在LoginCheckFilter中设置不需要处理的请求路径
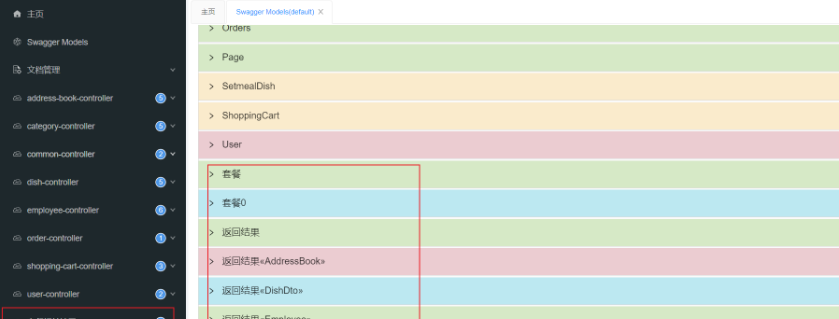
3.4.3 常用注解
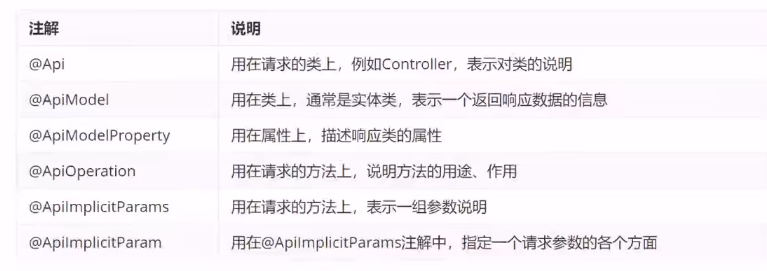
加入注解后的swagger文档:
3.5 项目部署
3.5.1 部署架构
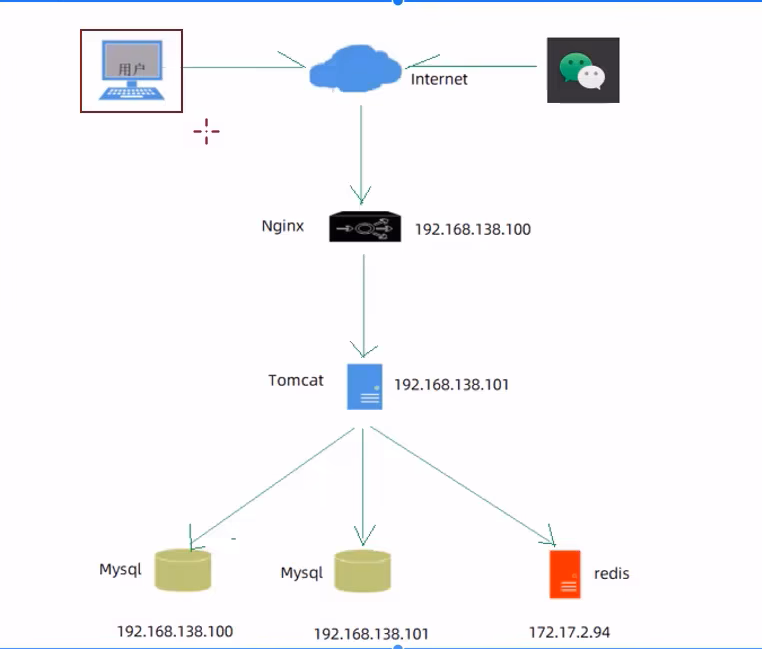
3.5.2 部署环境说明
-
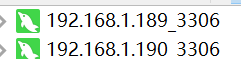
服务器A:192.168.1.189
- Nginx:部署前端项目、配置反向代理
- Mysql:主从复制结构中的主库
-
服务器B:192.168.1.190
- jdk:运行Java项目
- git:版本控制工具
- maven:项目构建工具
- jar:Spring Boot项目打成jar包基于内置Tomcat运行
- Mysql:主从复制结构中的从库
-
服务器C:127.0.0.1
- Redis:缓存中间件
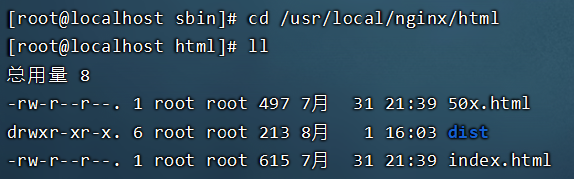
3.5.3 部署前端项目
- 在服务器A中安装Nginx,将dist目录上传到Nginx的html目录下,dist目录是前端打包后的目录

- 修改Nginx配置文件nginx.conf
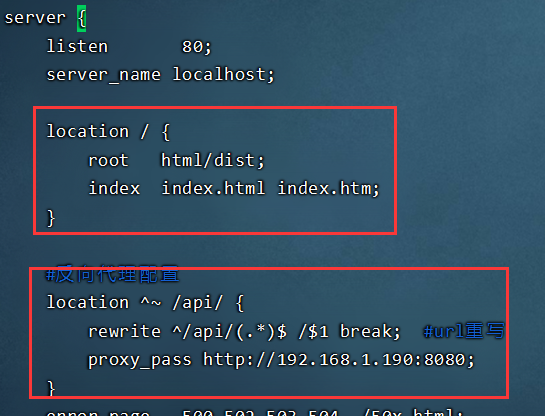
访问192.168.1.189,点击登录:
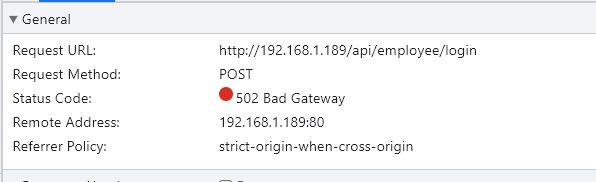
访问的 192.168.112.100
反向代理的结果 :192.168.112.100/api/employee/login
反向代理URL重写 :/api/employee/login ---->/employee/login
后端正常访问是 192.168.137.1:8080/employee/login
3.5.4 部署后端项目
- 在服务器B中安装jdk、git、 maven、MySQL,使用git clone命令将git远程仓库的代码克隆下来
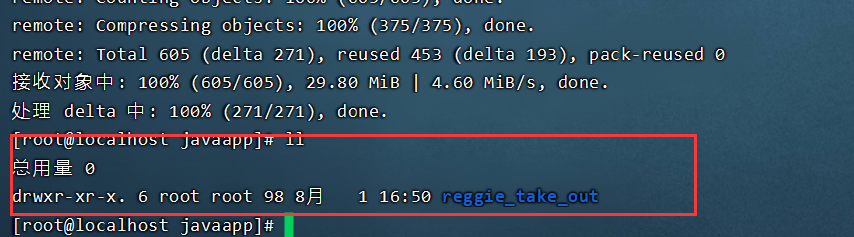
- 将reggiesStart.sh文件上传到服务器B,通过chmod命令设置执行权限
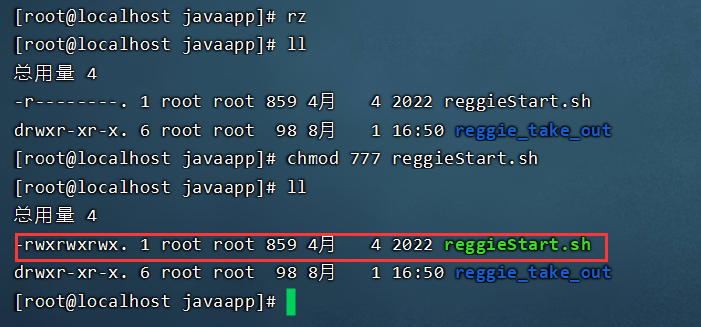
- 执行脚本文件,自动部署项目
注意:如果在Linux下部署记得修改一下yml文件下配置的图片的位置为
path: /usr/local/img/